MTB Technical Climbing

MTB Technical Climbing. In the following, I will address proper climbing body position and its importance while ascending steep and technical climbs and also debunk a couple of infamous myths regarding climbing on your MTB.

While we can get away with sloppy technique on relatively easy climbs and still make it to the top, when things get steep and loose (when traction is at a minimum) and obstacles such as water bars, erosion ruts, baby-head sized rocks, and who-knows-what-else, begin to appear on the trail (these things almost always naturally appear more often when the trail gets steep—dirt doesn’t like to stick to steep inclines, so it erodes, exposing the obstacles), our technique needs to be nearly perfect to top the climbs. Simply pedaling harder – as we all know – won’t get it done! Also, proper technique will save you huge amounts of energy even on climbs that you currently may actually make, but maybe waste a bunch of energy in the process because of not-so-great technique.

Losing traction, “bogging out”, doing accidental wheelies, and/or getting a case of the “swirvies”, are all common causes of riders not making it to the top of technical ascents. My guess is you’ve experienced all of the above issues when trying to ascend steep terrain (I think we all have!). While other aspects of riding technique such as proper use of vision (extremely important); proper gear selection, or cadence (very often overlooked – even by “good” riders); and others, are essential in order to make it to the top, proper body position will do a ton to help alleviate the above “climb killers”.
Andy. Climb.PosDakRidge

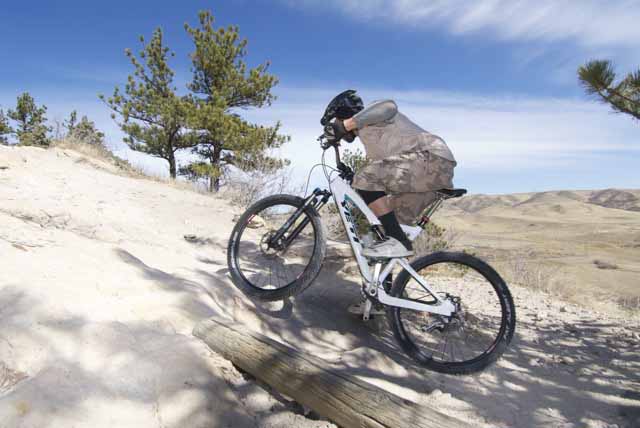
Forward on the seat, chest down, weight over the bottom bracket of the bike…That’s good climbing position…


First, let’s talk about weight-shifts. Take a look at the photo. Notice how far forward I have scooted on my saddle. Is that comfortable? Nope! However, very rarely will you need to move this far forward for an extended period of time (Most saddle companies do make saddles built with things such as the “enhanced climbing nose” to make being in this position as comfy as possible. If it is too painful to move this far forward with your current saddle, look into a different one. Your grundal will thank you!).

Why move this far forward? A couple reasons: if your bike is set-up correctly for you on flat ground and you feel like you’re in a good position to comfortably and effectively apply power to the pedals, what happens when your front wheel is elevated perhaps a foot, like in the photo? Your hips (your center of mass and origination of balance and power) have now moved rearward in their relationship with your feet (your effective applications of power). Moving forward – shifting your weight forward – helps you maintain your “power position” as much as possible when the front of the bike becomes elevated, enabling you to continue to effectively apply power to the ground when things get steep. Another very important reason that I move this far forward on the saddle: I put more weight on the front of the bike. Accidental wheelies and cases of the “swervies” (when your front wheel begins to wonder uncontrollably all over the trail, making it impossible to hold your line) occur because there is too much weight on the rear of the bike (not enough on the front). Shifting your weight forward will help to prevent these things from happening.

Even slight movements, or shifts, of the hips make a huge difference in our ability to ride the bike (contributing massively to weight placement, balance, power delivery). I am almost constantly making weight shifts – moving my hips fore and aft – on the saddle when ascending. A gentle climb with a small grade? I move forward only slightly – maybe a quarter of an inch. Medium grade? Medium movement – perhaps an inch … Steep as heck? All the way forward – as far as possible.

Eventually, on super steep stuff, you will have to come out of the saddle. If you stay seated, your mass will simply be too far back in relation to the bike and the front end will have no weight on it, thus no control and a case of the swervies. In the clinics, I constantly refer to having our weight over the bottom bracket of the bike and riding the bike through the BB. Not only is this going to be the most stable and calm area of the bicycle (the bike will pivot around the BB by design), but, if we have our weight—or, our line of force, as I often refer to it—going through the BB, both wheels will be properly weighted: the front will be planted allowing for control and steering and the rear will be weighted properly for traction. This is the way the bike is designed to work. This is huge. Will it take a little more energy to get out of the saddle? Yep. But, you have no choice on the super steep sections of climbs.

Another massively overlooked part of proper body position on steep climbs is the position of your upper body. Get that chest down!!! Look at the photo above. My chest is literally only a few inches off of the stem, and, when the front wheel climbs up the rock that it is touching – elevating the front of the bike even more and pivoting it around the BB – my chest will almost be touching the stem (and I’ll come out of the saddle slightly—or more accurately, I’ll keep my weight on the BB, my core will stay stable and balanced traveling in a smooth momentum path up the trail, and the bike will pivot around the BB, pitching backwards and dropping the seat from under my rear). I CAN NOT allow my upper body to rise as the front of the bike rises, or – assuming I am in perfect balance before the angle of the bike changes – I will no longer be balanced on the bike (weight on BB), I will be falling off the back of the bike, and I will have to “hang” on the handlebars, effectively pulling back on them (because of gravity, my body wants to fall off the back of the bike). Of course, I still will need to pedal to maintain momentum, but, because I will be “hanging” off the back of the bike and pulling on the handle bars, the bike will want to move out from under my body (rear wheel still moving uphill because of pedaling, handlebars wanting to fall off the back of the bike with my body), and – Bam! I’m doing an accidental wheelie or the front of the bike becomes so light that it’s now swerving all over the trail. Either way, I have to cut my power, and that’s it – I’ve stalled out, “bogged down” – I’m done, and my climbing is over. I didn’t make it … that has happened to everyone.
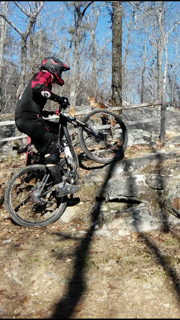
Lon charging up a nasty section. His chest could be a little lower, however, his weight is on the BB and not on the seat (not seated). This allows the bike to pivot around the BB without pulling his weight too far back.

Lon charging up a nasty section. His chest could be a little lower, however, his weight is on the BB and not on the seat (not seated). This allows the bike to pivot around the BB without pulling his weight too far back.


Lowering the chest – drastically, in the case of a climb this steep – allows me to keep my upper body balanced on top of my lower body (and the BB of the bike). I don’t want to lean forward with weight on my handlebars, nor do I want to “hang” off the back off the bike. In fact, in theory, I should be able to “flutter” my fingers on the grips when I’m in balance on the climb. This ensures that my weight is balanced on my lower body and not leaning or hanging on my hands. (I also say that you should be balanced in a position that if the bike where to disappear, you whould land on your feet)
D excellent Climb Pos

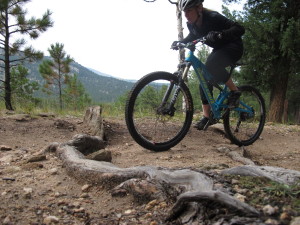
Dee’s weight is over the BB of the bike, she’s actually off of the saddle a bit, and her chest is low. This allows for optimal weight placement and and keeps her weight balanced on the most stable part of the bike (the BB area) as the bike pivots around the bb as it goes up those roots.  Great job!


This riders weight looks to be too far back mainly because of how upright he is. Notice the front tire sweving from side to side? getting the chest down would plant that front end...

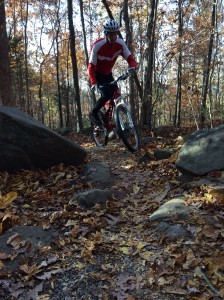
This riders weight looks to be too far back mainly because of how upright he is (this trail is steep, photo doesn’t really show it). Notice the front tire swerving from side to side? Getting the chest down would plant that front end…


Also, on a climb this steep, I will accelerate the bike (as much as possible) in order to have as much momentum as possible to help me get up the steepest part of the climb, or over obstacles such as the curb-type rock-ledge that my front tire is touching in the first photo (white Yeti Bike). This means that an even lower position of the upper body is needed during the acceleration in order to maintain fore and aft balance.

Your weight shift (fore and aft on the saddle), and lowering your upper body are both mandatory in ascending steep, nasty climbs – to do one or the other is simply not enough. Often, you do need to keep a fair amount of weight on the rear tire to maintain traction (weight over the BB will accomplish this) over slippery rocks, water bars, etc, so you can’t slide as far forward on the saddle as you would like to; you must compensate for this by lowering your chest even more in order to stay balanced on the bike (not “falling” off of the back of the saddle). Also, if you can exaggerate your movement forward on the saddle, you won’t have to drop your chest quite as low. If its super-duper steep, however, I’m probably all the way forward on the saddle—or out of it—and as low as possible with my upper body.

I also need to get out of the saddle for another reason. I need to get my weight off the seat so that the rear tire can “float” up obstacles. I want to get my butt off of the seat BEFORE the rear tire comes in contact with the obstacle and this will effectively “un-weight” the rear wheel. Take note of my upper body position in the first photo; my butt will only leave the seat a couple inches (the bike pivots around the BB and the seat actually drops away, then pivots back as mentioned above), and I will maintain this upper body position, and then return to the saddle (the bike pivots back when the trail flattens out a little). It’s still mandatory to maintain this upper body position, even if I do come out of the saddle briefly.

Since I’ve mentioned pulling or “hanging” on the handlebars, I feel that it’s necessary to debunk a popular myth about climbing on mountain bikes. Perhaps we’ve heard that we should “pull” on the handlebars with each pedal stoke? This advice comes from way back in the day and from road cyclists. While this technique may provide some additional leverage and miniscule amounts of additional power on the road (which is paved with excellent traction, unlike steep nasty MTB trails). It’s a kiss of death to a mountain biker. Road riders don’t have the problem of doing accidental wheelies on climbs because of the construction of the road bike and because the climbs simply aren’t very steep compared to MTB trails. The only times I “pull” on the bars on a MTB while ascending is to make a weight shift forward with my body. And in this case, I’m pulling my body forward, establishing a balanced position, and then I refrain from pulling until I make another adjustment; or, perhaps, make an extreme adjustment in search of traction. I don’t continuously pull on the handlebars with each pedal stoke for reasons explained above.

Perhaps we’ve also heard that we want to climb with our elbows in. Look at the photo. My elbows are fairly elevated. While I AM powering the bike with my lower body, the difficulty of the terrain necessitates frequent weight shifts and adjustments in order to keep the bike moving (the handlebars are used to manipulate the bicycle into a position so that it can be powered and controlled primarily with the lower body). Most of these adjustments require a substantial amount of effort. Your elbows will need to be up and out and, in an athletic and powerful position, in order to be effective with these movements.

Its safe to say that climbing steep and technical terrain requires far more dynamic technique and movement then climbing paved climbs with perfect traction (that’s not to say that one is more difficult – or painful – than the other!). Therefore, a lot of that old advice that may work on the road, or extremely smooth trails, isn’t applicable to riding a MTB in the nasty stuff. Apples and oranges …

Try this out for yourself: find a steep trail with consistent grade and get into the proper ascending position described above. Apply the power. That should feel pretty good, now, suddenly, do everything wrong: scoot back on your saddle and sit bolt up-right! You’ll notice that your power – and therefore your speed and momentum – will drastically decrease.

Trail-Vision and Riding Smoothly

I often refer to MTB racing, and particularly timed racing, as “Death By Paper Cuts.”

First, it sounds cool… And, second, in highly competitive, tight racing (and/or trying to smoke your riding buddies on the local trails) gaining big chunks of time over opponents in any given section usually doesn’t happen.  It’s more like a wheel here.  A bike length there… Little by little, that adds up.

Jared Graves, 2014 Enduro World Series Champion, when asked to describe his riding style in an interview stated this: “Smooth, efficient, aggressive when necessary…”

YES!!!! I love that.  That’s a quote from the EWS World Champion and that is EXACTLY what I teach with MTB instruction and exactly what I try to apply in my own riding.  Riding SMOOTHLY and efficiently is where you start stacking up those wheel-lengths (paper cuts) of time over opponents (and/or riding buddies).

But how do you ride “Smooth”?  Well, there are lot of factors that go into this, such as proper body position, proper technique in manipulating the bike, proper weight placement, etc., but one of the most important factors, without a doubt, is Trail-Vision and the ability to read the trail correctly.

Smooth (and proper trail vision) also leads to Efficient: smooth means not wasting energy, not making mistakes, not fatiguing.  And, again, all this adds up… If you participate and/or follow the racing disciplines of Enduro and Downhill, then you’re already aware of how important fractions of seconds can be.  But even if you don’t, and you’re a XC racer, endurance racer, recreational rider, or beginner, the stuff we’ll address in this article is still relevant in helping you get to the next level with your riding.  If you can go faster on the descents and still use less energy and recover adequately (which you can if you’re doing things correctly) then you’re going to be WAY ahead of your buddy who wasted energy, made mistakes, fatigued, and still was still slow on the descent.

Let’s look some overall times from a few races last year.  In the 2014 Downhill World Championships held in Hafjell, Norway, 3.028 seconds separated first through fifth places.  Second place, Josh Bryceland was off of the Champ, Gee Atherton, by 0.407 seconds; and third place, Troy Brosnan was 0.566 off of Atherton.  That’s half a second between first and third on a course where there were plenty of opportunities for things to go very right or very wrong.

Neko Mulally was back 2.21 seconds, in forth, AND he snapped his chain right out of the start gate (we’ll address this run a bunch).

Also, In the Enduro World Series in 2014, after well over an hour of timed stages and multiple days on the bikes in each of these respective races (again, with ample time for all kinds of drama to unfold), Valloire and La Thuile, 3.5 and 3.15 seconds separated first and second place, respectively.

Those are tiny amounts of time…

Yet, if you follow some of these races and the athletes, read and listen to interviews, etc., you’ll notice how none of these top riders are saying, things like, “I just need to go faster” or “I just have to pedal more”.  Nope… There is a ton of strategy to this game. It’s not simply about “trying harder”.

Being smooth…Going slow to go fast…Braking for speed… And especially SEEING THE TRAIL PROPERLY all come into play, big-time, when trying to ride well.  This is true at the highest levels as well as the recreational and beginner levels of riding.

If you consistently take bad lines on the trail (often the main line, because it’s created with the bad riding techniques and bad trail vision of the majority of riders) because you don’t understand trail-vision and don’t know how to read the trail properly…well, you’re only going to be able to go so fast (and you’ll be out of control and unsafe).  Most riders, when they try to go fast, do things backwards: the ‘aggressive’ part comes first, and that just gets them into trouble because they don’t have fundamental skills and strategies to build off of and use as tools.  Using the wrong tools for the job—even using them well—will only get you so far.

Putting the bike in the right place on the trail is huge when it comes to riding smoothly.  Vision is a massive component of this, and arguably the most important part of riding.  It comes first in every situation.  If you can’t read the trail properly, then it doesn’t really matter how good you are at any other aspect of riding; you’ll consistently be going to the wrong places on the trail, your momentum will consistently be getting you into trouble, and you’ll be fighting the bike, the trail, your body mass, etc.; crashing at worst, and wasting time and energy, at best.

(In the Instruction Clinics, I do an exercise where we slow down, see the trail properly, and then act.  It blows students away—including some of the top professional racers in the country—how they actually end up going faster by doing this.  This is the exact thing that happened to Neko Mulally, in his World Champs run when he snapped his chain)

There’s a lot going on when it comes to seeing and reading the trail properly and vision techniques, and I obviously can’t get into all of it here, but a big part of doing this right is what I call “Macro-vision”.  We need to see big chunks of trail and see a solution to the next big chunk.  Often, this means seeing the furthest point on the trail that I can see, and calling that my “end-point”.  I need to get to there.  Everything I do needs to be done in regards to that point in the least amount of time possible: often, this means controlling speed initially in order to maximize momentum and/or exit speed at that point on the trail. Again, most riders do this backwards: they “micro-manage” the trail.  They focus on what is immediately in front of them with no consideration of what will happen further down the trail.  Instead of looking at 60, 80, or 100’ sections of trail and finding a solution to this distance of trail, they ride whatever is right in front of them, in 10 – 15’ sections, unaware of what’s up ahead.  They may have success on the first obstacle in a section, but then they’re set-up terribly for the next one and then the one after.  (Yes, we do need to see the details of the trail and process these details and make decisions.  We can’t simply just “look ahead” on the trail and expect things to turn out fine.  This IS a very important part of trail vision, but it’s another topic for another article.)

Easy example: you’re cruising down the trail and there’s a right turn up ahead.  Well, hit that right turn as fast as possible with good technique right?  Except that “right turn” doesn’t mean much.  You need to look past that turn to a point where the turn is over, your “end point”.  You need to get to there in the least amount of time possible and with maximum speed/momentum lined up correctly for your next end point, which will soon come into sight…if you’re looking for it!  Even if you’ve ridden the trail a million times, you still need to “spot you mark” at your end point.  This is human movement 101 stuff: you WILL go where you look (we get way into this in the clinics).  Often, this may mean looking through trees, catching just a patch of trail, but that’s all you need at this point in time, you’ll deal with the details of the trail later (we do have to look at and process the details of the trail, eventually).  This tells you all about your momentum requirements for the turn.  Is the turn 90 degrees?  Does it come back more then 90?  Is it less then 90?  Different answers to that question (the angle, or sharpness, of the turn) will require or enable you to treat you’re momentum differently.  If you don’t see the end point, then you don’t know how much you need to slow down (or not) before you enter the corner.

I used a corner for this example, but any section (or successive sections) of trail need to treated this way. This is a huge component of “Smooth”.

Neko Mulally, when interviewed in Dirt Magazine, November ’14, about his 4th place in the 2014 DH World Championships and asked how he pulled off a podium without a chain (his best result to date), had this to say, “I don’t know how I was able to think about all of this on the spot, but watching the replay, I braked harder in some sections in order to carry a straighter line or more exit speed and also made smoother arcs through the turns…that’s something I need to tap into more often”.

Yep.  That’s also Proper Vision at work… Anybody that has been around Downhilling for a while has probably raced chainless DH races.  The chainless race times are always pretty close to the times when the chains are on (commentator, Rob Warner, mentions this during Mulally’s run).  This always blows people away, but really it shouldn’t be a huge surprise, because when you can’t pedal, you end up milking every little bit of speed out of the track (pumping, etc.).  You minimize every impact…and, you look way down the trail for those smooth momentum paths, straight lines, and smooth arcs.  There’s a saying in motocross racing—and it applies to MTB whenever the trail gets a bit tough—that “the top riders are looking at a totally different track then everybody else”.  It’s the same track, it’s just that the top riders are looking for those ‘smooth momentum paths, straight lines, and smooth arcs’ rather then just riding the main line on the trail as fast as they can.  This is also why the top riders are the first to adjust and find new lines on the trail or track—create new lines—when the old ones start getting blown out.  Smooth momentum paths have to be seen first; that’s where you should start.  Then, you try to apply a line on the trail’s surface to that momentum path, not the other way around.

There’s another saying in racing that holds true, “Don’t take the smooth lines fast. Take the fast lines smooth.” Think about that one for a bit…

When Mulally was asked if there was flow and clean riding in his run that may not have occurred if he had a chain, he stated, “I think I learned to ride smoother and really get the most out of my technique.  If I had been a hack and come into corners too hot, got on the brakes too hard and pedaled really hard out, I could have gone slower.”

That last quote will probably hit home pretty hard for some riders out there…

So all this probably makes sense to the DH and Enduro racers, but how about the XC folks and recreational riders?  Well, another cool thing that Mulally said when asked if he had more energy for pumping because he didn’t have a chain and couldn’t pedal was, “Yes, I definitely felt much fresher than in seeding and practice through the entire run.”

This is relevant to all riders.  Proper technique—especially proper vision—will save you energy.  Big-time!!!  On normal trails, not DH or descending oriented trails, we’re going to have to pedal a ton, but if we do things right, we can save that energy for when it really counts.

Watching Mulally’s run, there are flat sections of track where he is coasting paaaainfully slow.  He names numerous sections of track (probably about fifteen seconds worth) where he would have been sprinting had he had a chain.  He was two seconds out of first place.  Let’s face it, if Neko Mulally would have used those same techniques: seeing the track better, going slow to go fast, being smooth and efficient instead of overly aggressive…and had a chain, he’d be the World Champion right now.

Being smooth on the bike is a crucial part of riding well at any level of riding.  SEEING THE TRAIL PROPERLY is a huge part of this.  Macro-Vision is but one component of proper trail vision.

Many of the techniques I addressed above are completely foreign to most beginner, novice, and/or intermediate riders. Those riders NEEEEEED to learn these techniques if they want to get fast and/or be safe on the bike.  And, what I find pretty cool and half-fascinating is that even for Neko Mulally, one of the best riders in the world, who is clearly doing a lot of things, technique-wise, pretty well (you can’t ride that fast unless you’re doing a lot of things correctly)…there’s still a lot to learn.