
Breaking Down World Cup Photos
I always stress when coaching MTB, that riding well–at any level– is all about the human body working as effectively and efficiently as possible, in an athletic sense, with the design of the bicycle. It’s multiple simple movements and functions of the human body…on a bicycle. This is true whether you are a 70 year old grandpa that simply wishes to feel more safe and more in control on the bike or whether you’re Aaron Gwin, with no chain, smoking the best riders in the world at World Cup downhill races… It’s all basics, it’s all building blocks, it’ all fundamentals… It’s all simple…
But this doesn’t mean that it’s easy.
Unfortunately (or, fortunately, for me) most riders don’t understand how the human body works in an athletic sense. They also don’t understand bicycle design. Therefore, when it comes to riding, they follow the terrible advice of riding buddies, internet jokers, faulty dogmatic MTB traditions, and bad MTB coaching. A huge component of identifying proper riding is the ability to understand WHY we need to do the things that we need to do on the bike (and why we shouldn’t do a lot of the things even “good” riders pass around as riding advice).
In this blog post, I’ve poached a couple of photos of one of the best riders in the world off of the internet and I’m going to break down what is happening in these photos: WHY this rider is in the positions that he is in and what he is trying to accomplish. What are the differences in these positions and why? And, again, many of the same techniques that World Cup DH riders–the most skilled riders in the world–are trying to execute are the same techniques that every day students work on in the camps, and consistently experience success, when these techniques click; whether that means that they finally feel comfort, control, and safety on the bike or whether that means that they have realized that new sought after tool that is going to shave big chunks off of their race times.
As some of you are aware, I’m not the hugest fan of trying to coach via internet. It can be done well, but there is no substitute for real-time coaching and instruction. Obviously, I can’t cover every single aspect of a photo, but we definitely can see some interesting stuff here.
*** Also, this post ended up getting a little advanced and in the deep end… I may lose a few folks on this one. Hey, I’ll risk that because it’s fun for me to get this deep into it, and, I promise the next post will relate to all riders, but focus more on beginners.
Below is a photo of Aaron Gwin. Aaron Gwin is a beast. Fitness, speed, power…and, yes, super solid technique. If you want to see a rider doing things right, Aaron Gwin is an almost sure bet. In the photo below he is showing pretty much flawless descending position. This is the athletic and “ready”position of the human body. You’ll see this position in almost all sports that require varied, explosive, and athletic movements (baseball shortstop, tennis player, football linebacker, etc.)
In the photo, Gwin is half way through a squat and halfway through a push-up (ninety degree bend in limbs), with ALL of his weight on his feet. Notice the bend in the knees? This is SO important for so many reasons, many of which we don’t have the space to get into here. (And, you can’t get that bend if your seat is up and in the climbing position. This is one big reason why dropper seat posts are a must to ride well in nasty stuff).
This position supplies maximum range of motion–or body-suspension–to the rider’s core. This is crucial for a balanced and stable core and head–which means a smooth momentum path for the core and head down the trail–even as the bike bounces, drops, and slides over the obstacles of the trail. You CAN NOT ride the bike well if you core and head are not balanced and stable (Good article on that, here). There are coaches and trainers out there that state that riders should keep their knees fairly straight and then bend at the hips… This is simply wrong for many reasons, but giving up range of motion in all directions except the bike coming directly back to the core, is a big one. (Check out this video of World Cup DH practice and tell me how many straight legs you see in the gnarly stuff).
When getting into this position (which MUST precede braking, cornering, Manual or Coaster wheelies, and others–if you intend to do things correctly and ride the bike well.) there are a few “checks” that riders can use to see in they’re doing things right. Here are two. (We get into way more with real instruction):
1) If the bike disappears, would you land on your feet? The answer should be yes. This means that not only are you in the proper athletic position, but that your weight placement on the bike is good: the weight is over the bottom bracket of the bike, thus, allowing both wheels to pivot around this point. This allows both wheels to roll over and/or through obstacles. Both wheels also have adequate traction if the rider’s weight is over the BB (again, some common-terrible riding advice is to “weight the bar” to help the front wheel get traction. I will push down and pressure the bars…but this is way different from ‘weighting’ the bars. Keep your weight on your feet and over the BB–with rare exception–for all of the reasons mentioned here as well as many more). This is crucial (here’s and video on weight distribution and it’s importance, here). Often, I’ll see riders in this position, but their weight ends up on their hands, especially under braking, or, they end up leaning back for various reasons. Both leaning forward (weight on hands) and leaning backward–contrary to a lot of common, but terrible riding advice–are bad news when it comes to controlling the bike and also how the bike will work over the terrain (again, check out this article on weight placement. There’s an excellent example at 2:33 where you can feel how this work for yourself): we need to use our legs to support, balance, and power our mass/upper body if we want it to work well in an athletic manner. If we’re using our arms, instead of our legs to do this, we’re in big trouble. This is human movement 101 stuff…
2) Can you comfortably flutter your fingers? The answer should be yes. Now, there is a lot of MTB coaching out there that states always have a loose grip on the bars. This is simply impossible. Once I’m ‘in’ the obstacle–rock garden, corner, wheeling, jumping, etc–I’m often going to have to have a very solid grip on the bars. However, when I “set up” for the obstacle–get into this good/ready/athletic position before the obstacle–I should absolutely be able to comfortably flutter my fingers, and, in theory, be able to take make hands completely off the bars and nothing, position-wise, would change. If I can do these things it means that my mass/core is being supported by my legs and my arms are free to do the small and precise manipulations–such as lean angle adjustments, steering, fore and aft adjustments, etc–that are necessary to ride the bike well (again, check out this article on weight placement. There’s an excellent example at 2:33 where you can feel how this works for yourself).
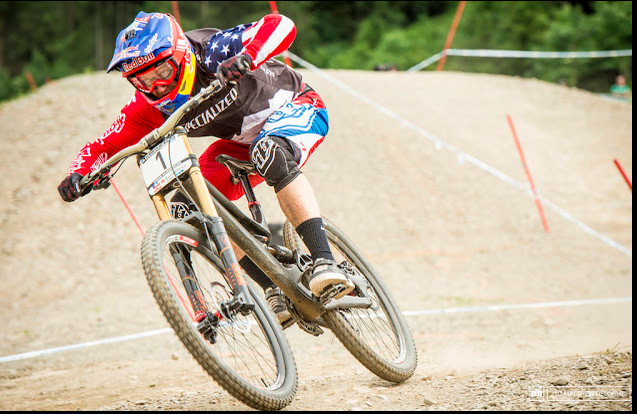
Alright, enough on that photo. How about this one:

Oh, same thing, right? Nope, actually WAY different…
This could almost qualify as good position, but BAD weight placement. However, because of where Gwin is at, the track’s surface and angle, and what he’s trying to do, it’s perfect. Keep that in mind…
Unfortunately, many riders find themselves in this position while descending AND while trying to decelerate by braking (Gwin is not decelerating in this photo. In fact, he is trying to generate more momentum…again, get to that in a bit).
The huge (yet subtle, visually) difference is in the angle of the cranks. Notice how even though the pedals are level in relation to the bike, the front pedal is substantially lower than the rear in relation to planet earth and gravity? This is a big deal. Riders always want to talk pedal position and it’s always about ‘level’ or one down and one up. In reality, our pedals should kind of end up all over in their rotation in relation to the bike; it’s really about the rider’s ‘line of force’ (as I relate to it) and the angle and intention of the pedal pressure that the rider is applying. Think about this: if you’re force is equal through both feet, and, thus, through the BB of the bike…then your cranks will be perpendicular to that force. If you’re trying to push the bike forward with your legs (as you should be doing during proper technique of a manual wheelie), or if you’re countering the forces of the bike decelerating during braking–and correctly not letting your weight go onto your hands–your angle of force isn’t going to be vertical, it will instead be downward, back to front, and the angle of your cranks (perpendicular to force, roughly) will be angled backwards–sometimes only slightly, sometimes drastically, depending on the amount of force and the angle required to accommodate it.
If, while braking and decelerating–especially in steep terrain–the rider’s front foot gets lower than the rear foot…the rider is starting to get into big trouble. This means that the rider’s weight and line of force isn’t going through the BB anymore, but is instead, in front of the BB. Now the rider’s weight will have to start going onto the hands, bars, and front wheel…now the bike, instead of pivoting around the BB over the terrain, will now want to pivot around the front axle…
If you’ve read this far, you’re probably understanding that all of these things are about to cause big problems: the rider’s body can’t work in an athletic sense with the weight being supported by the arms; the front wheel won’t ‘float’ up and over and through obstacles because all the weight is now on the front wheel; the front brake can’t be utilized well because it’s going to exacerbate all of these problems…
To remedy this: simply keeping the heal of the rear foot quite low (flexing the toe upwards helps) will tilt the cranks backwards and keep the rider’s mass slightly back and over the BB (very subtle–perhaps only an inch or two–but this subtle shift is huge because it is moving the rider’s entire mass/core. The body is a kinetic chain, and often, very subtle movements of one part will affect the actions of the whole body) where the line of force can go through the BB… and life is good again.
There are actually coaching organizations that teach to use the front foot as a “bracing foot” when you brake. This puts the line of force in front of the BB, not through it; this will almost always drop the front foot lower than the rear; the weight will go on the hands, bars, front wheel…and the cascade of terrible technique continues… This is straight-up dangerous for all of the reasons above.
But again, without knowing the “why” behind riding technique, it’s very difficult to decipher proper riding from improper riding. Thus, bad techniques keep getting passed around.
So why can Aaron Gwin get away with this position and weight placement that I just described as potentially catastrophic? Because he is not on the brakes and decelerating (if he were, he would be out of position)…but, instead, he’s ACCELERATING forward and about to “pump” the bottom of this steep drop where it transitions to flat in an effort to gain even more momentum. Instead of his line of force being downward, from back to front to counter the forces of braking (and his cranks being perpendicular to this), his line of force is downward FRONT to BACK so he can push down and back into the tracks’s surface (roughly perpendicular to the slope of that drop), and effectively that energy will accelerate him forward. That is a ‘pump’… Also, notice where he is looking? Way down the track…focused on the next solution to the next section of track. We obviously get WAAAY into vision, reading the trail, and how this relates to riding the bike in a physiological sense in the camps (we’re not going to, here), but “you go where look” holds pretty true and Gwin is obviously focused way forward on the track.
Also, he won this particular World Cup Downhill race without a chain (snapped it about three cranks into his race run). He milked and pumped every surface of the track for all it was worth… He’s accelerating here.
Hope this wasn’t too confusing…Hope this made some sense… Hope this made a lot of sense…Two very similar positions on the bike; but depending on the surface of the trail, the forces, the angles, and the intention of the rider, these two positions could have drastically different outcomes.
Again, understanding how and why the body and bike need to work together in order to ride well is crucial. Without understanding the basics and building blocks of this, riders will have a tough time learning the proper techniques and improving on the bike. After coaching and instruction, every student comes away from my stuff stating that, conceptually, riding is incredibly simple. This is a victory in the first, and arguable most important battle.
But, that doesn’t mean it’s easy…