How Tire Tread Works

How Tire Tread Works

What slows down and stops your bike? Your brakes? Nope…your tires tires stop your bike! What makes your bike turn? Leaning the bike and a bit of steering with the bars right? Well, actually it’s the contact patch of your tires on the trail surface that ultimately changes your bike’s direction.

When it comes to MTB equipment, tires are extremely important. Yet they are pretty over looked by many riders. There are a lot of aspects of tires that need to be taken into consideration if you’re serious about getting it right; tire pressure; volume; casings,… but today we’re going to talk about tire tread and how it works with the surface of the trail.

Tire Tread for Soft, Loose Surfaces

There are two ways in which your tires can get traction. One, the rubber of the tire simply contacts the ground surface (like on pavement or a hard-packed trail), or two, the tread of the tires (or lugs or knobs) dig into the surface of the trail when it is soft (loose gravel, sand, mud, etc.). This is where different types of tread for different types of conditions come into play.

But how does this work? First, imagine trying to stab a screwdriver into the grass on your front lawn. If the ground is fairly soft, the screwdriver will stab right in. Now, imagine trying to do the same thing with the end of a baseball bat. Probably isn’t going to happen right? The bat is too blunt and large to penetrate the surface. Lugs on tires work in a similar manner. A stiffer and thinner lug will stab into the soft, loose trail and “claw into” the ground while a shorter, fatter lug probably won’t, but instead will “float” on top of the surface (sometimes this is desirable—like with fat bikes in deep snow—but usually this simply means no traction and slipping and sliding around). Also, in order for the lugs to stab into the ground, there needs to be some space between the lugs, so the material can move out of the way as the lug stabs in.

Mud tires, or spikes, are on the extreme side of a loose terrain tire. They have, literally, little rubber spikes for lugs. These lugs will stab and claw into the ground on loose surfaces and the adequate space between the lugs will allow the tire to “clear” mud and debris easily.


TI237A07

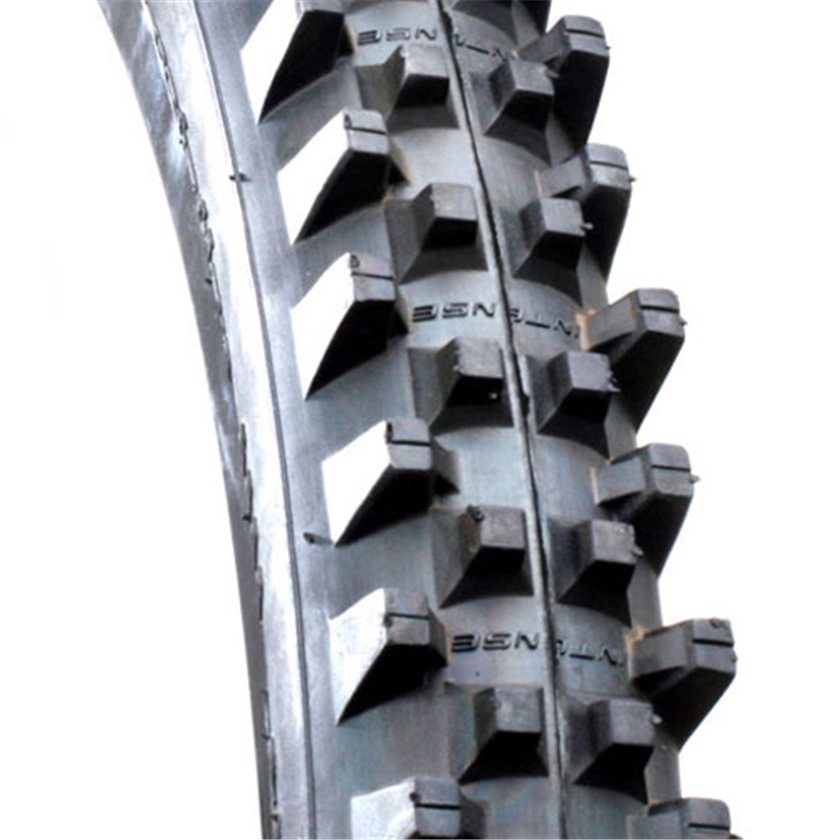
 Mud “spikes”. Notice the space between the lugs


The downside of tires that do a great job in the loose stuff? They can be fairly terrible on hard packed trail surfaces, rock, pavement, etc. Why? Because when the trail surface is hard and impenetrable, traction comes from contacting the rubber of the tire with the trail’s surface, not stabbing into it. Spikes and thin lugs that are designed for stabbing into loose terrain will provide very little surface area for contact on the hard surface. Also, the lugs are usually long and thin and will “roll over”, or bend, under the weight of the rider and bike. This means little to no traction.

Tire Tread for Hard-packed Surfaces

In the case of a hard trail surface—if you’re looking for traction—the more rubber that can touch the surface of the trail, the better.

Tires for hard-packed surfaces are the types of tires that are sold on XC race bikes. These are the tires of choice for non-technical, smooth, fast, hard-packed surfaces. They will almost always be lower volume (volume is essentially the width and size of the tire), with light casings (how thick and tough the tire will be: light means fast, but also means thin and more susceptible to damage).

These tires will have low profile (short) and tightly spaced lugs. The priority of these tires is usually very little rolling resistance and just enough tread to get a bit of traction when necessary. The pattern of the center lugs usually will provide a near constant contact with the trail’s surface. This allows the tire to move along with very little vibration or “buzz” and helps provide low rolling resistance.


4-IMG_5545

A low profile, fast rolling design (Great for hard-pack…)


The downside? No ability to dig into loose terrain: the lugs aren’t large enough and are also too tightly spaced to allow the material to move out of the way. And, because of the lighter casings and lower volumes, these tires will have to be run at higher pressures to prevent flats, damaged rims, cut tires, etc. providing less ability for the tire to dampen bumps and conform to the trail for traction.

These tires will be bad news in loose terrain: they will float and slide on gravel as if it were a bunch of marbles instead of being able to dig in and find purchase; because of their necessary higher pressures, they’ll deflect and bounce off of obstacles instead of absorbing them.

And the Winner is?

Unfortunately, no tire is great—or even good—everywhere. What will work awesome in the blown out loose moon-dust and gravel of the Rocky Mountains will be slow, sluggish and sketchy on east coast hard-pack; what will have you smashing your buddies on those lung-busting fire road climbs could put you in the weeds on the way back down if you’re not careful!

I usually use tires that work great in Colorado; large volume tires with large, well spaced lugs that move material and dig in, but also support and don’t roll over on off-camber rock. The problem is that they feel like they are filled with molasses when I’m back east coaching on fast, smooth trails. And, lighter, faster rolling tires, that fly on hard-packed trails east of the Mississippi can be somewhat of a death-wish back home in the gnarlier stuff.

And, with today’s tubeless tire systems, it’s a hassle to swap out tires every week.

What’s the answer? Aside form multiple wheel-sets mounted with different tires for different conditions (that’d be nice!), there really isn’t an answer. Investigate, research, ride… I have a couple of different tire combos that I use and they differ at different time’s of the year.

What’s your priority? Rolling resistance or traction? And, traction on what type of surface?

Hopefully this article shedded a little light on the subject of tire tread and pointed a few of you in the right direction. In the DirtSmart Skills Camps, I have a bike set-up and equipment segment and we get way deep into tire choice, tire pressures, volumes, casings, etc.


MTB Coaching is Too Expensive!

One of the biggest reasons why riders decline to take MTB coaching/instruction is the price… MTB coaching is too expensive!

So, OK, I’ll readily admit that quality coaching isn’t cheap. I charge $500 for a two-day clinic. That is some serious scratch.

But…what did your bike cost? Plus all your gear: riding get-ups, shoes, helmet, pack, rack on your car, couple pairs of cool shades… maybe your new set of carbon wheels… And, what’s your insurance deductable for an ER room visit? (And—trust me—there’s always something ridiculously expensive, that isn’t covered, in such visits). Also, how much money are you losing in missing work—disability insurance or not… What’s the cost of family members and significant others worrying about you both in getting injured and also every time you go out on the bike after you’ve been patched up and heal up?

Have you ever taken a day of quality instruction in, say, golf or ski lessons? Scuba classes? Avalanche training? Or, how about a weekend seminar for work? What does something like that run?

Hmmmm… five-hundo is almost looking cheap!


Here’s an email from a previous student that I just received today:


Hey Andy,

 I had another giggle moment at Palos yesterday.

 You probably rode “Badass Hill” while you were here. It’s a stretch of Bullfrog trail that is pretty long, pretty steep, somewhat rooty, and sweeps in a long turn. But mainly, it’s full of cobbles. Yesterday I was riding with a group of riders, all of whom are better than I am. Naturally they had pulled ahead. So, to try and keep up, I unwisely decided to bomb Badass.

 About halfway down I was on the far edge left as the trail was sweeping right when my brain realized that I was going MUCH too fast. But, on that surface, there was not much slowing down. And as soon as I looked at the trees just off my left elbow I started going toward them….

 And then it all kicked in; I dropped heels, got low, looked at that sweet spot down the trail where I wanted to end up, dragged a bit of back brake and rode it out. My GPS said I was doing 19.3 mph; it would have been a very bad fall. And yeah, I was laughing like I did on Gravity Cavity.

 So I can truly say that the coaching, and practicing what I was taught, almost certainly kept me out of the hospital.

 Thanks!


The above rider is a recreational enthusiast who very much enjoys riding his bike. He’s not serious racer, he doesn’t ride at a super high level. But he get’s out there and has fun, get’s his fitness on, pushes himself a bit… (Sound familiar?)

As most of you know, MTB has a steep learning curve. And, falling on rocks at 19.3 mph usually doesn’t end too well. To get up and walk away from a crash of that nature (road-rash, cuts and bruises, mangled bike, rattled confidence, and shattered ego aside)…well, you’re gonna feel a little lucky, and righty so…

The above email illustrates one very important reason why pretty much any rider that throws a leg over the bike should almost definitely take some quality MTB coaching/instruction: safety!

But MTB coaching is too expensive!


Proper technique—while it will make you much faster—isn’t necessarily about speed: it’s very much about just being safe! Is that worth $500? Do you owe that to yourself and others around you?

Maybe you just ride at a beginner or novice level. You don’t race or compete. You’re just going to take it easy out there, so you don’t need to bother with coaching. That’s for racers, right? (Heck, why bother wearing a helmet? They’re like a hundred bucks!)

Well, I have news for you: you’re riding at a beginner or novice level not because you lack the fitness or time on the bike, but, ultimately, because you’re doing a lot of things (most things) wrong when to comes to technique. If you were doing them right, you wouldn’t be riding at that level anymore.

Unfortunately, when it comes to MTB’ing, bad technique doesn’t only mean going slow, it also means lack of control; lack of comfort and confidence; and finally, being unsafe…to yourself and others! YOU WILL get yourself into situations that you won’t be able to get yourself out of with poor technique.

Proper MTB riding is simple when it’s broken down to its basic components, but until we get into the highest levels of riding, almost everybody is doing most of it wrong (and, even the top pros on the planet seek out and benefit from coaching). The best, quickest, and most effective way to learn to do it right: Good Coaching!!! The alternative: The School of Hard Knocks, trial and error, years and years and years of learning the hard way… (Let’s face it; the internet and your riding buddies haven’t been much help!)

Almost all riders have pretty terrible technique by default. There are normal and common reasons for this. In the situation described in the above email, the rider would almost definitely have done almost everything differently had he not previously had quality MTB coaching: proper braking, proper trail-vision, proper body position and weight distribution…all of these things are very counterintuitive. And, it would take a lifetime of trial and error and learning-the-hard-way (and lots of hospital bills) before a rider would be able to react properly and make the proper decisions and adjustments in order to not end up seeing the inside of the ER room in that situation.

The other really cool thing: the exact techniques that this rider used to preserve his hide, to not crash, to remain safe…are the exact things one would do if they were a serious racer, trying to go as fast as possible.

safety = control and confidence = smooth and efficient = fast

Again, riding is simple once it is broken down to it’s very basics: whether you’re looking for more comfort and control on the bike, or you’re trying to shave seconds off your race time…the techniques are virtually the same. The difference is usually just a matter of more difficult terrain and higher consequences.

Take riding waaaay better out of the equation… And leave out the having-more-fun part… Leave out the More Confidence, crushing your buddies, meeting your competition goals (if you have them)… being able to go anywhere and ride the local trails competently…

Leave all that out and think about simply being much safer and having a way lower probability of getting seriously injured. Is that worth five hundred dollars? I’m pretty much positive, that with rare exception, any rider that has been seriously injured would gladly hit the rewind button and go back and pay five hundred bucks in order to have learned how to do it right…

What do you think the rider who wrote the email would say? Was it worth it?


Sign up for a scheduled clinic or contact us about getting one in your area. Check our coaching philosophy and what to expect in DirtSmart camp/clinic. Do your riding buddies a favor and share this article with them before they learn the hard way!

Bar Height

The following came about after an email from a confused/frustrated rider. He was having some issues concerning the handlebar height of his bike and was also the victim of some bad riding-advice from arguably the most common source of bad riding-advice: a riding buddy!

This particular rider was setting a bike up for lift accessed/downhill bike-park riding. Though riding bikes that are set up exclusively for downhilling are obviously not what the majority of MTB riders ride, learning how to descend with more control and faster are often the main reasons people seek MTB skills instruction/coaching. Even though the following pertains to downhill oriented riding, the same principles apply in setting up any MTB where having control on descents is a priority and/or necessity.

This rider stated that he had always been mainly an XC rider and had always previously set his bar height slightly lower then his saddle height (probably setting saddle height first in order to get proper leg extension while pedaling). But understanding proper descending position (on this bike his seat would be low and he would be standing when using the bike as intended), this meant that the seat was no longer a good gauge for bar height. He knew that he didn’t want to be reaching out and down too much (getting arms too extended) when the trail got steep, but he also knew that many downhillers were riding flat or nearly flat bars (no or very little rise) in an attempt to keep the bars quite low. He said his friend told him that downhillers do this in order to ride with more weight on the front of the bike. So this is where we’ll pick up the story…

…Bar height is a concern among many riders and setting proper bar height is the first place many riders want to start when setting up a new bike. But what many riders don’t understand is that bike set-up—first and foremost—should about body position and weight placement on the bike. This means maintaining an athletic position so that the body can function optimally in an athletic sense. (And, keep in mind, the focus of this article deals with control oriented riding, or riding MTB’s in tough technical terrain where control is paramount. In other words, riding mountain bikes in the nasty stuff! XC racing or road racing will have more emphasis on pedaling efficiency and power delivery when it comes to bike set-up, over the ability to control or handle the bike.)

First, we have to understand that all movements of the body originate at the core. A rider is in big trouble if the core is not a stable and balanced platform from which these movements can originate. Your body is a kinetic chain; maintaining this position of stability is priority; the position of your bars ultimately will be determined by the position of your body/core.

Now, whether you choose to weight the front of the bike or not (I’m not a big fan of this. Keep reading and see why.), everything needs to start off in a neutral and balanced position (that means a balanced core) with your weight on your legs and off of your hands/arms. Your legs play many important roles in human movement: support the body’s mass, supply balance, and are really are what should be powering and controlling the bike in many situations. (We get way into the how and why of this during instruction). Your arms are great at supplying small and precise movements and manipulations of bike, but not very good at balance and power especially compared to the legs; and, they don’t work well when they are weighted down by your body mass. This all has to come into play when setting the controls for one’s bike.

In regards to weighting the front of the bike, this really should be an adjustment that is made and used only when necessary (usually after you’ve made a mistake–often having your weight too far back–and the front wheel is doing something that you don’t want it to do, probably sliding or pushing). The rider’s default position should start out neutral (weight on feet, balanced over bottom bracket). One reason for this is because you may have to un-weight the front of the bike half way through a corner or a rock garden. When done properly, this is done primarily with the legs (check out this video on the manual, or coaster wheelie). If you do get your weight up onto your hands, it may be very difficult, if not impossible—because your arms really aren’t very strong when it comes to supporting body mass—to then get the weight off of your hands and, thus, off of the front end if the bike…and this, as we all know, could spell disaster! (Imagine a large root or rock ledge half way through the corner but obscured until the last second). Once you commit to weighting the front end of the bike (supporting your mass with your arms; and thus, trying to control your body mass, the mass and movements of the bike, the forces of the trail, etc, with the upper body) you give up your body’s most effective tools in balance and support (your legs), AND you give up your ability to effectively manipulate the bike because your upper body is tied up supporting your mass.

You also will have to adjust lean angles through corners, perhaps dodge trees, etc., and the arms are only able to provide adjustments and manipulations effectively if they are NOT weighted down by the body’s mass. Try this: stand straddling your bike with your feet on the ground. [good example of this exercise at 2:32 of this video]. Now, get all your weight up on your hands and the bars. Get up on the very tips of the front of your shoes/toes so as much weight as possible is on your hands. Now try to make small, micro-adjustments and manipulations of the bars/bike with all your body mass supported on your hands. Notice how this is tough to do: the movements are large and not very precise. (Not to mention, this is tiring and one will fatigue real quick if this is the position that they ride in). Now, simply put ALL of your weight back onto your feet. Now try to make those same micro-adjustments and precise movements with your arms/hands/bars. Notice how much more control you have of these precise movements and subtle manipulations (and how this is way less tiring!). This is how your body is meant to work: mass supported, balanced, and transported by the lower body, thus, freeing the upper body to perform other tasks.

Again, weighting the front end should be an adjustment, not a default position or a riding style…and should be used as sparingly as possible.

I’ve heard many riders in both MTB and motocross proclaim that they ride with a lot of weight on the front of the bike. Studying their riding styles, watching video, etc, I can emphatically say that this is not what they are doing. There are exceptions to every rule and always are a few outliers, however, ALL of these top riders are remaining centered and neutral—with their mass supported by their legs—the majority of the time.

To provide proper position—and a balanced and stable core—your limbs basically have to be half way through a squat and half way through a push-up, with ALL your weight on your feet. This is the athletic position of the human body and MTB is an athletic endeavor. You now have supplied maximum range of motion, in any direction, from all of your limbs and your core is properly “suspended”. From this position, you are able to react, pro-act, etc, with movement in any direction. Any decent motocross school and/or decent MTB skills instruction should teach this (this is also body movement 101).

And that takes us back to bar height and bar position: bars too far forward (too low–away from you) means giving up the bend in your arms (range of motion) and your weight will end up tossed (bucked) forward onto your hands (example: if your arms are already straight, and your front wheel has to drop a foot, your core is going to have to go forward with the bike as the front end drops and your weight will be thrown onto your hands). Bad news… Bars too high and your arms will be all cramped up/bunched up in your chest and you won’t be able to manipulate the bike effectively, thus you’ll start to lean back to get your arms in a better position and then you’ll be too far off the back, giving up the balanced, stable, and neutral position (this is one reason why you shouldn’t lean back on descents, but instead stay neutral by continuing to keep your weight on our feet and over the bottom bracket). Muscles function best (strength, reaction time, balance) when the muscle belly is half contracted…this is another reason why the half push-up, half squat is the most effective athletic position for the human body (Think: tennis player, baseball shortstop, middle linebacker, etc…)

So, wherever your bars end up when you’re in this position…that is the proper bar height.

I’m sure you noticed that I haven’t given you an exact measurement or number on that bar height! Obviously, they can’t be perfect all the time because you should have a dynamic relationship with your bike: your core should remain stable and static while your bike will move—often quite a bit—underneath you: on super-steep descents, they may be a bit too low; on a fairly flat track they may be a bit too high. There’s nothing wrong with making height adjustments depending on where and what you’re riding; the difference between even 5 mm can really be felt if you’re in tune with your bike; 15, 20 mm’s is a huge difference. Play around with the spacer stack height of your stem. I always start out with at least 25 mm of spacers, that way, I have plenty of room to move the bars up and down when necessary.

So, really, it doesn’t START at the bars, but it’s more like where do the bars END UP when your body is properly positioned on the bike? That is the optimal bar height.

Many riders also believe that if the bars are set-up to descend well, then they are too high for effective climbing. Not true. Proper climbing depends, again, on core position, not bar height or where a rider’s hands are located. I will admit that sometimes, at proper descending bar height, the cockpit starts to feel a bit cramped on long climbs, but the bar height shouldn’t drastically hinder one’s ability to climb. Again, adjustments can be made depending on what a rider’s priorities are. Having a travel adjustment on the fork is a great way to drop the front of the bike, lower the bars on long climbs and help out in the comfort department. I love this option on front suspension, especially with a longer travel bikes.