MTB Pedals—Clips or Flats? Ride Both!

Still not sure which pedal system is best for you? Confused on why a pedal that you clip into with your cleat/shoe is actually called a “clippless-pedal”?

Here’s some history on where these systems came from, more on the advantages and disadvantages of each system… If you’ve had my instruction previously, you’ve already heard a bunch of this, but there’s definitely some new info here (even for advanced riders)…And, this may be a cool article to share with a buddy who is still up in the air on pedal choices.

First, there is no such thing as a better or worse pedal system…

Of course, both systems have advantages and disadvantages; and, while many of these are quite obvious, there are still many misconceptions about each. If you want to be the best all around MTB rider possible, you’ll have at least working knowledge of both systems. And, it’s my belief, that for many reasons, all beginner riders should ride flat pedals for at least a while, at least to the point where they get comfortable with this pedal system.

So, first, a little history on MTB pedal systems…In the ancient days of mountain biking (you know, like fifteen-twenty years ago), most mountain bikers believed that—when it came to pedals—you had to be “clipped in” to be a real mountain biker. “Clipped-in” means the rider’s shoes had metal cleats attached to the soles, and these cleats actually clipped into the  pedals, securing the shoe to the pedal. This system came from road riding. Mountain bikes, in the early days, were primarily derived form road cycling.

It wasn’t until the influence of downhill riding and racing—which was more akin to motocross and BMX than road cycling—that modern mountain biking started to come into it’s own in terms of equipment: full suspension, disc brakes, real tires…and, yes, flat pedals systems (also referred to as Platform pedals or BMX pedals). With these pedals, there are no cleats to clip into the pedals…just the rider’s shoes placed on the pedal—BMX style. This equipment “revolution” started happening around the mid to late nineties. Previous to this, mountain bikes were essentially road bikes with slightly fatter tires and straight handlebars…a far cry from today’s MTB machines.

Road riders such as Lance Armstrong and Eddy Merckx, among others, popularized the high cadence spin (high RPM’s with the pedals) as the most efficient way to pedal a bicycle on the road. It’s more difficult to spin these high cadences without your feet being attached to the pedals in some manner, hence the retention systems.

Because MTB was derived from road cycling, this high cadence pedaling technique made it’s way over into MTB pretty quickly…and never went away….which is good. Because it is necessary…sometimes. However, many MTB riders don’t take into consideration that riding MTB’s in tough terrain and riding road bikes on paved roads is like apples and oranges. I’ll buy that the most efficient way to pedal a bike on a smooth surface is with your butt on the seat and your feet spinning high cadence circles with the pedals. This is true on the road and on smooth trail with a mountain bike. But this doesn’t cut it in real MTB riding in technically difficult terrain. Proper technique in difficult terrain, when the bike will need to pivot and move around beneath us, requires us to get off the seat—definitely while descending and at least intermittently while climbing difficult terrain. We also need to slow our pedal cadence so that we can accelerate the bike when needed, wheel over obstacles. balance better, clock—or time—our pedals to miss obstacles, unweight the rear of the bike, etc…none of this is necessary for road riding or riding MTB on smooth trail surfaces.

Because of this (and more), many of the perceived advantages of clipping in are negated when the trail gets a little tricky. Really, when it comes to the act of pure pedaling, the only advantage of clipping in is the ability to spin those higher cadences with less effort. All of the skills exclusive to mountain biking listed above (and more), in fact require quite low pedal cadences to be effective. Thus, clipping in isn’t really an advantage in a lot of situations and can often be a hindrance.

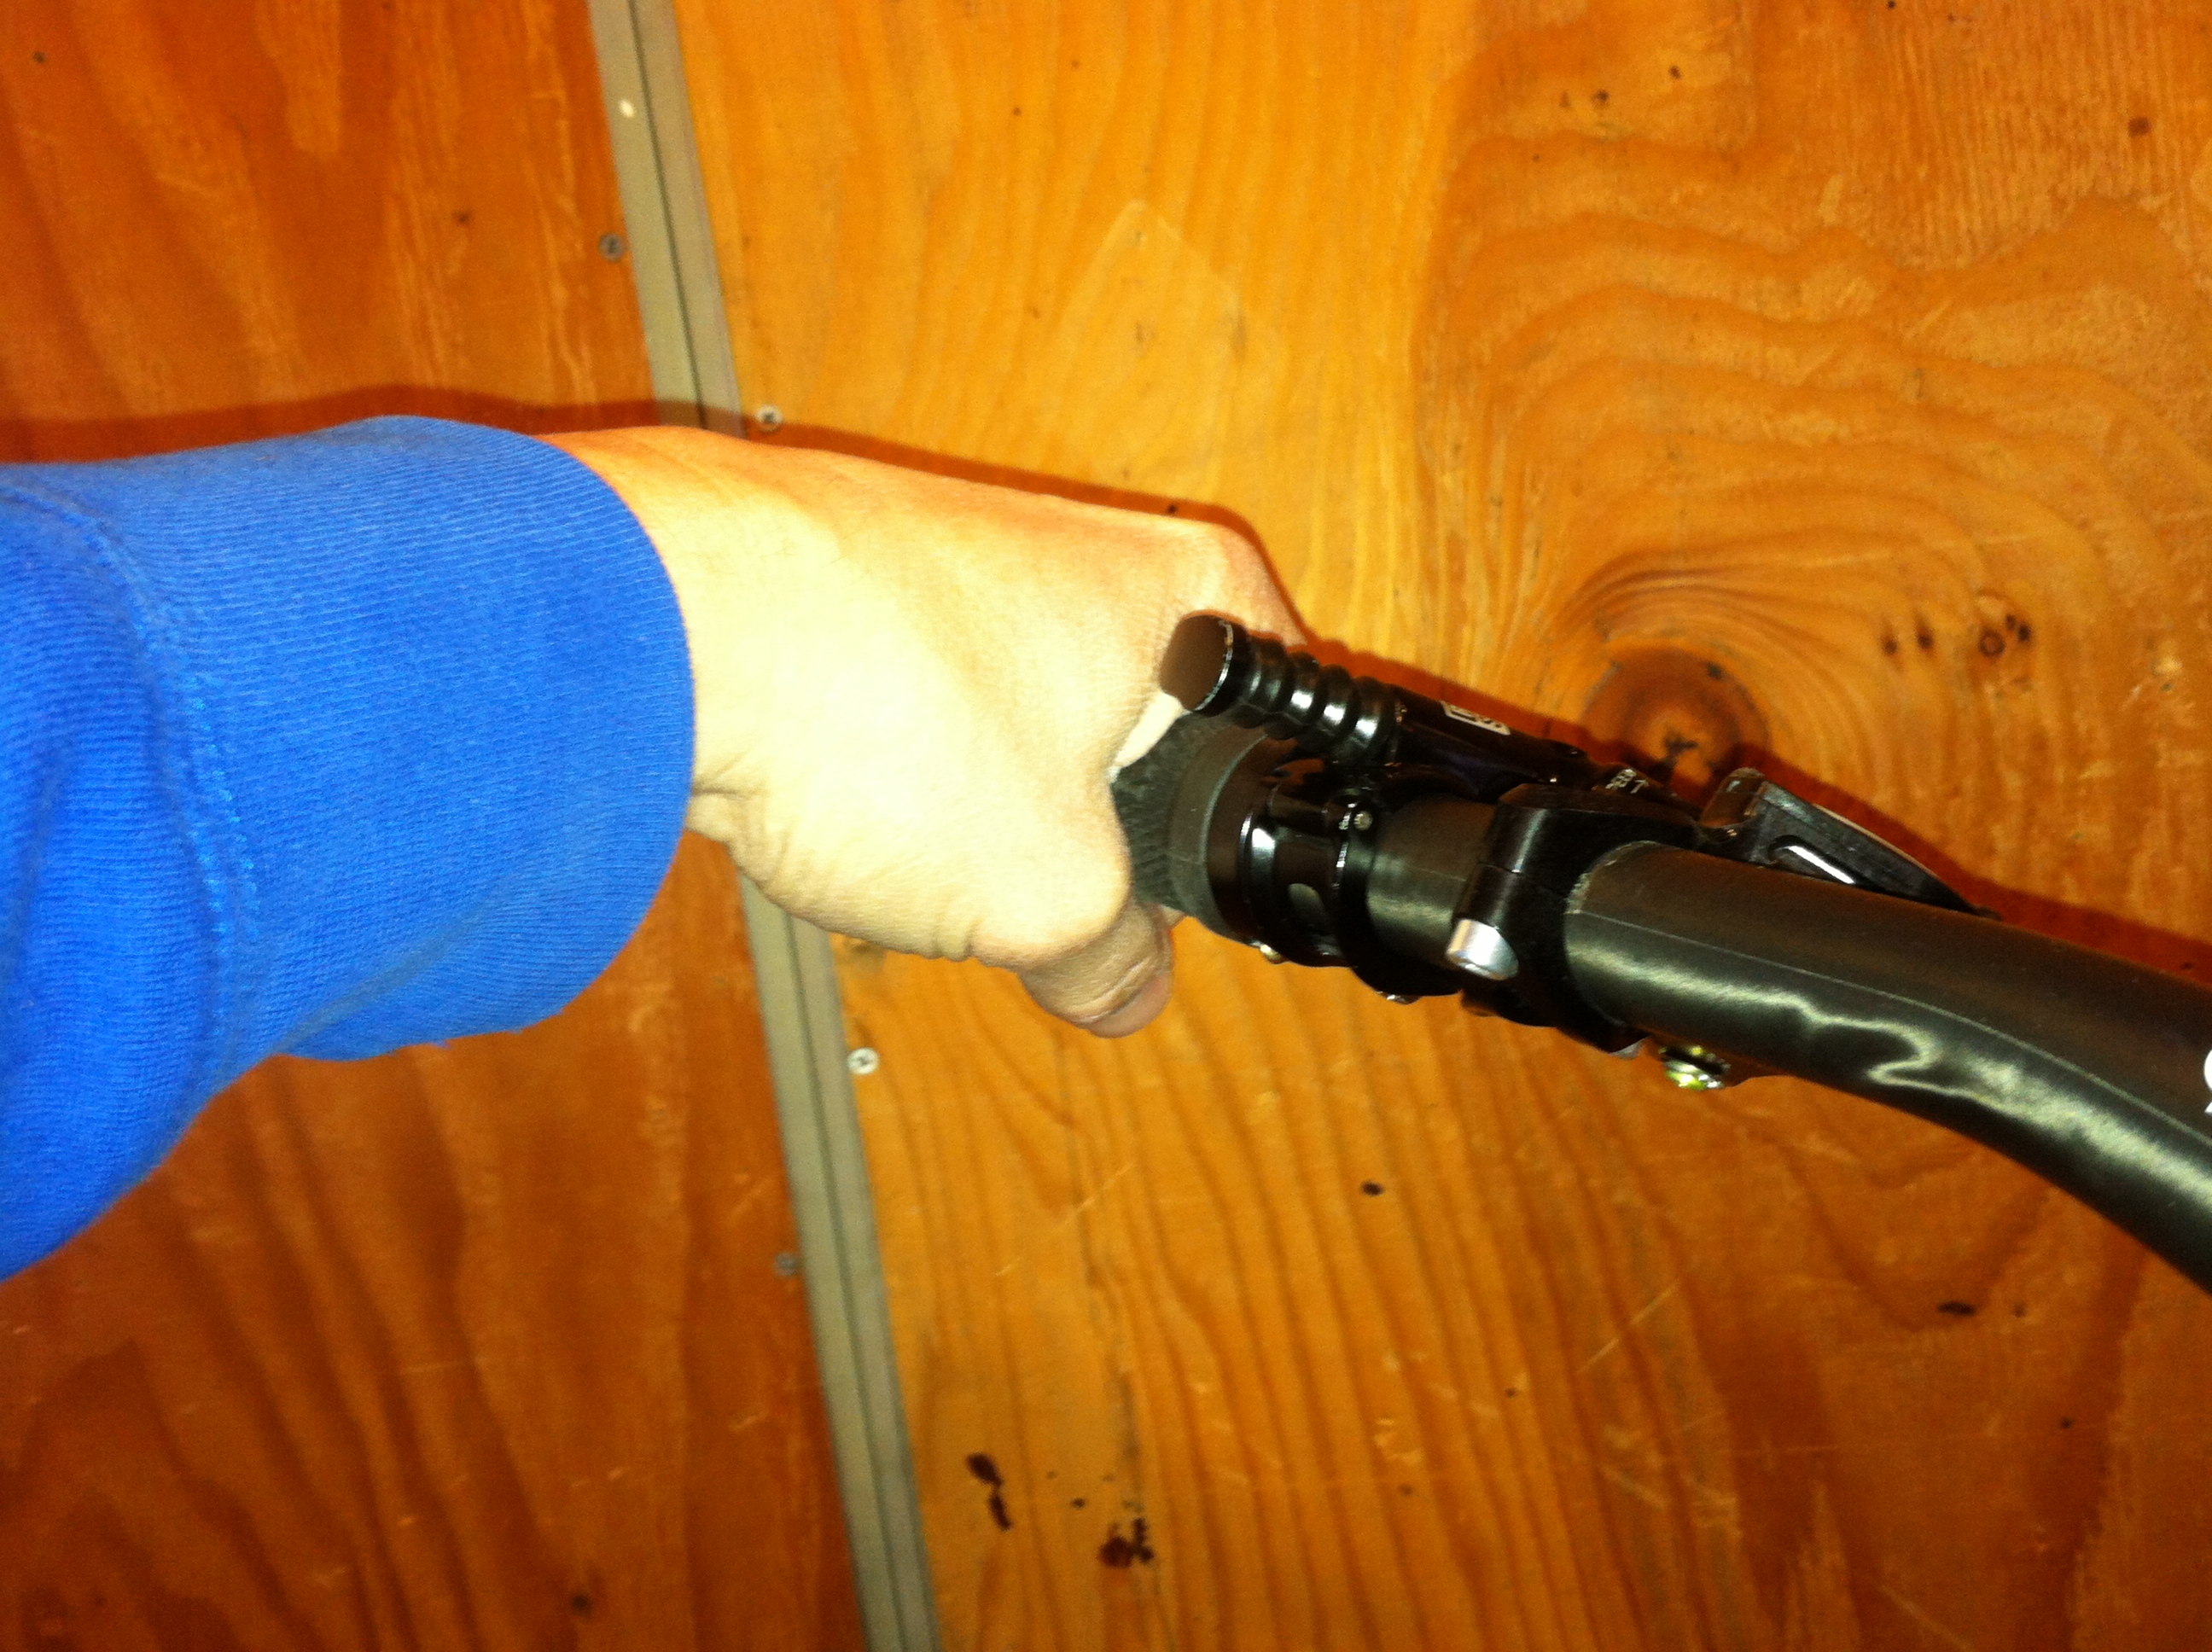
*** Here’s a quick explanation of the terms “clip-less” pedals vs Flats, Platforms, and BMX-style pedals: 

OK, so the term “clip-less pedals” doesn’t really make sense. After all, this is the system where a cleat, that is attached to the bottom of your shoe, actually does CLIP INTO your pedal (so why’s it called clip-less, right?!?). The pedal retains this cleat so that your shoe is “attached” to the pedal (you un-attach the shoe from the pedal with a twisting motion of your foot and this allows the pedal to release the cleat). If you’re clipped in, your shoe won’t bounce off or slide around on the pedal. You have the ability to “spin circles” when pedaling as well as have power on the up-stroke of the pedaling cycle, which, depending on who you talk to and (more accurately) where and how you ride, may (or may not) be a big advantage. BMX or Flats or Platform pedals are simply pedals with platforms that you put your foot on. They don’t have a retention system. They do, however, have replaceable pins protruding from the platform that provide very ample traction with the correct shoe/pedal combinations.

Still confused on where the “clip-less” name came from? Of course you are… Here’s how it happened: in the good ol’ days, road bikes didn’t have fairly advanced spring-loaded retention systems on pedals; nor did they have precisely machined cleats that attached to the bottom of $350 carbon fiber shoes…as they do now. In the ol’ days, they had what were called Toe-clips. This was a simple system where simple straps tightened a clip, holding your shoe tightly to the pedal. Eventually, the toe-clips were ditched in favor of the more advance, modern cleat/pedal-retention systems. No more toe-clips meant modern pedals were now labeled as clip-less… and the name stuck.

But back to riding…

Why should beginner riders be on flat pedals, at least at some point, and for at least long enough to feel comfortable riding with them?

First, if you’re new to riding MTB, you’re going to notice that there are all kinds of crazy things out there on the trail to worry about besides fumbling around, trying to clip in and out of your pedals. Trees, rocks, roots, steep ups, steep downs, other riders, dogs, cats…you name it. And, that’s not even to mention the other challenges of riding the bike correctly: proper body position, weight placement (Video), reading the trail properly and picking a good line, proper braking technique, shifting, pedal cadence, perhaps wheeling over a log…You get my drift. All of these challenges and obstacles will be overwhelming at first. Why complicate things further by not being able to readily put a foot down in order to save yourself from hitting the deck?

That’s the number one advantage of flat pedals: you can almost always instantly get a foot (or two) to the ground when needed (no getting stuck in the pedal). And, easily get your foot back on the pedal when needed…


Mary, Bad

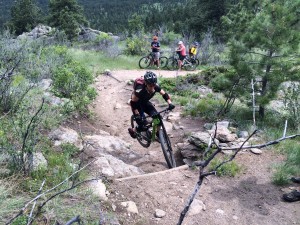
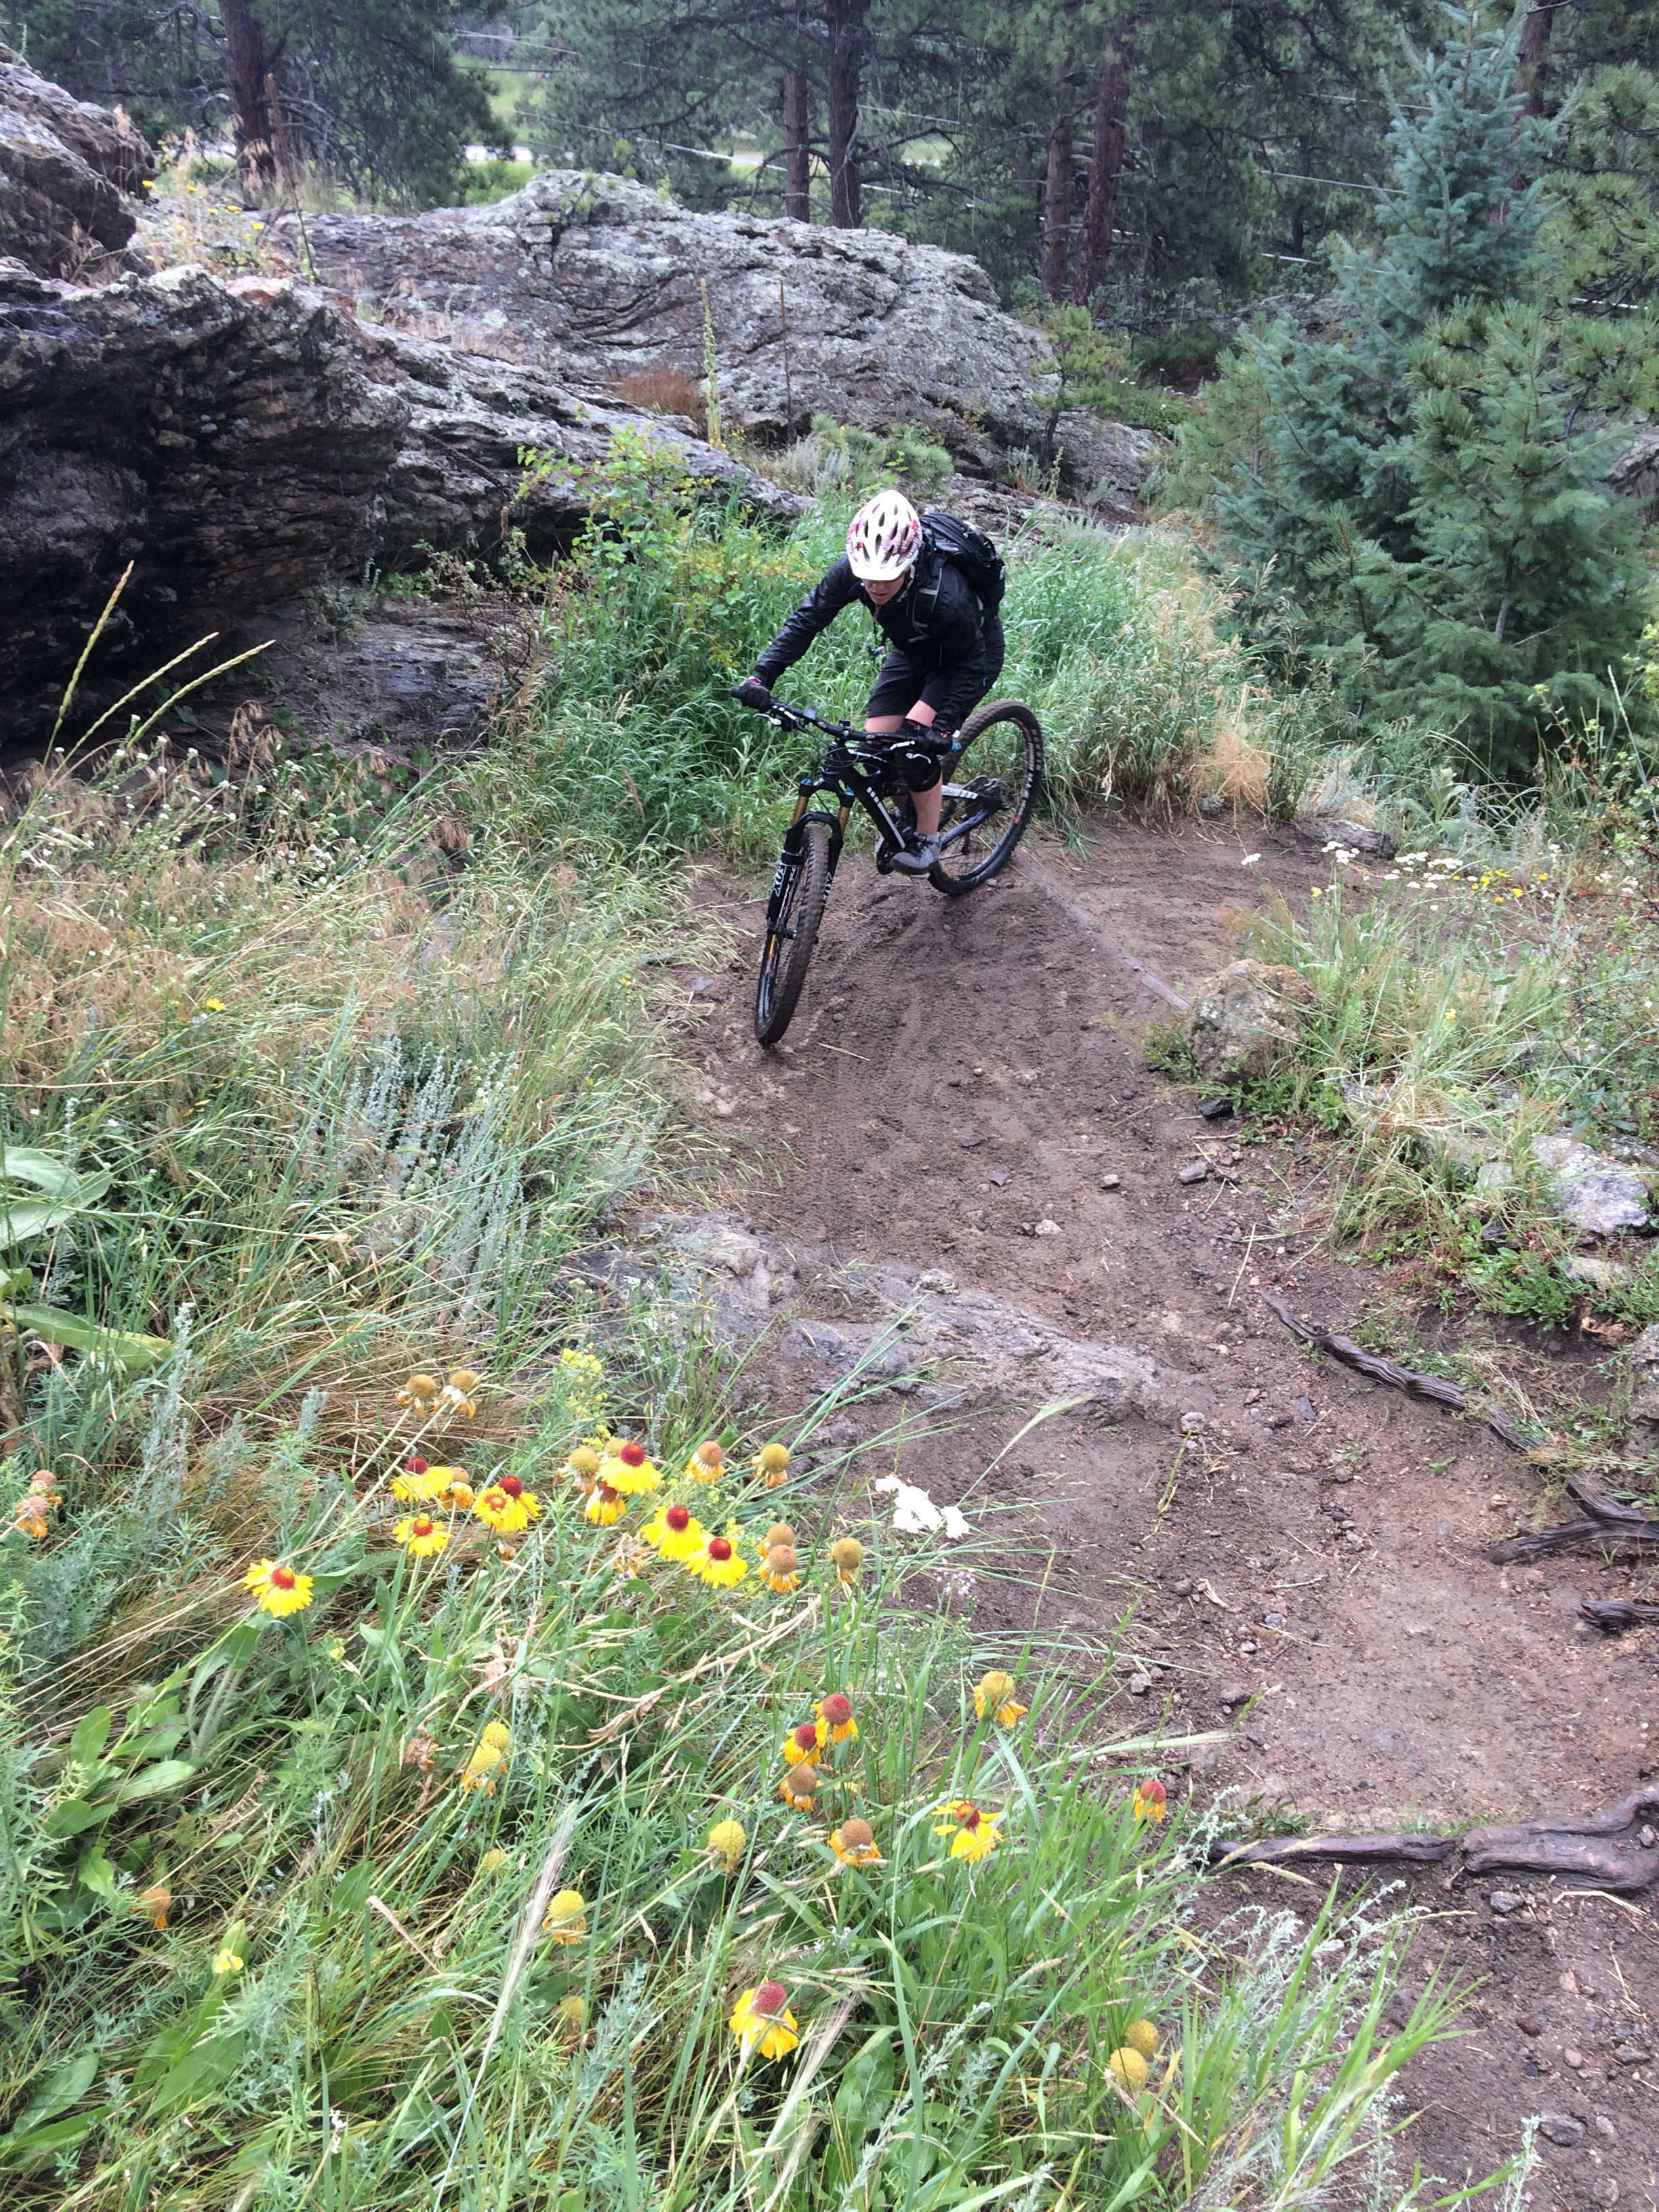
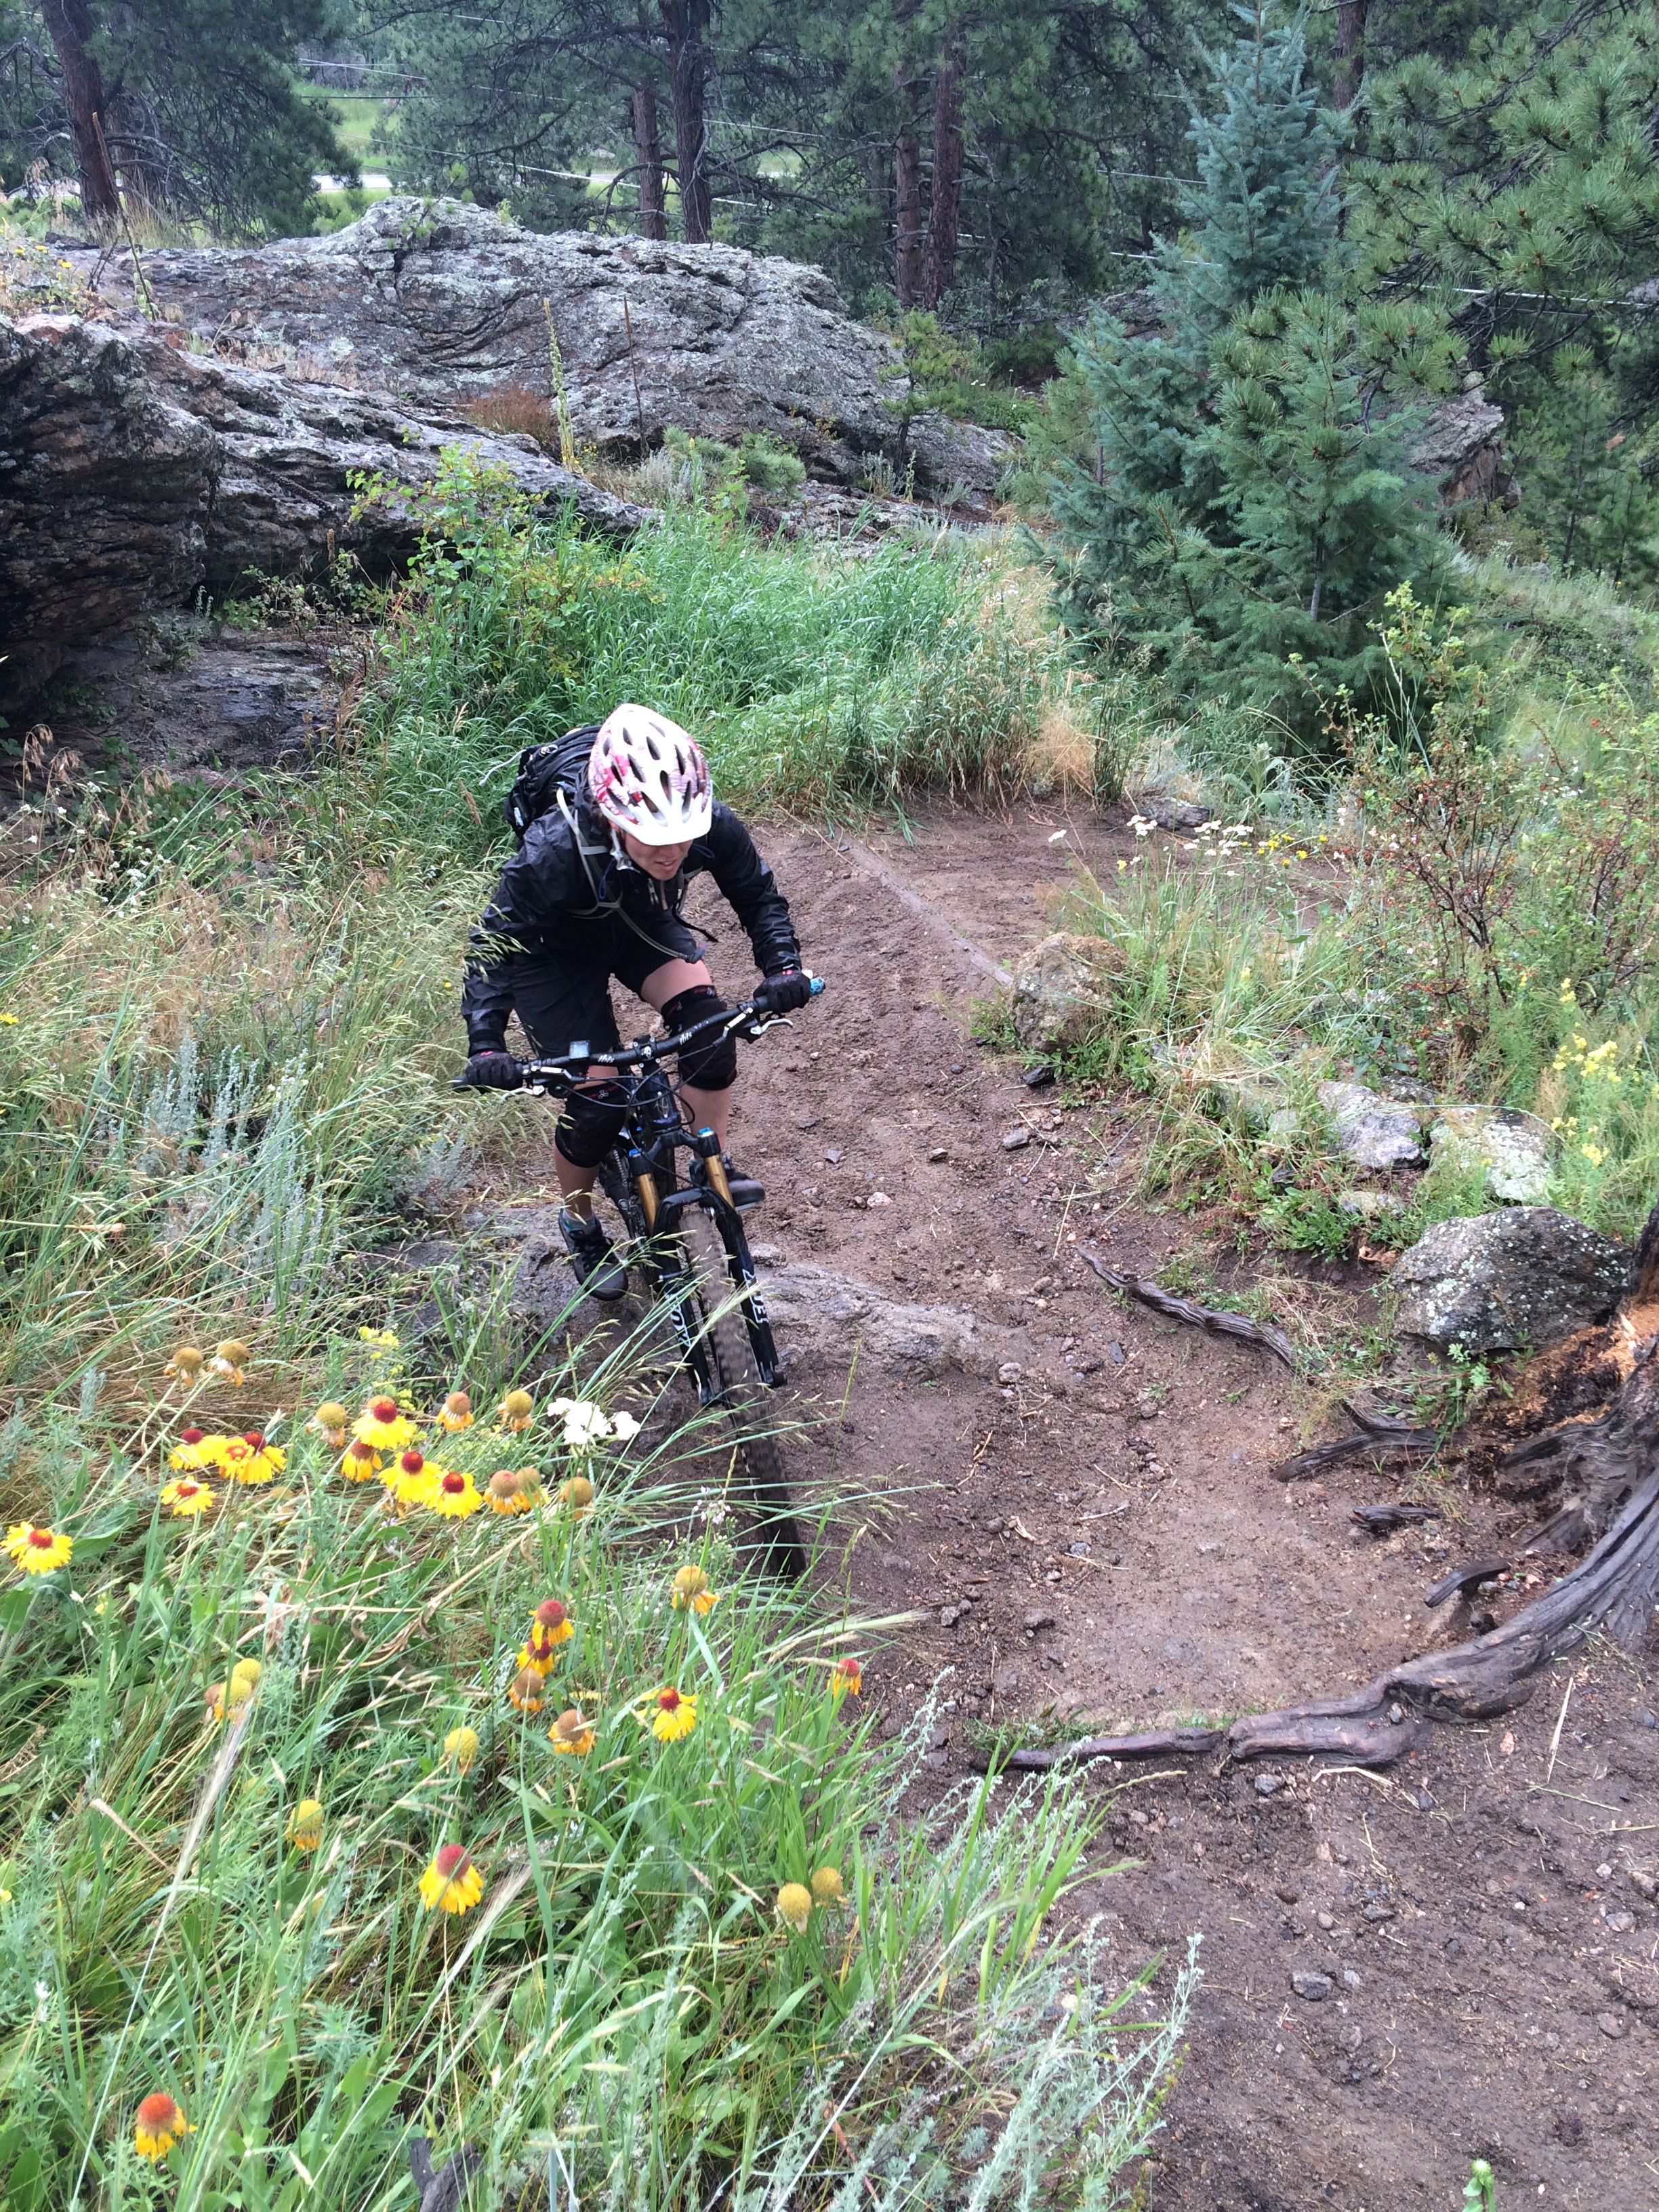
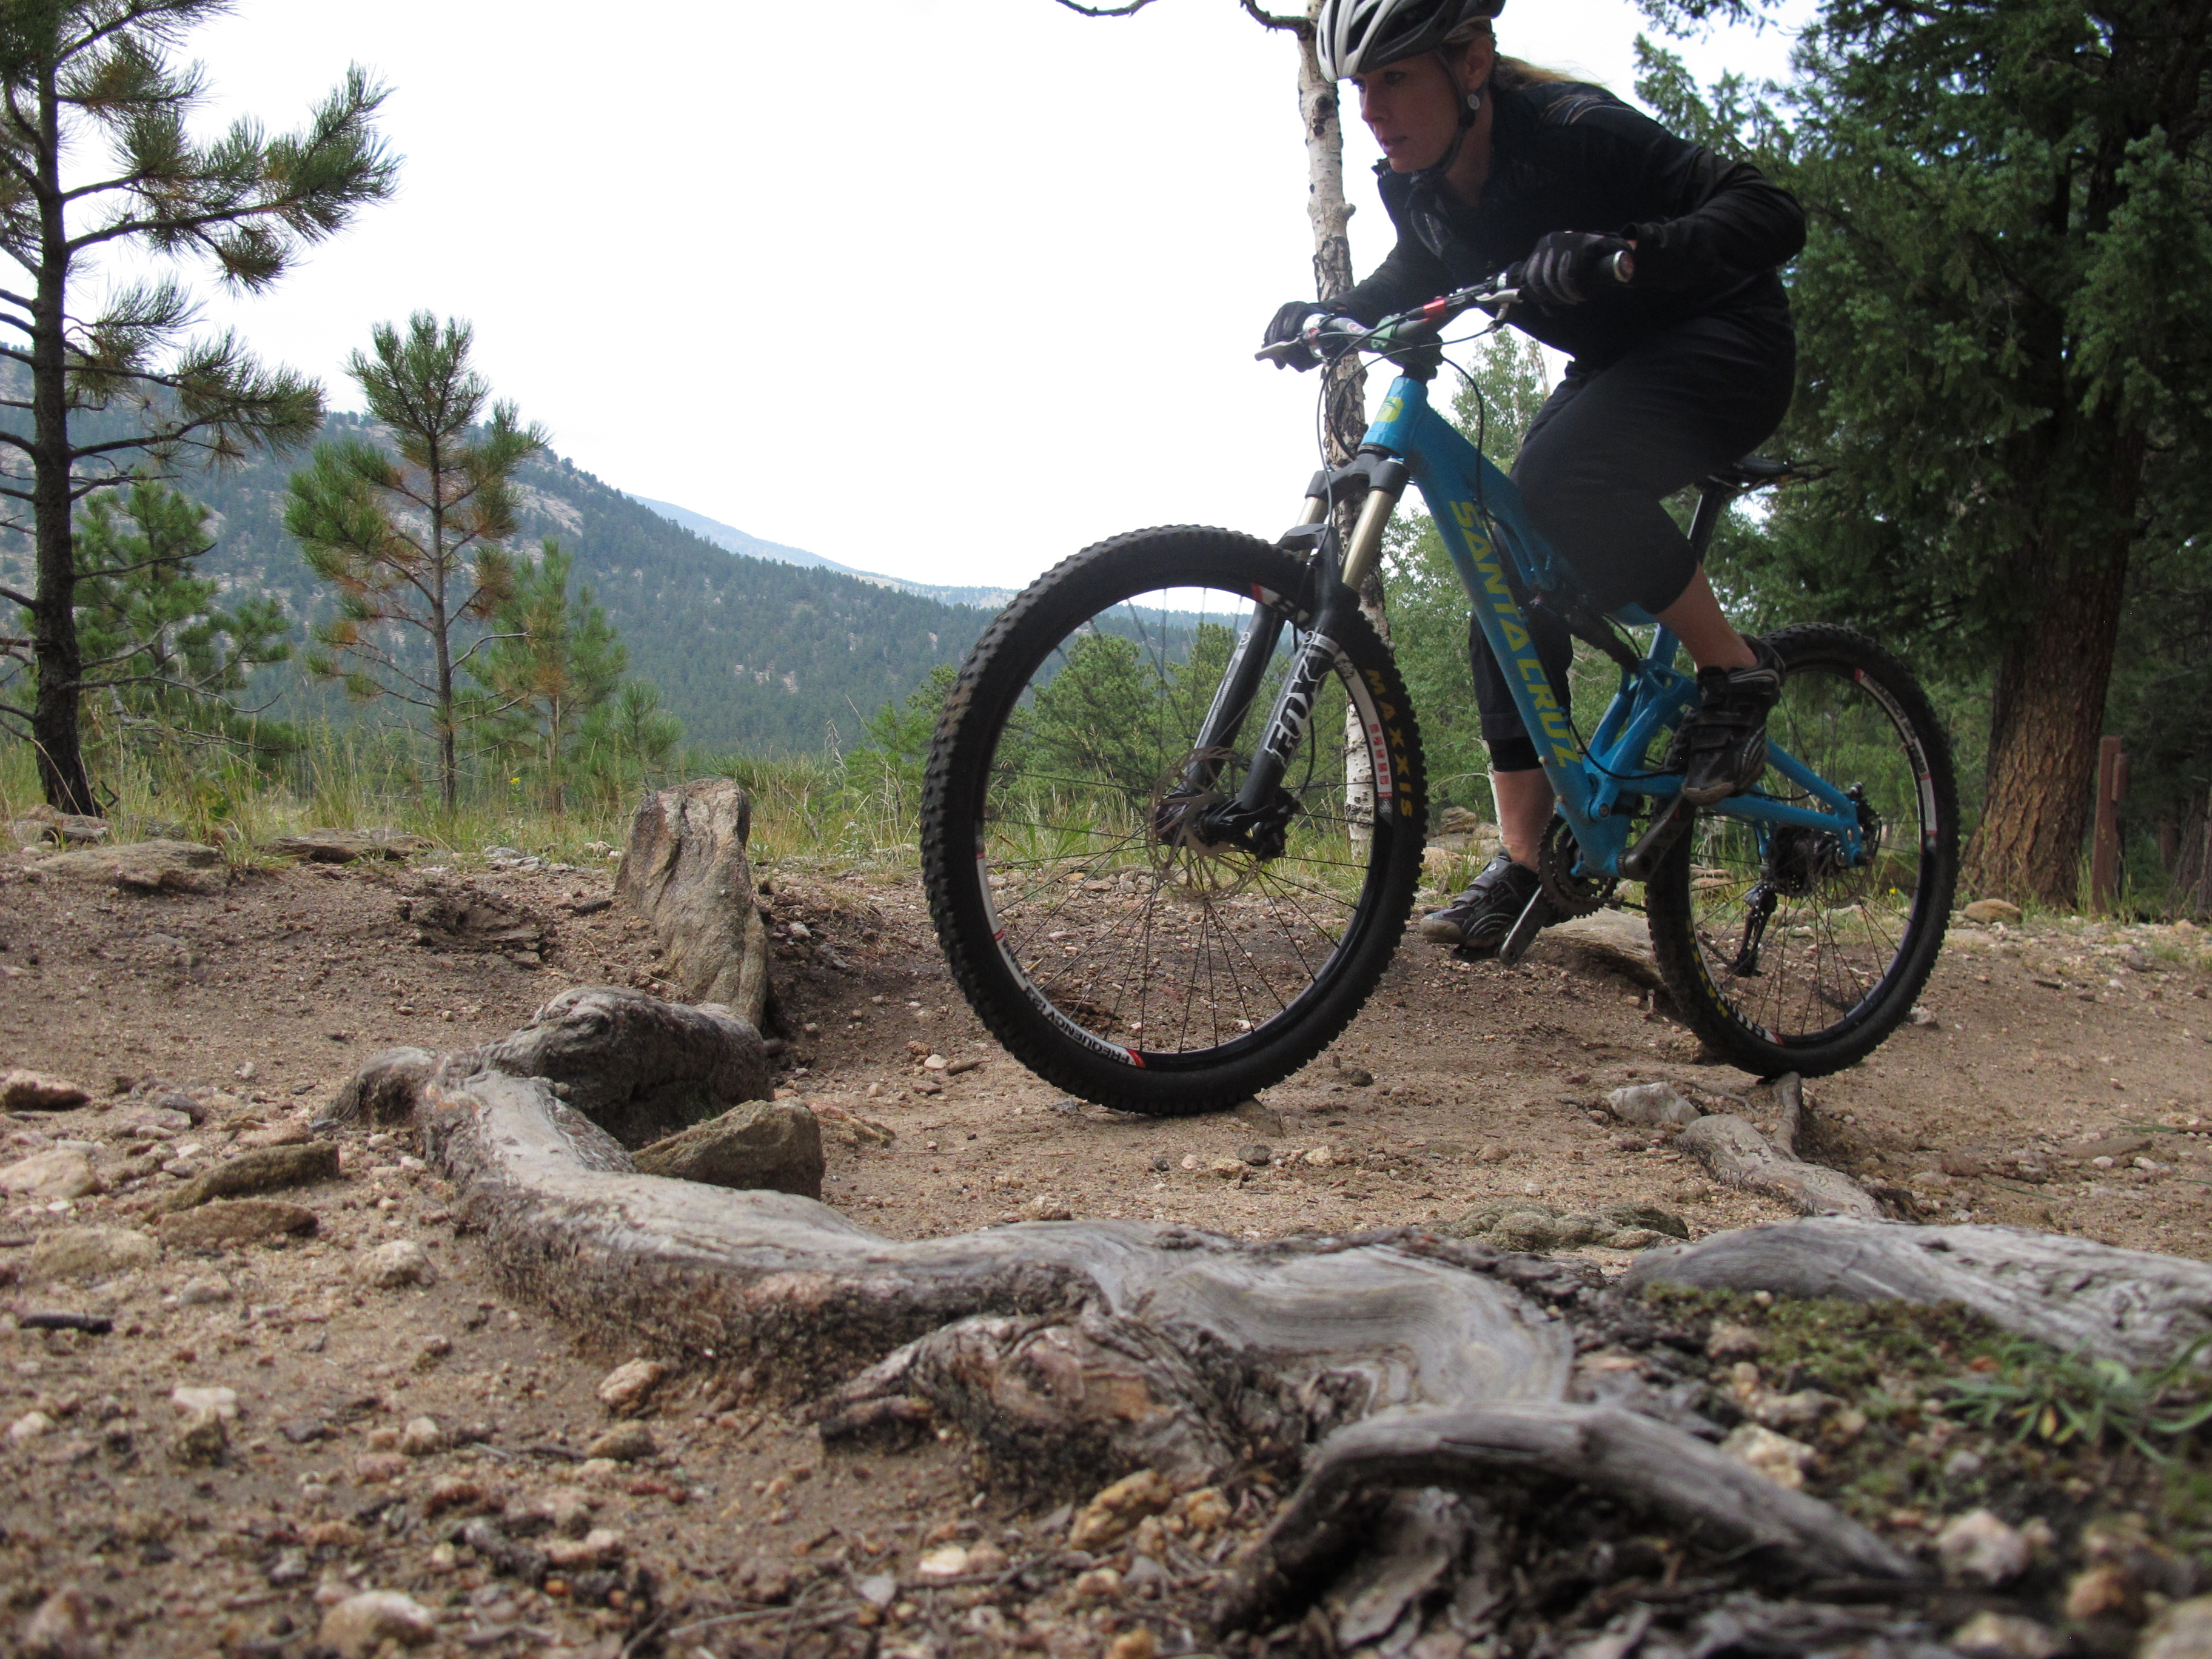
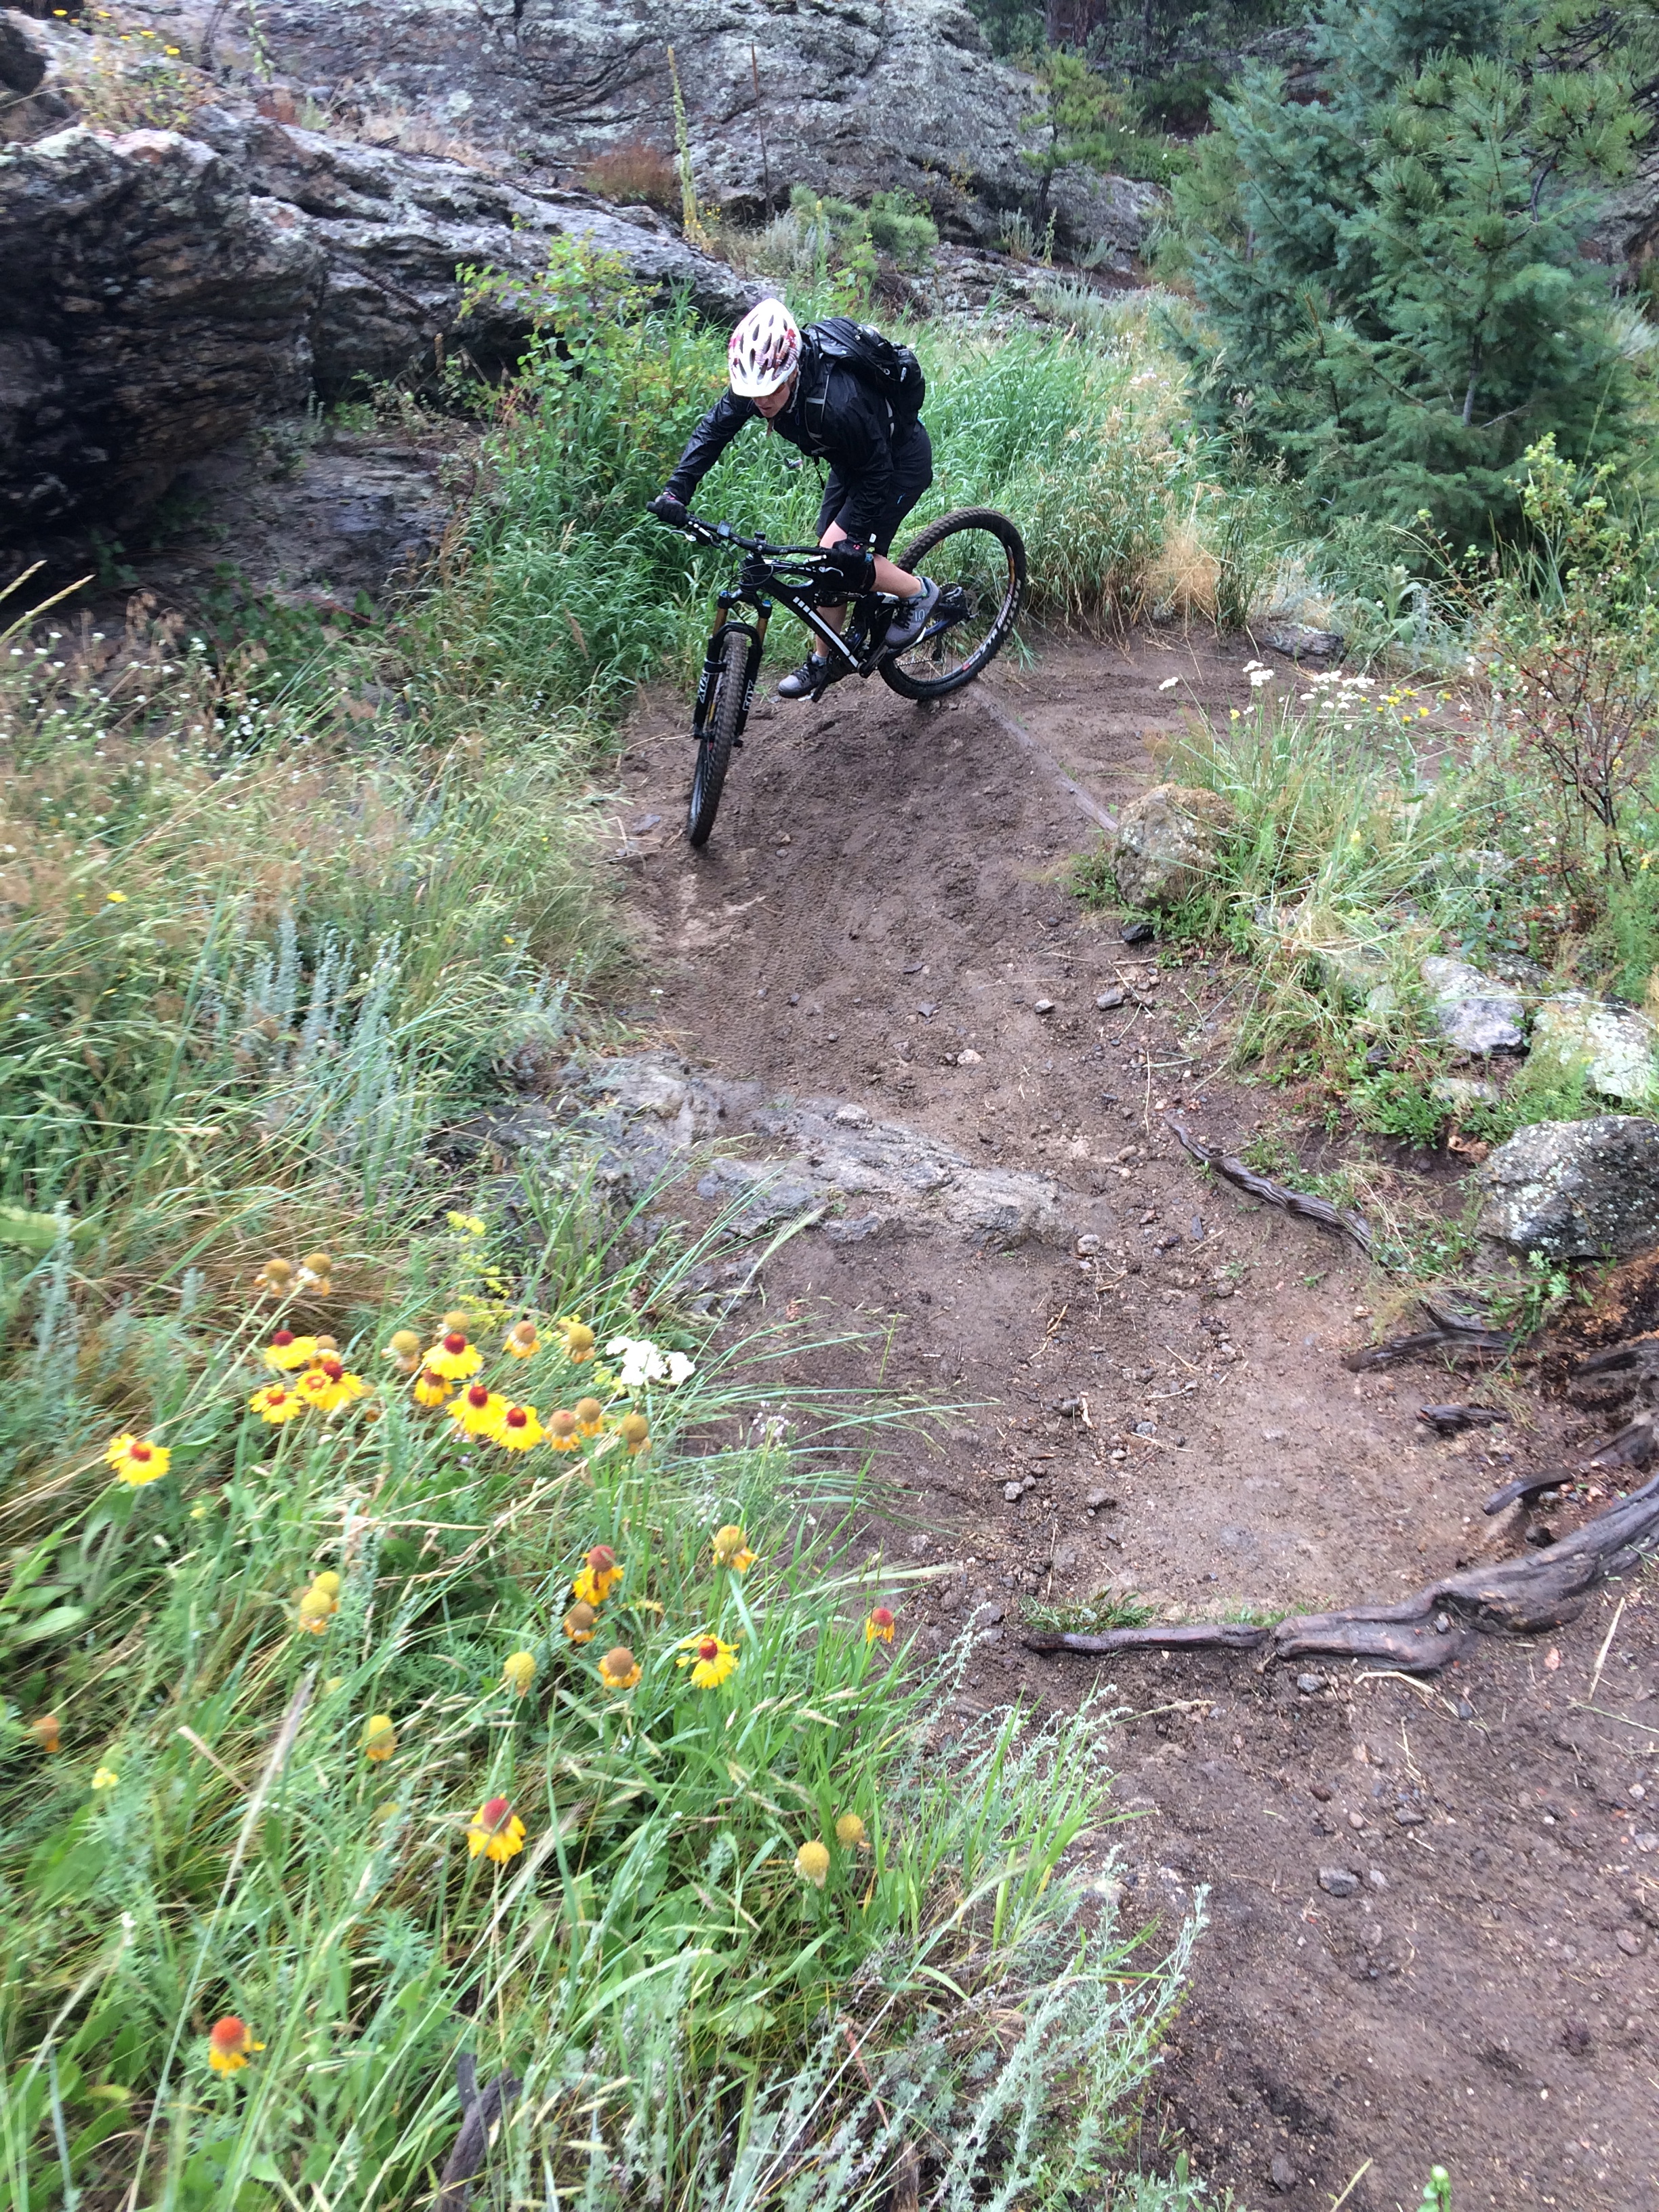
This rider has made a few mistakes on this climb and has come to a sudden halt. As you can see, she is twisting her right foot to get out of her pedal and get a foot to the ground safely. Often, with clip-less pedals, the twisting motion can take a bit too long–especially for beginner riders–and the rider ends up taking a tumble on the rock because they can’t release their for quickly enough.


Not surprisingly, beginner riders (no cycling background at all: no road, triathlon, etc.) don’t have much of an issue starting out with riding flat pedals. Flat pedals—and not being attached to the bike—feel way more natural than being clipped in. These riders are usually terrified at the thought of clipping in. Good for them. The all important basics of MTB will come to them a lot quicker and easier with flat pedals than if they started out with clip-less pedals and they’ll be way safer and more confident on the bike.

The group that suffers the most from the pedal choice/situation/dilema are riders that are new to mountain biking but that have cycling riding experience in the areas of road, triathlon, even true XC  (“cross country”) mountain bike racing (which is seldom involves riding technically difficult terrain). Unlike the first group, who is scared to clip in and attached to the bike—and rightfully so—this group, because of their previous experience in other riding disciplines (where you do clip in and reap the benefits because most of it can easily be done seated and with high pedal cadences), is comfortable being clipped in… and they freak out when they are not attached to the bike. One of the biggest reasons why MTB riders won’t ride flat pedals is because when the bike starts bouncing around, their feet bounce off of the pedals. This is obviously not good. So, they clip in. No more bouncing off the pedals! Problem solved, right? The bummer with this is that the rider wasn’t bouncing off of the pedals because of the lack of a retention system, he was bouncing off of the pedals because of improper technique which will lead to all kinds of other problems down the road. He may getting away with improper technique for the moment, but he essentially put a band-aid on the real problem and is now developing bad technique and bad habits that will eventually catch up with him.

And that’s another advantage of flat pedals. Flats force the rider to do things correctly on the bike: proper body position and weight placement will provide pedal pressure and range of motion in the legs. This will allow the riders feet to “follow” the pedals as the bike moves around under the rider and the rider will not bounce off of the pedals in the rough. Thus, the rider has to maintain this proper riding technique, creating proper riding habits in the process. This proper position and weight placement is the foundation of proper MTB riding. Flat pedals make you do these things correctly.


Mary, Good Line copy

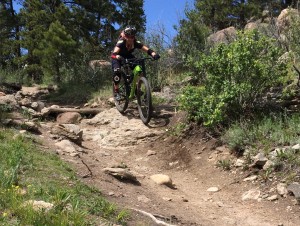
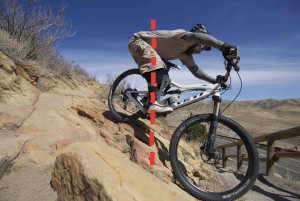
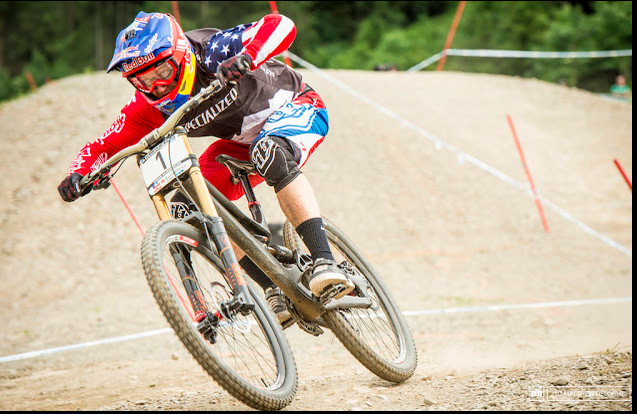
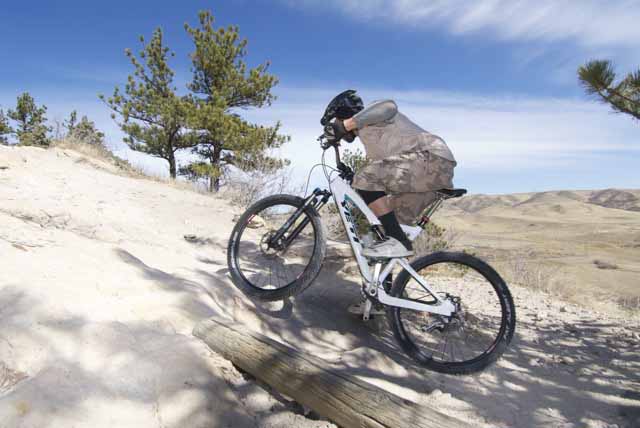
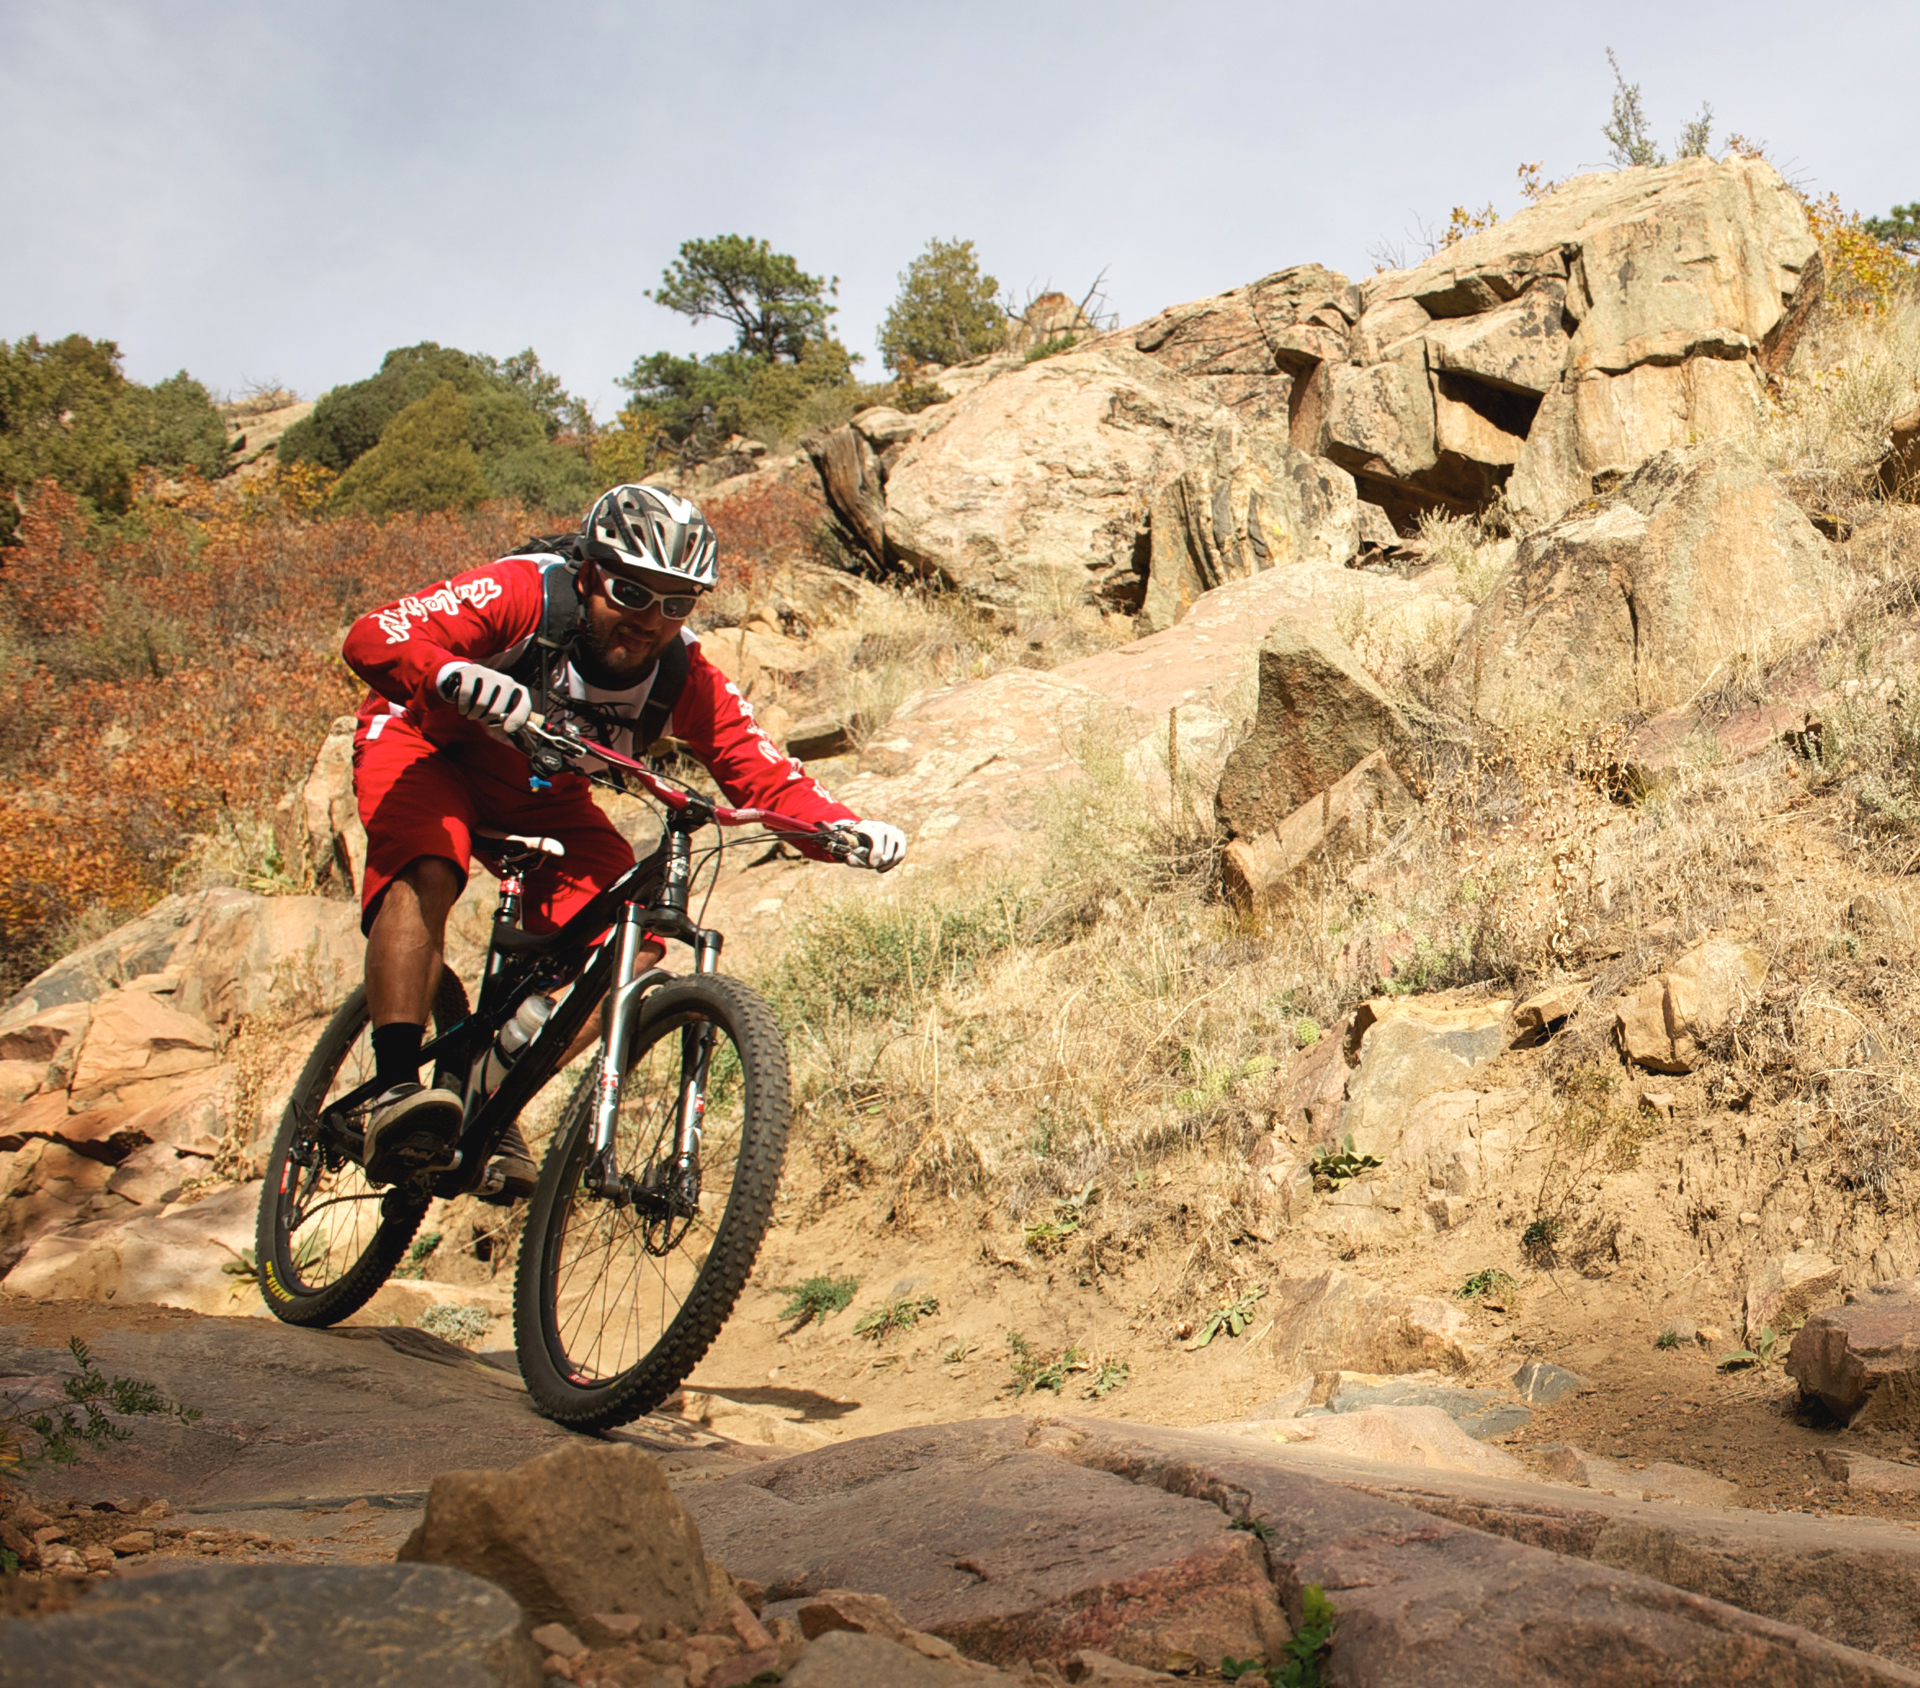
While clip-less pedals will definitely aid in keeping a rider’s feet on the pedals in difficult terrain, proper body position and weight placement–as seen here–are crucial and are the main factor in keeping a rider glued to the pedals.


How about pulling up on your cleats to “bunny-hop” or unweight the rear wheel? This is Terrible Technique 101. This may work for a bit, and this may be the way your buddies tell you to get the bike off the ground, but—mark my words—you WILL pop out of your cleats at the wrong time and it’s going to hurt really bad…. Lifting the bike properly is about leverage and doing a few simple things correctly. Many pro downhillers ride with flat pedals as well as all BMX’ers. Your cleats are not for bike handling.

Another problem with group that starts MTB riding clipped in? Very often, they never develop the ability to ride the bike at extremely slow speeds. Any rider that has ridden clipped in for any length of time has had the dreaded (and possibly embarrassing) experience of slowing or stopping (or maybe stalling out on a climb) and needing to immediately put a foot down; however, for whatever reason, the rider can’t quite get her foot out of the pedal, and, BAM! She’s toppled over and hit the ground. Usually these falls are simply that: toppling over at slow speeds, not even crashes, really. But, in the wrong situations, this can be extremely dangerous (over a cliff? Into traffic?). And, even just toppling over— especially if its on jagged rocks—is going to hurt. Once a rider has had this experience with clip-less pedals, it’s in the back of their head every time they slow down to extremely slow speeds…so they don’t ride at extremely slow speeds, and if they do, they always take their foot out nice and early.

Unfortunately, being able to ride at extremely slow speeds, with both feet on the pedals, and under control is a must in technical MTB riding [check out this video at the 2:05 mark. Notice how riding slowly is extremely necessary in order to ride these steep trails sections]. Again, on super easy, flat trail, or the road, you can take a foot out early—you don’t need much control at these slow speeds. But this won’t work—and is quite dangerous— in the nasty stuff.

In my instruction clinics, we cover switchbacks extensively. A true switchback is a 180 degree, very tight turn, on a very steep section of trail. These are some of the more difficult features out there. I don’t care who you are or how good you are as a rider, with very few exceptions, switchbacks will need to be taken at very slow speeds. You simply can’t change direction to that degree, with that tight of an arc, unless you are moving very slowly. And, quite often, because of the steepness of the terrain and erosion, there will be rock ledges, tree roots, water-bars, etc. present on the trail’s surface…and the switchback will be on the side of a cliff! The fact of the matter is, if you can’t ride extremely slowly, with confidence, under these conditions…you can’t—or shouldn’t—ride this trail. I consistently get riders that are itching to know what the magic formula is to being successful on switchbacks. Bad news: there isn’t one. Switchbacks require a rider to (often) do many basic things correctly—without the benefit of momentum: nine times out of ten, the rider’s inability to ride slowly and under control is the main problem.

There are many other examples where the ability to ride slowly is a must. Most of these involve clinging to steep, rocky, loose terrain where making mistakes just isn’t an option. Again, if you can’t ride slowly because of bad habits you developed with clip-less pedals, you simply won’t be able to ride these types of trails. And most fun trails will have at least a a bit of this type of terrain.


Spank Pedal 1Spank Pedal 25.10Sole

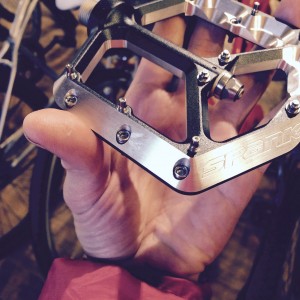
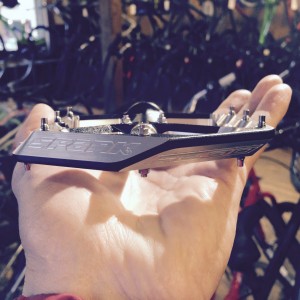
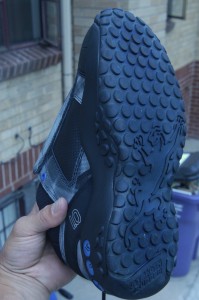
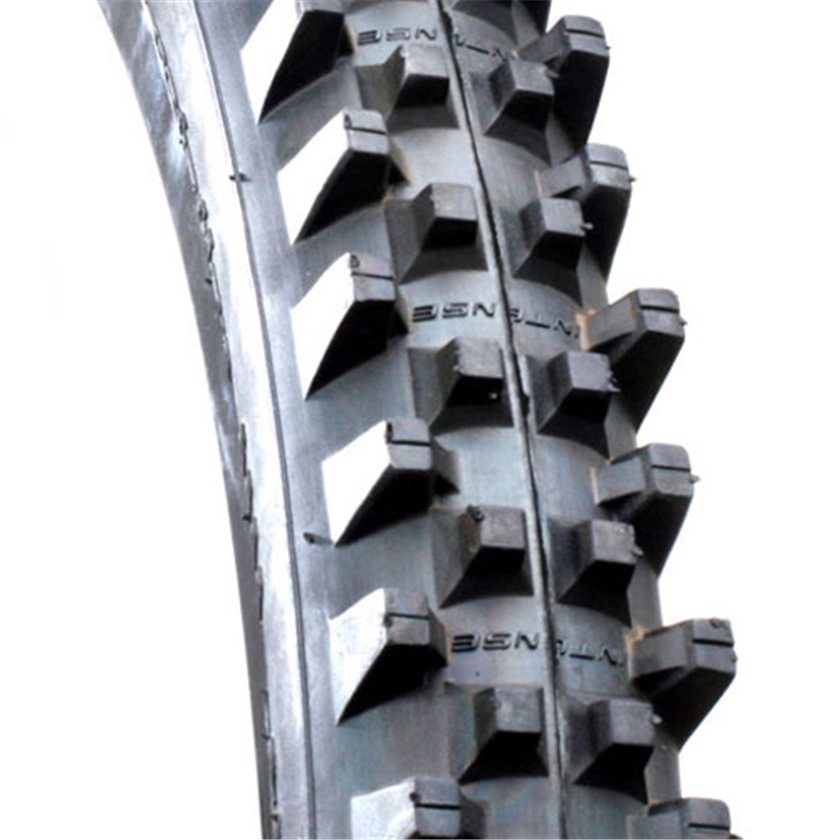
Stay away from cheap, low-quality flat pedals. A quality flat pedal will be thin with a large platform, have a parallelogram shape when viewed from the side (so it spins under your foot when stepped on), and have replaceable pins. These features combined with a shoe that has a flat, low profile, and soft soft rubber sole (5.10, Vans, etc…a decent skate board shoe will work) will provide more than adequate traction on the pedal.


What are the advantages of clip-less pedals?

Efficiency at the shoe/pedal interface is one. Shoes that are compatable with clip-less pedals will have a much stiffer sole relative to flat pedal shoes. The cleat on the bottom of these shoes will be made of metal and it will engage in a metal pedal. These are hard surfaces and there will be very little energy loss between shoe/pedal interface. On the contrary, flat pedal shoes are almost always pretty flexible and the soles are made of soft rubber to get a better purchase on the pedal. I can almost always feel a little “squish” of a flat pedal shoe with every pedal stroke, thus, there is a decent lose of energy.

Another advantage is the ability to “spin like a roadie”. As alluded to above, remaining seated on the smooth sections of trail and spinning a high cadence is arguably the most effective way to deal with these trail sections and provide the most efficiency and net speed over larger distances (but not very effective in a short distances, like a sprint…where the rider will almost always be out of the seat for maximum power). And, even on the most technically difficult rides out there—though you’ll need to get out of the seat on the nasty stuff—you’ll very often have a lot of ground to cover that is not technical at all and, thus, falls into this category.

***Note: there are people out there that will state that clipping in has no advantage what-so-ever over flat pedals, even in terms of pure pedaling. They’ll site various graphs and charts and numbers, etc. as proof. I’ll call BS on that. I’ll site road racing as an example: high cadence, seated pedaling, on smooth surfaces, while clipped in… That is what professional road racers do, for the most part. The type of pedaling that I’m referring to in this instance—on a smooth trail—is quite similar to road racing and not to what we would need to do in steep and varied terrain— rough trail. While there definitely are a lot of times when the perceived advantages of clip-less pedals are negated, I believe they do hold a pretty big advantage on smooth sections of trail where the rider can remain seated and utilize an efficient high pedal cadence. If someone tells you that there is no advantage to clipping in, ask them, ‘then why do roadies do it?’

So when and where would you ride flats over clip-less and vice versa?

I’ll use this example. Last summer I rode a super fun trail. It was a long, multi-hour climb out and to the top of a ridge. Then, all the way back to town, the trail descended on the very top of this rocky ridge. This was a few miles in duration, and it was steep, technical riding the whole way back. It was literally a rocky spine with a decent sized steep drop to either side.

I was riding clip-less pedals on that trip. There are a few different types of clip-less pedals, Shimano SPD’s being one of them. I love the feel of SPD’s over any other type of pedal, but one of their drawbacks is that once they get a little dirty—this could be mud, snow, or even a lot of dust, as was the case on this ride after a long day in extremely dry conditions—it can be a little tough getting in and out of the pedal. Not being able to get out of the pedal, when needed, on this trail was not an option. It would mean almost certain injury. It would have been very nice to have flat pedals, and, thus, to be able to abandon ship at will. If I ride that trail again, I’m throwing some flats on!

Anytime you feel a little intimidated by the terrain, flat pedals are a nice go-to just for the safety factor. But, you have to first put the time in to feel comfortable riding them. Once you get comfortable on flats, you’ll be able to go back with just a slight adaptation period.

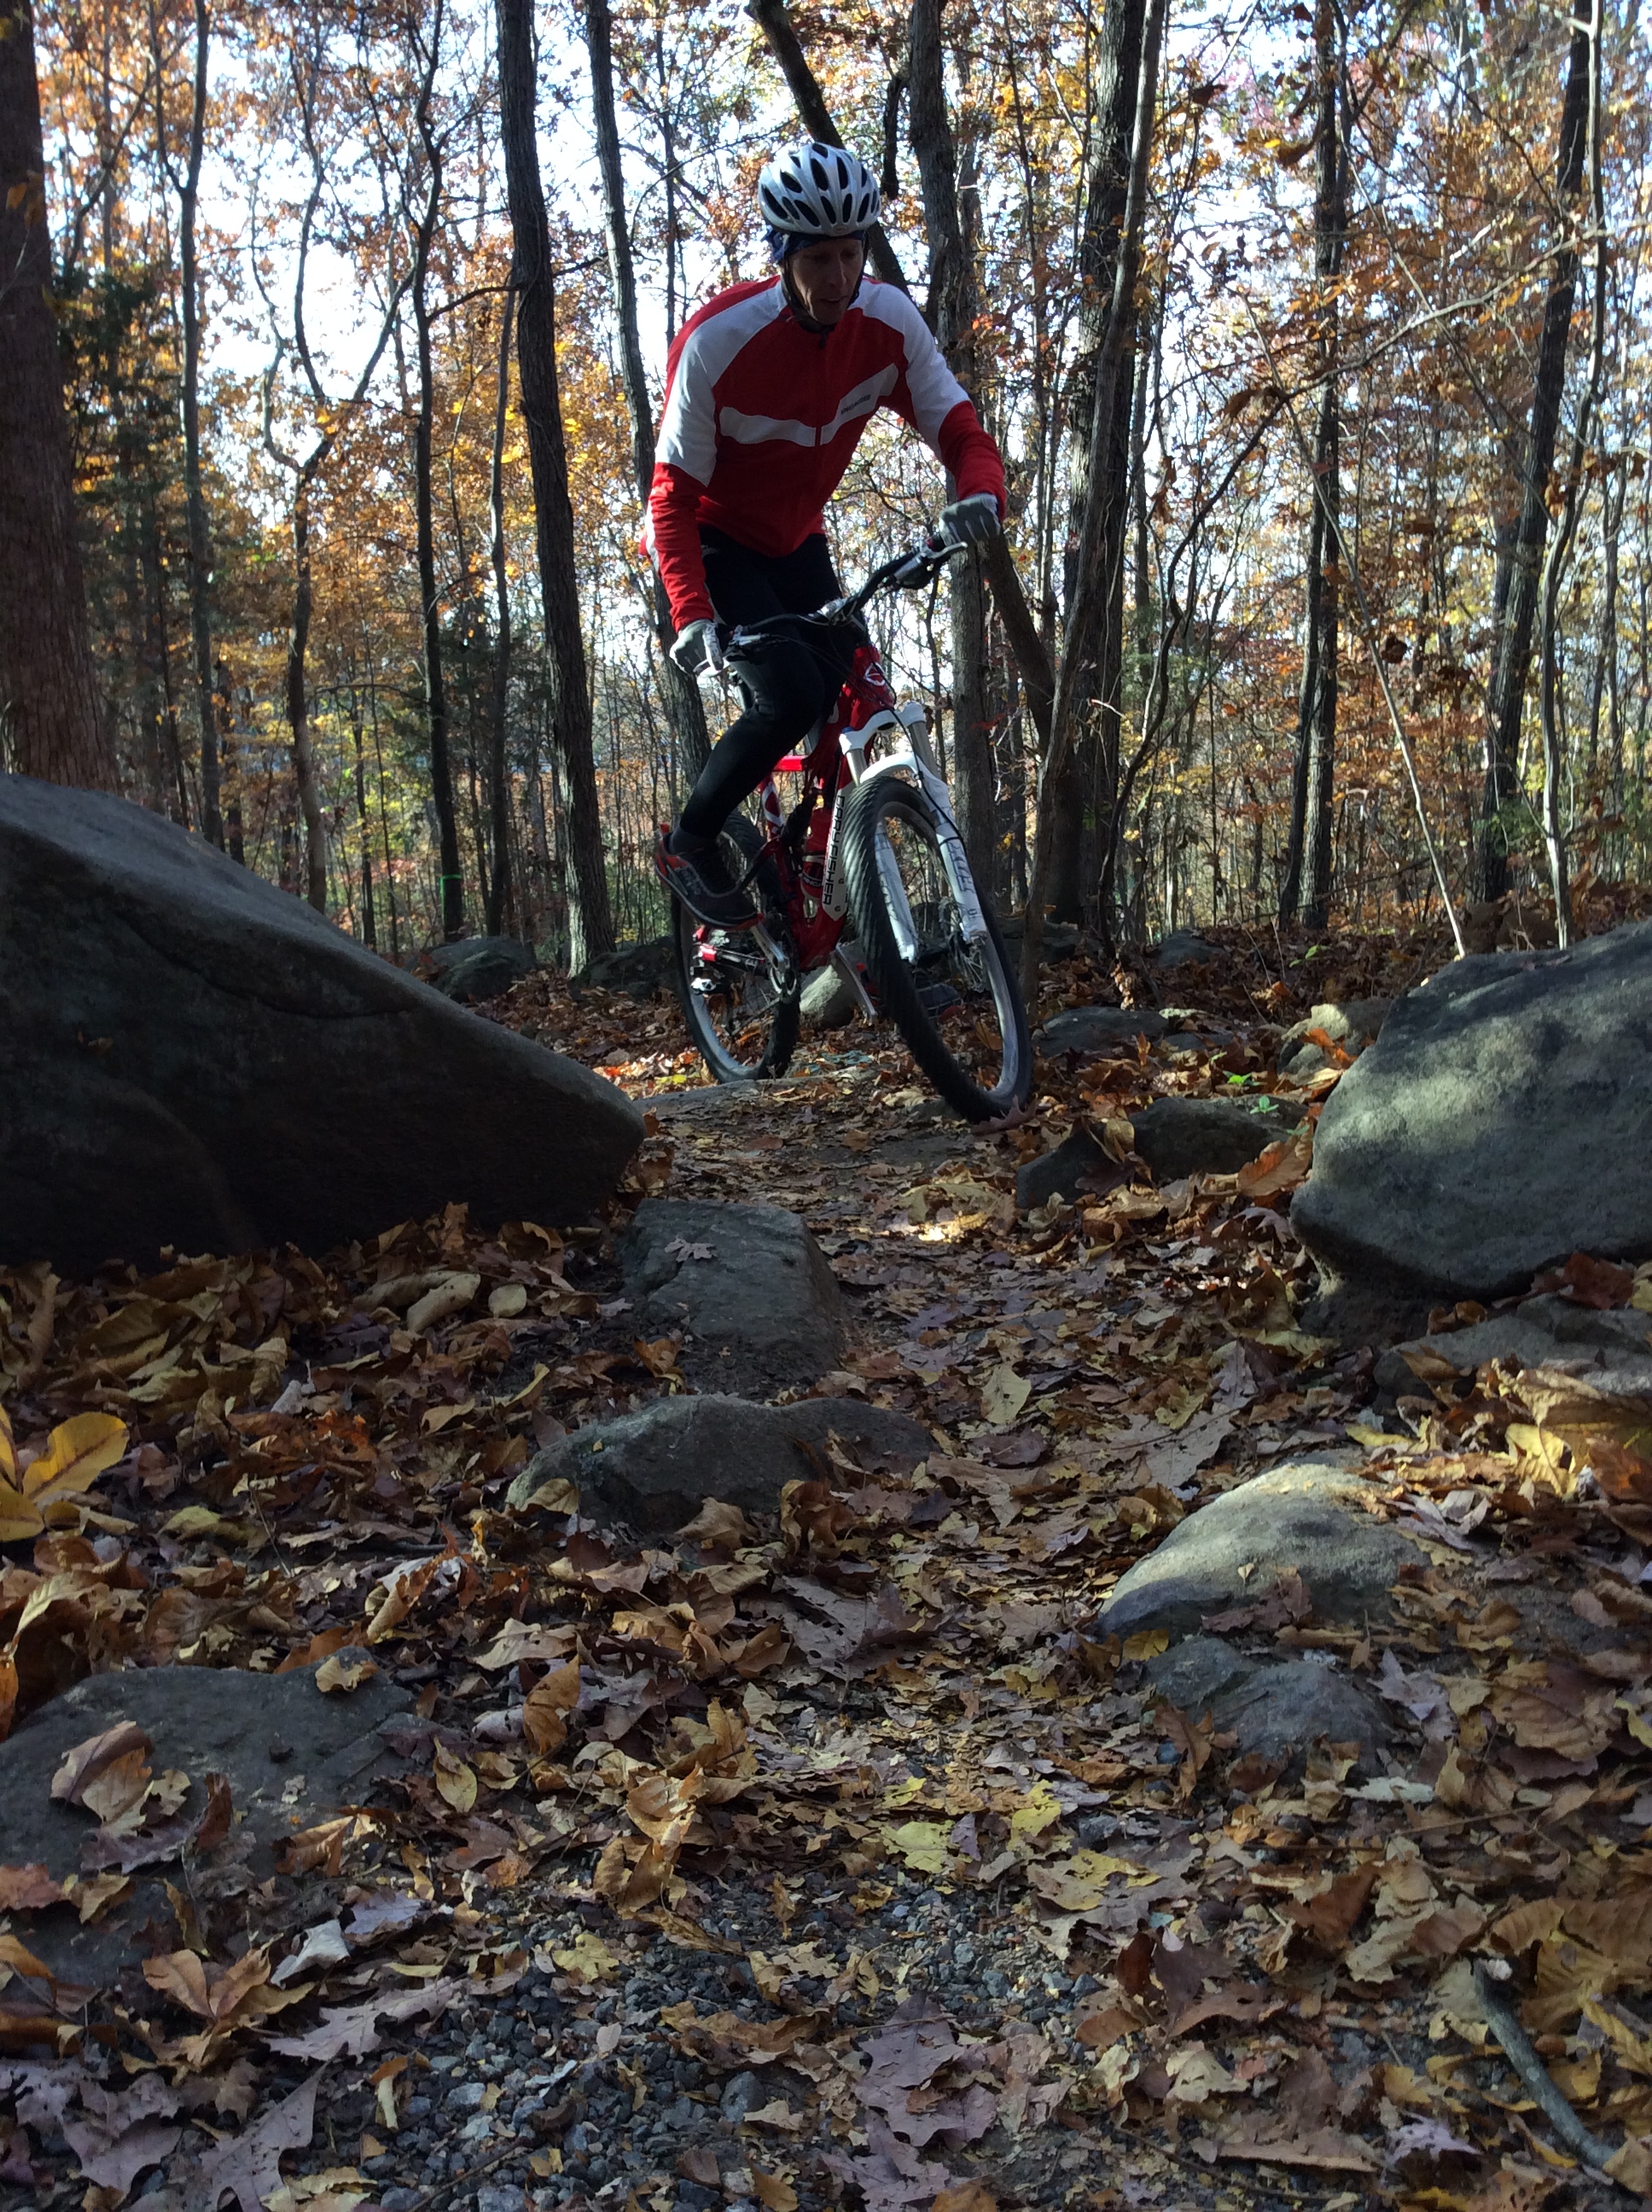
I’ve had similar experiences in exactly opposite terrain: trails covered in wet slippery leaves and roots on the east coast. These trails were by no means intimidating. But, I knew that there would be a least a few times when I would find myself suddenly losing traction and needing to immediately get a foot down. Sometimes, when things happen real fast, even the split second it takes to release your shoe from the pedal is too much. I would’ve liked to have flat pedals for that ride.

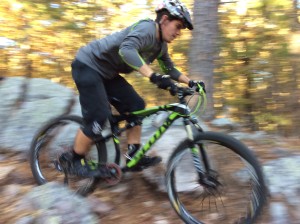
Even at my advanced age, I still do a bit of dirt jumping. I always ride with flats when I dirt jump. The last thing I want, is to be attached to my bike when things go bad in the air.

On trails, I almost exclusively ride clip-less pedals over flats these days. Why? Especially since I’ve been touting flats and kinda dogging and discrediting clip-less in this article? First, keep in mind I raced years and years of professional downhill exclusively on flats (however, I have always clipped in on XC and trail riding). I feel pretty good about my body position and weight placement on the bike, much of which I learned because of the time I spent riding flat pedals. I do enjoy the benefits of clip-less pedals, namely their efficiency.  I also feel real good about being able to get in and out of my clip-less pedals (most of the time). And, finally, when I do ride like a goon and make huge mistakes…instead of blowing off my pedals and crashing, my feet are right where I left them: on the pedals!!!

But, again, riding flat pedals played a huge role in my learning and understanding of proper riding technique. I am very comfortable with either set-up and can easily go back and forth depending on the riding conditions. I highly advise any MTB’er who wishes to become a good technical rider to spend a bunch of time on flats, enough to get comfortable riding them in any terrain. And, I especially encourage the beginners to lay off the clips for a while.

Of course, if you’re a serious XC racer, you’ll probably want to race clipped in, but spend some time on flats to help develop proper technique. There is a learning curve to flats. So, if you’ve never ridden them, don’t throw a pair on your bike right before the big race or a huge ride with your buddies…give yourself some time to figure them out in a very controlled setting.

That’s it for now. Check out www.dirtsmartmtb.com for more on MTB skills instruction and coaching, scheduled clinics, skills videos, articles, blog…

MTB Technique: (DON’T!) Lean Back

Getting Hurt Sucks!

In many sports, if you do things wrong, you’ll simply end hitting a plateau with your skill level, and, well, maybe, just kind of suck for a while… And, often, that’s OK!!! Maybe you’re not the star player on your beer league softball team or you end spending a lot more time looking for your golf balls in the woods. No biggie…It’s just a game. Who cares?

However, with some sports (like mountain biking) there is a pretty good chance of getting injured if you make it a habit of doing things wrong. Proper technique is key to avoiding injury. Proper technique means more control, which directly affects safety, efficiency, and speed. It’s all tied together. It’s all about the human body working optimally, in an athletic sense, with the way the bicycle was designed to work.

There are many reasons why improper techniques and bad habits develop for riders. Often, the way we do things—movement, vision, etc.— are typical movement-habits that we’ve had success with in other athletic activities and we naturally bring them over to MTB… where they may not work so well. Many times, good technique is quite counter intuitive to what most riders believe and also what is perpetuated around riding circles and the internet. In fact, even high-level riders often aren’t aware of what they are actually doing on the bike (bad advice from “good” riders is incredibly common).

So we’re going to take a look at many MTB’ers first deadly sin: leaning back when things get steep and scary.. We’ll get into the reasons why most riders are guilty of this at some point and to some degree, and why this will get you into trouble. And, of course, we’ll address what the proper technique is and why its necessary.

The Oldest (Terrible) Tip in MTB

If you haven’t heard that we need to “Lean Back” on drop-offs, steep downhills, etc., don’t worry, you will. Its one of the oldest tips in mountain biking. We need to “lean back” so that we don’t fly over the handlebars on the steeps, right? Well, I’m here to tell you that one of the best ways to end up going over the bars is too get in the habit of leaning back when things get steep.

Here’s how it works:

When we lean back, we get all of our weight is over the rear wheel. Which means no weight is on the front wheel. So now—because the front wheel is weightless—it will easily roll up and over obstacles, through transitions, etc. So when we hit the transition from steep to level at the bottom of the creek bed, or the big log or rock on the steep downhill, our front wheel will roll right on through or over. So, it works! Sometimes…but, this technique will catch up to you sooner or later, and probably in a bad way.

There’s a lot more to successfully negotiating tricky stuff than just getting the front wheel to safety. When we lean back, big problems occur because of what happens to our rear wheel and our body mass. Because all of our weight is on the rear wheel, all of our force is pushing it into the ground. Because of this, the rear wheel is not going to want to roll up and over obstacles and through transitions. In fact, it will start to get “hung up”, or stall or stop, when it meets an obstacle. However, because of gravity and inertia, our body mass will continue to move forward, even thought the bike is now stalled. And that’s when it happens! Our weight and mass will end up thrown forward onto the bars and onto the front wheel. Now, the front wheel won’t roll over obstacles—it will stop—and we’re taking a painful trip over the bars. By leaning back, we actually ended up getting thrown forward. Classic mistake. In this situation, even if we are able to keep from going over the bars—by sheer strength, luck, whatever—we will have killed our momentum and speed and wasted a ton of energy fighting our body mass and inertia.

Got ROM?

Another problem we run into when we lean back is running out of range of motion (ROM) in our limbs. ROM in our limbs is the natural suspension for our core and head. Maintaining a balanced and stable core and head is essential to any effective movement, balance, vision, etc…all very important when riding a mountain bike in nasty conditions. When we lean back and our arms and legs are straight (very little ROM), we stand a much greater chance of getting jarred and thrown off balance; any bit of movement in the bike—side to side, sliding or bouncing, or falling away from us; like on a drop-offs—will be directly transmitted to our core and head. This is bad because we’ve given up stability and balance and our bodies will always need to fight to right the ship before we can be effective with any movement. In my instruction clinics, I use the example of having an imaginary glass of water on our heads as we descend and this glass of water shouldn’t not only spill or slosh around, but it should be calm and smooth. Your glass of water will be long gone if you start leaning back.

When we lean back on the bike, our arms and legs become straight. We can’t allow for our arms to straighten if they are already straight. So if we lean back before that drop-off, and then the front wheel has to drop two feet, guess what? We’re going to get pulled two feet forward and down because we had no range of motion left in our arms. Now our weight ends up on the front wheel, right where we didn’t want it to be, just like the example above. Again, we ended up being pulled forward because we leaned back. Bad technique 101…

So, What Should We Do?

What is good technique? Well, instead of leaning back on descents, we need to keep our weight and our “line of force” on the bottom bracket of the bike (what your cranks are connected to and rotate around). This means that we aren’t leaning at all. Now, often, even if a good rider is correctly positioned and has proper weight placement over the bottom bracket, it appears as if the rider is “leaning back” because the bike has pivoted and is pitched forward, matching the steepness of the terrain. This is a big reason why riders pass around the advice of leaning back on the steeps: because it looks like the pro rider is leaning back, even though their weight is on the bottom bracket of the bike and they are not leaning back at all. This proper weight placement and line of force allows the bike to pivot around the bottom bracket, allowing both wheels to adequately roll up and over obstacles and not get hung up. This is essential. This is the way the bike was designed to work. This also means smooth momentum paths for the rider (and, of course the rider’s core and head) and efficiency instead of being jarred off balance and wasting energy. This means safety, control, and, yes…speed. Essentially, we will no longer be fighting our own mass and the laws of physics.

In my clinics, another “check” that I use is the question of “if your bike disappears, would you land on your feet?”  The answer should be yes. This means that your weight is on your feet and properly placed on the bike. This is our our proper default position and weight placement when descending. This is definitely not leaning back.

Red LIne,Dak.Ridge Switchback

In this photo, it does appear that the rider is leaning back. However, if we draw a vertical line up from the bottom bracket, it becomes apparent that his weight is indeed on his feet and thus, the BB. If the bike were to disappear, he would land on his feet.

We’ve addressed the negative points that happen when we lean back on the bike, both in terms of how the bike functions and also in the way that our bodies work . We’ve touched upon the benefits of proper weight placement and how it allows the bike to function correctly. Now we’ll hit upon the benefits of proper body position and weight placement, and how this enables our bodies to function optimally while descending.

First, range of motion. I sometimes hear “be one with the bike”. While this may be somewhat of a figure of speech, the fact is, that last thing we want to do is be one with the bike. We need to keep a dynamic relationship with our bikes. Our core and head need to remain stable and calm for the reasons stated above, while allowing the bike to bounce, slide, move side-to-side, pitch forward and back… This means that we need ROM in our limbs, and, usually, the more the better. By getting low on the bike and providing this ROM, we buy ourselves some cheap insurance for when things go wrong. And, they will go a little wrong on drop-offs and steep descents; the traction is usually minimal when things get steep and stuff starts to happen really fast. This is not the time to get thrown off balance and/or thrown off line. By maintaining an athletic position, plenty of ROM, and proper weight placement, our bodies are able to function optimally in this pretty crucial moment.

Jacob_Arkansas

This rider is maintaining an athletic body position and proper weight placement on the bottom bracket of the bike. This allows for adequate Range of Motion in the limbs and enables the bike to pivot and move around the BB, providing a dynamic relationship between the bike and rider. The bike can bounce, slide, move over the trail’s surface yet the rider is able to maintain a balanced and stable core and head.

Our legs offer balance, support, and power for our core, or our body mass. We need to support our core with our legs and this doesn’t happen when we lean back on the bike; when we lean back we’re supporting our mass with our arms. This is not optimal movement and control of the human body. Also, our arms obviously have a very important role to play in riding the bike, but that role should not be to support the mass (that’s a job for our legs) and the fact is, if the arms are busy supporting the body’s mass, they can’t perform the tasks of small, quick, precise manipulations of the bike through the bars. The weight has to be on the legs to free up the arms to do their thing.

Another reason lots of rider lean back when things get scary is simply because they naturally want to stay away from the scary stuff! In skiing this is called “getting into the back seat” and, just like in mountain biking, this natural reaction of self preservation actually results in loss of control. It’s hard to override your natural reactions and maintain proper position, but, in this case, is so important to do so.

Will we occasionally lean back and get into the position of “butt on the tire”? Yes, we will. But only for the right reasons, and we don’t want to make a habit of living there.

Of course, there are always exceptions to the rules. You will see photos of pro riders leaning back (but this should be viewed in the context and intention of the of the pic; often cool photos aim to sell products, not reflect proper riding technique). Armed with this information, you should have some really good reasons to break that bad habit of leaning back and a bunch of good reasons to start doing it right. As always, www.dirtsmartmtb.com for more MTB skills articles and videos, full camp schedule, and a bunch of other good stuff.

Bike Pack Essentials

Most bike shops or riding buddies can clue you in on the basics that should be in your riding pack: A multi-tool (see pics below) to make adjustments to the bike out on the trail; a spare tube to fix a flat tire (flat tires are one of the most common and easily remedied mechanical problems that mountain bikers will encounter on the trail); probably a light jacket just in case the weather turns a bit; maybe a bite to snack on…Pretty simple, right? Also, your car keys, phone, and your hydration liquid of choice, etc…

However, if you are going to carry a pack—which you probably should if you’re going to be riding any distance from you’re car, home, hotel, etc.—there are a few little tid-bits that you probably want to throw in there and these things probably won’t be recommended to you by that local bike shop or your riding buddies. These are all Bike Pack Essentials that I carry in my pack and they fall under the category of “learned this the hard way” because I’ve been on a ride or two when I really needed them…but, of course, didn’t have them with me at the time.

Before we get into the contents, let’s start with the preferred size of your pack.

Three packs from EVOC (www.evocusa.com). On the left, the big dog with a capacity of 30 liters. On the right, the 10 liter (and my go-to for most rides). And in front, the ultra-hip, Hip-Pack...

Three packs from EVOC (www.evocusa.com). On the left, the big dog with a capacity of 30 liters. On the right, the 10 liter (and my go-to for most rides). And in front, the ultra-hip, Hip-Pack…


There have been many times that I have taken off on a ride without a pack. I have, however, had the very basics (phone, keys, multi-tool, spare tube) stuffed in my pockets of my shorts (zippered pockets, of course. Lost smart phones or car keys will put a damper on the good times you had on your ride). On those rides, I’d have a water bottle with me, in the H20 cage, on the bike. On these pack-less rides, I’d be absolutely positive that the weather wasn’t going to go bad on me. I would never be any more than a few minutes walk from wherever I need to be if something did come up, mechanically, that I could’t repair. And, from a safety perspective, there were almost definitely going to be plenty of people around.

So, on that type of ride: short ride, close to safety, no weather…OK, no pack…stuff a couple things in your pockets… But, Fashion Police be damned, this is a great ride for the Hip-Pack! (foreground in the photo). Throwing a bunch of expensive and important stuff in non-zippered pockets isn’t such a great idea for obvious reasons. And, stuffed cargo pockets (with shredded layers, warm hat, etc.), especially if they are on your thighs, means that the weight is going to have to go up and down with every pedal stroke. I don’t like that.

A hip-pack keeps your valuables secure and carries the weight of the contents on your lower lumbar, which is also the center of mass of your body. This will be the calmest and most efficient place to carry it.

And, heck, if Day-Glo colors and Skinny-Pants came back into fashion, then Hip-Packs have to be right around the corner, right?

The pack that is the next size up in the photo is a 10 liter pack (on the right). This is my go-to for most mountain bike riding and the size of pack that I suggest most riders buy first. There are many packs that are smaller in size than this (5 or 6 liters, roughly), but all they can really carry is your water and those very basics mentioned above. If you plan on really riding, you’re going to get into rides where you’ll need to shed layers, carry extra layers, and have space to put them. With a 5 – 6 liter pack, this is already too much stuff to fit in there. That’s why I jump up to the 10-ish liter right away. It’ll house all the stuff that will be addressed in this article while still not being too big, bulky, and overkill.

The final pack in the photo is a 30 liter pack (on the left). A pack of this size is a necessity if you’re carrying a sleeping bag, lugging food and camping gear, maybe a pro camera set-up…But it’ll be overkill for the majority of rides.

Again, the 10-ish liter size is a great size for an adequate and versatile, all-arounder pack.

So let’s start getting into the contents…

Most people are aware that a light jacket is a great idea. But I want to go a step further and suggest having a light jacket that will also keep you dry. If you can stay dry, you can probably stay at least relatively warm. If you’re soaked to the bone because your jacket wasn’t waterproof or water-resistant enough…well, you probably won’t be at all warm. So look for a decent waterproof or very water-resistant jacket that will pack well. I also always carry a moisture wicking hat and usually some warmer gloves. Staying warm while riding in a light rain isn’t very hard to do, even if you are a little damp. But, if someone gets hurt, if you get lost, if you have a major mechanical breakdown that can’t be repaired…and then the weather changes and you’re out for an extended period of time…that’s when a little extra protection from the elements will come in real handy.

H20-proof/resistant jacket that WILL keep you dry. Warm, moisture-wicking hat and gloves... Most peeps pack the jacket; Trust me, you'll want the hat and gloves at some point.

H20-proof/resistant jacket that WILL keep you dry. Warm, moisture-wicking hat and gloves… Most peeps pack the jacket; Trust me, you’ll want the hat and gloves at some point.

Next (and, of course, in the learned-this-the-hard-way catogory), is stuff that will give you the ability to repair a flat beyond just that of putting a fresh tube in the tire.

Most riders know that flat tires are pretty much inevitable…even with today’s much improved tubeless tire systems. So, most riders do carry a spare tube (hopefully) with them and have the knowledge to actually be able to install it to repair the flat (again, hopefully). But what happens when you flat your spare and your buddy didn’t bring his? (on long rides away from civilization, two spare tubes may not be a bad idea)

Patch Kit!

Patch kits are small and easy to carry and can be found in any bike shop. And, WILL come in handy at some point. It’s a pretty simple process to patch a tube and you’ll be glad you have one in your pack when you need it.

Flat repairs on the trail aren’t always about throwing a fresh tube in a flat tire, however. I see a lot of flats these days because of damage to the tire, particularly a slice or hole that is large enough so that the sealant of the tire (in modern tubeless systems) is unable to seal the puncture. In this case, the pressure of an installed tube (the usual flat repair method), when it is inflated, will simply force the tube out of the hole, the tube will pop, and you’ll be walking.

There are numerous methods to possibly salvage your expensive tire when you get home, but out on the trail, things can be a bit tougher. Turns out, a paper bill folded over, and placed over the hole, on the inside of the tire, will work great for a tire patch. Two will work better. And a roll of Gorilla Tape will work in a pinch for damaged tire beads, holding the make shift bill-patch in place, etc.


Photo 3

Gorilla tape, patch kit, paper bill$…multiple flat, real world tire repair kit…

Gorilla Tape also comes in handy with fix-anything-McGuyver-style repairs. As do Zip-ties… Cracked cable housing? Sliced brake line? Broken shoe buckle? Possibly—if necessary—even making a a split or—god forbid— a tourniquet… Again, not much space is taken up and you’ll be glad you have these things when you need them.

Strong tape, various tip-ties... Watch a couple episodes of Macgyver and get the fix-anything vibe.

Strong tape, various tip-ties… Watch a couple episodes of Macgyver and get the fix-anything vibe.

Most riders know that a good multi-tool is a must. But, A CHAIN TOOL IS A MUST, also (many multi-tools do include chain tools). If something goes slightly—even majorly—out of adjustment on your bike, you can usually still nurse it home, covering decent ground, albeit a bit slower. But with a broken chain, and no way to fix it, you’re going to be pushing on all but the downhills. I’m also blown away by the amount of bamboozled riders that I find on the side of the trail, broken chain, chain tool in hand…but clueless as to how to actually use the thing. Make sure that you have a chain tool in your pack (whether on your multi-tool or not) AND you know how to use it. Any bike shop should have plenty of excess lengths of chain lying around that they will gladly donate to you so you can hone your chain repair skills. A good shop will actually show you how it’s done (Youtube.com will, if your shop won’t).

Chain tool included on a multi-tool. But ,pretty useless if you don't know how to use it!

Chain tool included on a multi-tool. But, pretty useless if you don’t know how to use it!


This also brings us to the proper way to fix a chain, and that is with either a SRAM Power Link or a Shimano chain pin. A Power Link should work with both SRAM and Shimano chains, but the pins are designed to work with Shimano chains, so I prefer to use pins on Shimano chains. It’ll be necessary to remove a potion of the damaged chain (with your chain tool) in order to properly repair with either system. Also, you always want to push a chain pin through the links from the inside to the outside of the bike as well as always having the wider link being the “pulling” length for more strength. This gets a little technical (do a little research), but, again, these are things you want to be aware of when you have to make that repair on the trail. And, be prepared to do it when you’re a little lost, it’s getting dark, it’s raining, and you can barely feel your fingers because you didn’t pack your warm gloves!!!  😉

Shimano chain pins and a SRAM Power Link... essential for proper on-trail chain repair.

Shimano chain pins and a SRAM Power Link… essential for proper on-trail chain repair.

A shift cable. A shift cable is small and light, easy to carry, and pretty easy to install. Inevitably, you or one of your riding pals will break a cable, or, more likely, fray one to the point where the bike will be almost impossible to shift. If you still have a bunch of distance to cover, especially in difficult terrain, getting the bike back to operational with proper shifting, could be really important.

Photo 7

Shift cable…

Spare derailleur hanger. Your derailleur hanger is that piece of metal that your derailleur threads into. It is designed to bend or break before your expensive derailleur does when the derailleur is impacted in a fall, by a trailside obstacle, etc. Thus, it’s a fairly malleable and weak piece of your bike and easily damaged. When this happens, your bike won’t shift well, if at all.  A broken or severely damaged derailleur hanger on a long ride is no bueno… Thus, having a spare in your pack is a good idea. Most bikes have derailleur hangers that are specific to models so make sure you get the right one.

These are derailleur hangers. There are many different versions... make sure you have the correct spare for your bike

These are derailleur hangers. There are many different versions… make sure you have the correct spare for your bike

Last thing: Spare cleat bolts. If you ride with clip-less pedals, you have cleats on the bottom of your shoes. These cleats are attached with two bolts so that they don’t twist when you twist your foot to get out of the pedal. If you lose one of those bolts, allowing the cleat to twist relative to you shoe instead of relative to the pedal (relative to the pedal is the motion necessary so that the cleat will disengage from the pedal), you won’t be able to get out of your pedal, can’t put your foot down, etc. This can be very dangerous. Cleat bolts should be a installed with blue Loc-tite, preventing them from loosening up…but this doesn’t always happen. Again, a small part to carry, and an easy remedy to a potentially dangerous predicament.

Photo 9

Cleat bolts… If you ride clips pedals, you’ll want to have at least one spare in your pack.

Last, last thing: some type of first aid kit and some first aid skills. I’m not going to go super in-depth with this one, but if you intend to have fun outdoors, I highly recommend that you have at least basic first aid skills and the necessary equipment to implement them.

That’s it for now. Check out www.dirtsmartmtb.com for more on DirtSmart MTB Skills Coaching and Training and scheduled clinics and camps.

How Tire Tread Works

How Tire Tread Works

What slows down and stops your bike? Your brakes? Nope…your tires tires stop your bike! What makes your bike turn? Leaning the bike and a bit of steering with the bars right? Well, actually it’s the contact patch of your tires on the trail surface that ultimately changes your bike’s direction.

When it comes to MTB equipment, tires are extremely important. Yet they are pretty over looked by many riders. There are a lot of aspects of tires that need to be taken into consideration if you’re serious about getting it right; tire pressure; volume; casings,… but today we’re going to talk about tire tread and how it works with the surface of the trail.

Tire Tread for Soft, Loose Surfaces

There are two ways in which your tires can get traction. One, the rubber of the tire simply contacts the ground surface (like on pavement or a hard-packed trail), or two, the tread of the tires (or lugs or knobs) dig into the surface of the trail when it is soft (loose gravel, sand, mud, etc.). This is where different types of tread for different types of conditions come into play.

But how does this work? First, imagine trying to stab a screwdriver into the grass on your front lawn. If the ground is fairly soft, the screwdriver will stab right in. Now, imagine trying to do the same thing with the end of a baseball bat. Probably isn’t going to happen right? The bat is too blunt and large to penetrate the surface. Lugs on tires work in a similar manner. A stiffer and thinner lug will stab into the soft, loose trail and “claw into” the ground while a shorter, fatter lug probably won’t, but instead will “float” on top of the surface (sometimes this is desirable—like with fat bikes in deep snow—but usually this simply means no traction and slipping and sliding around). Also, in order for the lugs to stab into the ground, there needs to be some space between the lugs, so the material can move out of the way as the lug stabs in.

Mud tires, or spikes, are on the extreme side of a loose terrain tire. They have, literally, little rubber spikes for lugs. These lugs will stab and claw into the ground on loose surfaces and the adequate space between the lugs will allow the tire to “clear” mud and debris easily.


TI237A07

 Mud “spikes”. Notice the space between the lugs


The downside of tires that do a great job in the loose stuff? They can be fairly terrible on hard packed trail surfaces, rock, pavement, etc. Why? Because when the trail surface is hard and impenetrable, traction comes from contacting the rubber of the tire with the trail’s surface, not stabbing into it. Spikes and thin lugs that are designed for stabbing into loose terrain will provide very little surface area for contact on the hard surface. Also, the lugs are usually long and thin and will “roll over”, or bend, under the weight of the rider and bike. This means little to no traction.

Tire Tread for Hard-packed Surfaces

In the case of a hard trail surface—if you’re looking for traction—the more rubber that can touch the surface of the trail, the better.

Tires for hard-packed surfaces are the types of tires that are sold on XC race bikes. These are the tires of choice for non-technical, smooth, fast, hard-packed surfaces. They will almost always be lower volume (volume is essentially the width and size of the tire), with light casings (how thick and tough the tire will be: light means fast, but also means thin and more susceptible to damage).

These tires will have low profile (short) and tightly spaced lugs. The priority of these tires is usually very little rolling resistance and just enough tread to get a bit of traction when necessary. The pattern of the center lugs usually will provide a near constant contact with the trail’s surface. This allows the tire to move along with very little vibration or “buzz” and helps provide low rolling resistance.


4-IMG_5545

A low profile, fast rolling design (Great for hard-pack…)


The downside? No ability to dig into loose terrain: the lugs aren’t large enough and are also too tightly spaced to allow the material to move out of the way. And, because of the lighter casings and lower volumes, these tires will have to be run at higher pressures to prevent flats, damaged rims, cut tires, etc. providing less ability for the tire to dampen bumps and conform to the trail for traction.

These tires will be bad news in loose terrain: they will float and slide on gravel as if it were a bunch of marbles instead of being able to dig in and find purchase; because of their necessary higher pressures, they’ll deflect and bounce off of obstacles instead of absorbing them.

And the Winner is?

Unfortunately, no tire is great—or even good—everywhere. What will work awesome in the blown out loose moon-dust and gravel of the Rocky Mountains will be slow, sluggish and sketchy on east coast hard-pack; what will have you smashing your buddies on those lung-busting fire road climbs could put you in the weeds on the way back down if you’re not careful!

I usually use tires that work great in Colorado; large volume tires with large, well spaced lugs that move material and dig in, but also support and don’t roll over on off-camber rock. The problem is that they feel like they are filled with molasses when I’m back east coaching on fast, smooth trails. And, lighter, faster rolling tires, that fly on hard-packed trails east of the Mississippi can be somewhat of a death-wish back home in the gnarlier stuff.

And, with today’s tubeless tire systems, it’s a hassle to swap out tires every week.

What’s the answer? Aside form multiple wheel-sets mounted with different tires for different conditions (that’d be nice!), there really isn’t an answer. Investigate, research, ride… I have a couple of different tire combos that I use and they differ at different time’s of the year.

What’s your priority? Rolling resistance or traction? And, traction on what type of surface?

Hopefully this article shedded a little light on the subject of tire tread and pointed a few of you in the right direction. In the DirtSmart Skills Camps, I have a bike set-up and equipment segment and we get way deep into tire choice, tire pressures, volumes, casings, etc.


MTB Coaching is Too Expensive!

One of the biggest reasons why riders decline to take MTB coaching/instruction is the price… MTB coaching is too expensive!

So, OK, I’ll readily admit that quality coaching isn’t cheap. I charge $500 for a two-day clinic. That is some serious scratch.

But…what did your bike cost? Plus all your gear: riding get-ups, shoes, helmet, pack, rack on your car, couple pairs of cool shades… maybe your new set of carbon wheels… And, what’s your insurance deductable for an ER room visit? (And—trust me—there’s always something ridiculously expensive, that isn’t covered, in such visits). Also, how much money are you losing in missing work—disability insurance or not… What’s the cost of family members and significant others worrying about you both in getting injured and also every time you go out on the bike after you’ve been patched up and heal up?

Have you ever taken a day of quality instruction in, say, golf or ski lessons? Scuba classes? Avalanche training? Or, how about a weekend seminar for work? What does something like that run?

Hmmmm… five-hundo is almost looking cheap!


Here’s an email from a previous student that I just received today:


Hey Andy,

 I had another giggle moment at Palos yesterday.

 You probably rode “Badass Hill” while you were here. It’s a stretch of Bullfrog trail that is pretty long, pretty steep, somewhat rooty, and sweeps in a long turn. But mainly, it’s full of cobbles. Yesterday I was riding with a group of riders, all of whom are better than I am. Naturally they had pulled ahead. So, to try and keep up, I unwisely decided to bomb Badass.

 About halfway down I was on the far edge left as the trail was sweeping right when my brain realized that I was going MUCH too fast. But, on that surface, there was not much slowing down. And as soon as I looked at the trees just off my left elbow I started going toward them….

 And then it all kicked in; I dropped heels, got low, looked at that sweet spot down the trail where I wanted to end up, dragged a bit of back brake and rode it out. My GPS said I was doing 19.3 mph; it would have been a very bad fall. And yeah, I was laughing like I did on Gravity Cavity.

 So I can truly say that the coaching, and practicing what I was taught, almost certainly kept me out of the hospital.

 Thanks!


The above rider is a recreational enthusiast who very much enjoys riding his bike. He’s not serious racer, he doesn’t ride at a super high level. But he get’s out there and has fun, get’s his fitness on, pushes himself a bit… (Sound familiar?)

As most of you know, MTB has a steep learning curve. And, falling on rocks at 19.3 mph usually doesn’t end too well. To get up and walk away from a crash of that nature (road-rash, cuts and bruises, mangled bike, rattled confidence, and shattered ego aside)…well, you’re gonna feel a little lucky, and righty so…

The above email illustrates one very important reason why pretty much any rider that throws a leg over the bike should almost definitely take some quality MTB coaching/instruction: safety!

But MTB coaching is too expensive!


Proper technique—while it will make you much faster—isn’t necessarily about speed: it’s very much about just being safe! Is that worth $500? Do you owe that to yourself and others around you?

Maybe you just ride at a beginner or novice level. You don’t race or compete. You’re just going to take it easy out there, so you don’t need to bother with coaching. That’s for racers, right? (Heck, why bother wearing a helmet? They’re like a hundred bucks!)

Well, I have news for you: you’re riding at a beginner or novice level not because you lack the fitness or time on the bike, but, ultimately, because you’re doing a lot of things (most things) wrong when to comes to technique. If you were doing them right, you wouldn’t be riding at that level anymore.

Unfortunately, when it comes to MTB’ing, bad technique doesn’t only mean going slow, it also means lack of control; lack of comfort and confidence; and finally, being unsafe…to yourself and others! YOU WILL get yourself into situations that you won’t be able to get yourself out of with poor technique.

Proper MTB riding is simple when it’s broken down to its basic components, but until we get into the highest levels of riding, almost everybody is doing most of it wrong (and, even the top pros on the planet seek out and benefit from coaching). The best, quickest, and most effective way to learn to do it right: Good Coaching!!! The alternative: The School of Hard Knocks, trial and error, years and years and years of learning the hard way… (Let’s face it; the internet and your riding buddies haven’t been much help!)

Almost all riders have pretty terrible technique by default. There are normal and common reasons for this. In the situation described in the above email, the rider would almost definitely have done almost everything differently had he not previously had quality MTB coaching: proper braking, proper trail-vision, proper body position and weight distribution…all of these things are very counterintuitive. And, it would take a lifetime of trial and error and learning-the-hard-way (and lots of hospital bills) before a rider would be able to react properly and make the proper decisions and adjustments in order to not end up seeing the inside of the ER room in that situation.

The other really cool thing: the exact techniques that this rider used to preserve his hide, to not crash, to remain safe…are the exact things one would do if they were a serious racer, trying to go as fast as possible.

safety = control and confidence = smooth and efficient = fast

Again, riding is simple once it is broken down to it’s very basics: whether you’re looking for more comfort and control on the bike, or you’re trying to shave seconds off your race time…the techniques are virtually the same. The difference is usually just a matter of more difficult terrain and higher consequences.

Take riding waaaay better out of the equation… And leave out the having-more-fun part… Leave out the More Confidence, crushing your buddies, meeting your competition goals (if you have them)… being able to go anywhere and ride the local trails competently…

Leave all that out and think about simply being much safer and having a way lower probability of getting seriously injured. Is that worth five hundred dollars? I’m pretty much positive, that with rare exception, any rider that has been seriously injured would gladly hit the rewind button and go back and pay five hundred bucks in order to have learned how to do it right…

What do you think the rider who wrote the email would say? Was it worth it?


Sign up for a scheduled clinic or contact us about getting one in your area. Check our coaching philosophy and what to expect in DirtSmart camp/clinic. Do your riding buddies a favor and share this article with them before they learn the hard way!

Bar Height

The following came about after an email from a confused/frustrated rider. He was having some issues concerning the handlebar height of his bike and was also the victim of some bad riding-advice from arguably the most common source of bad riding-advice: a riding buddy!

This particular rider was setting a bike up for lift accessed/downhill bike-park riding. Though riding bikes that are set up exclusively for downhilling are obviously not what the majority of MTB riders ride, learning how to descend with more control and faster are often the main reasons people seek MTB skills instruction/coaching. Even though the following pertains to downhill oriented riding, the same principles apply in setting up any MTB where having control on descents is a priority and/or necessity.

This rider stated that he had always been mainly an XC rider and had always previously set his bar height slightly lower then his saddle height (probably setting saddle height first in order to get proper leg extension while pedaling). But understanding proper descending position (on this bike his seat would be low and he would be standing when using the bike as intended), this meant that the seat was no longer a good gauge for bar height. He knew that he didn’t want to be reaching out and down too much (getting arms too extended) when the trail got steep, but he also knew that many downhillers were riding flat or nearly flat bars (no or very little rise) in an attempt to keep the bars quite low. He said his friend told him that downhillers do this in order to ride with more weight on the front of the bike. So this is where we’ll pick up the story…

…Bar height is a concern among many riders and setting proper bar height is the first place many riders want to start when setting up a new bike. But what many riders don’t understand is that bike set-up—first and foremost—should about body position and weight placement on the bike. This means maintaining an athletic position so that the body can function optimally in an athletic sense. (And, keep in mind, the focus of this article deals with control oriented riding, or riding MTB’s in tough technical terrain where control is paramount. In other words, riding mountain bikes in the nasty stuff! XC racing or road racing will have more emphasis on pedaling efficiency and power delivery when it comes to bike set-up, over the ability to control or handle the bike.)

First, we have to understand that all movements of the body originate at the core. A rider is in big trouble if the core is not a stable and balanced platform from which these movements can originate. Your body is a kinetic chain; maintaining this position of stability is priority; the position of your bars ultimately will be determined by the position of your body/core.

Now, whether you choose to weight the front of the bike or not (I’m not a big fan of this. Keep reading and see why.), everything needs to start off in a neutral and balanced position (that means a balanced core) with your weight on your legs and off of your hands/arms. Your legs play many important roles in human movement: support the body’s mass, supply balance, and are really are what should be powering and controlling the bike in many situations. (We get way into the how and why of this during instruction). Your arms are great at supplying small and precise movements and manipulations of bike, but not very good at balance and power especially compared to the legs; and, they don’t work well when they are weighted down by your body mass. This all has to come into play when setting the controls for one’s bike.

In regards to weighting the front of the bike, this really should be an adjustment that is made and used only when necessary (usually after you’ve made a mistake–often having your weight too far back–and the front wheel is doing something that you don’t want it to do, probably sliding or pushing). The rider’s default position should start out neutral (weight on feet, balanced over bottom bracket). One reason for this is because you may have to un-weight the front of the bike half way through a corner or a rock garden. When done properly, this is done primarily with the legs (check out this video on the manual, or coaster wheelie). If you do get your weight up onto your hands, it may be very difficult, if not impossible—because your arms really aren’t very strong when it comes to supporting body mass—to then get the weight off of your hands and, thus, off of the front end if the bike…and this, as we all know, could spell disaster! (Imagine a large root or rock ledge half way through the corner but obscured until the last second). Once you commit to weighting the front end of the bike (supporting your mass with your arms; and thus, trying to control your body mass, the mass and movements of the bike, the forces of the trail, etc, with the upper body) you give up your body’s most effective tools in balance and support (your legs), AND you give up your ability to effectively manipulate the bike because your upper body is tied up supporting your mass.

You also will have to adjust lean angles through corners, perhaps dodge trees, etc., and the arms are only able to provide adjustments and manipulations effectively if they are NOT weighted down by the body’s mass. Try this: stand straddling your bike with your feet on the ground. [good example of this exercise at 2:32 of this video]. Now, get all your weight up on your hands and the bars. Get up on the very tips of the front of your shoes/toes so as much weight as possible is on your hands. Now try to make small, micro-adjustments and manipulations of the bars/bike with all your body mass supported on your hands. Notice how this is tough to do: the movements are large and not very precise. (Not to mention, this is tiring and one will fatigue real quick if this is the position that they ride in). Now, simply put ALL of your weight back onto your feet. Now try to make those same micro-adjustments and precise movements with your arms/hands/bars. Notice how much more control you have of these precise movements and subtle manipulations (and how this is way less tiring!). This is how your body is meant to work: mass supported, balanced, and transported by the lower body, thus, freeing the upper body to perform other tasks.

Again, weighting the front end should be an adjustment, not a default position or a riding style…and should be used as sparingly as possible.

I’ve heard many riders in both MTB and motocross proclaim that they ride with a lot of weight on the front of the bike. Studying their riding styles, watching video, etc, I can emphatically say that this is not what they are doing. There are exceptions to every rule and always are a few outliers, however, ALL of these top riders are remaining centered and neutral—with their mass supported by their legs—the majority of the time.

To provide proper position—and a balanced and stable core—your limbs basically have to be half way through a squat and half way through a push-up, with ALL your weight on your feet. This is the athletic position of the human body and MTB is an athletic endeavor. You now have supplied maximum range of motion, in any direction, from all of your limbs and your core is properly “suspended”. From this position, you are able to react, pro-act, etc, with movement in any direction. Any decent motocross school and/or decent MTB skills instruction should teach this (this is also body movement 101).

And that takes us back to bar height and bar position: bars too far forward (too low–away from you) means giving up the bend in your arms (range of motion) and your weight will end up tossed (bucked) forward onto your hands (example: if your arms are already straight, and your front wheel has to drop a foot, your core is going to have to go forward with the bike as the front end drops and your weight will be thrown onto your hands). Bad news… Bars too high and your arms will be all cramped up/bunched up in your chest and you won’t be able to manipulate the bike effectively, thus you’ll start to lean back to get your arms in a better position and then you’ll be too far off the back, giving up the balanced, stable, and neutral position (this is one reason why you shouldn’t lean back on descents, but instead stay neutral by continuing to keep your weight on our feet and over the bottom bracket). Muscles function best (strength, reaction time, balance) when the muscle belly is half contracted…this is another reason why the half push-up, half squat is the most effective athletic position for the human body (Think: tennis player, baseball shortstop, middle linebacker, etc…)

So, wherever your bars end up when you’re in this position…that is the proper bar height.

I’m sure you noticed that I haven’t given you an exact measurement or number on that bar height! Obviously, they can’t be perfect all the time because you should have a dynamic relationship with your bike: your core should remain stable and static while your bike will move—often quite a bit—underneath you: on super-steep descents, they may be a bit too low; on a fairly flat track they may be a bit too high. There’s nothing wrong with making height adjustments depending on where and what you’re riding; the difference between even 5 mm can really be felt if you’re in tune with your bike; 15, 20 mm’s is a huge difference. Play around with the spacer stack height of your stem. I always start out with at least 25 mm of spacers, that way, I have plenty of room to move the bars up and down when necessary.

So, really, it doesn’t START at the bars, but it’s more like where do the bars END UP when your body is properly positioned on the bike? That is the optimal bar height.

Many riders also believe that if the bars are set-up to descend well, then they are too high for effective climbing. Not true. Proper climbing depends, again, on core position, not bar height or where a rider’s hands are located. I will admit that sometimes, at proper descending bar height, the cockpit starts to feel a bit cramped on long climbs, but the bar height shouldn’t drastically hinder one’s ability to climb. Again, adjustments can be made depending on what a rider’s priorities are. Having a travel adjustment on the fork is a great way to drop the front of the bike, lower the bars on long climbs and help out in the comfort department. I love this option on front suspension, especially with a longer travel bikes.

Getting Air, Drop-offs, and Switchbacks

Getting air, drop-offs and switchbacks… three things many students mention when we discuss their goals with MTB instruction and coaching.

The thing is, “Getting air, drop-offs and switchbacks” are some of the most difficult features/actions that we’ll encounter on a MTB trail, however there isn’t any rocket science to pulling them off successfully. It’s all about the basics, the fundamentals…but, it’s crucial to execute these basics and fundamentals – to near perfection – on these difficult and, very often, high consequence trail features.


Below, we’ll look at one those difficult trail features I mentioned earlier: the dreaded nasty, tight, up-hill switch back with a water-bar, a big rock, and a root, all present (of course, this is steeper than it looks in the photos). While I simply can’t teach the techniques here in this article, I will address many of the very basic techniques that need to be present in order to successfully ride these features. These are the crucial keys to riding well at any level, whether that means just feeling safe and comfortable on the bike, or going mega fast (although, in this case–uphill switchbacks–no one will be going mega fast).


Riders are always looking for some far-out technique that will magically wisk them up the switchback. But, really, the techniques for successfully ascending a tough uphill switchback are exactly the same as the techniques that we need to use when tackling a tough ascent in a straight line (here’s a article that breaks down body position on tough technical climbs). These include properly reading the trail and proper line choice; correct body position; correct weight placement; being in the right gear/proper pedal cadence so that we can accelerate the bike in order to wheelie (it’s not about simply yanking up on the bars) or at least lighten the front end, accelerate to gain more momentum, unweight the rear wheel by getting off of the seat, and perhaps time our pedal stroke–or “ratchet pedal”– in order to not smack the pedal on an obstacle (many of these techniques are address in the Pedal Wheelie Video).

We can look at each one of the techniques that I mentioned above and then break the technique down into a couple/few simple movements and proper timing. We do this in every camp. And, in every camp, every rider has success and learns each technique in a very controlled and safe setting. But the issue with a good (bad?) switchback is that–for a real nasty one–often all of these techniques will have to be executed, in succession or sometimes simultaneously, and often on the side of a cliff (the switchback is there for a reason!). Also, what makes switchbacks hard is that these techniques need to be done well while turning a tight 180 degree turn, so the rider has very little momentum. Very few riders understand how crucial it is to be able to ride under control, comfortably, and confidently at very slow speeds. We work a ton on this in the camps. This is hard to do well.

So let’s take a look at this thing…

IMG_3285


What you can’t see in the above photo is that Julie took an excellent line going into the switchback. This is very important. She started her turn wide and late and is actually almost done turning at this point and has an almost straight shot at that rock (the rock is steeper than it looks in the photo, too). “Setting up” for switchbacks and corners is usually a great thing because not only is it going to give you the smoothest arc and smoothest momentum path, but it allows you options in line choice as you exit the corner/switchback. (Not quite the same…but similar: Video on Descending switchbacks and proper line choice.) Also, it’s tough to read the trail properly and take the correct line in this switchback because of that water-bar that Julie’s rear wheel has just cleared. Why? Because almost all riders won’t look past the water-bar as they approach it. They ride whatever is right in front of them without regard for the rest of the trail and what will be coming up next. In this case, they ride straight into the water-bar…maybe they make the water-bar, but they end up pointed way too wide and never make the turn because their bad line choice made the turn too tight after the water-bar. This its typical of the incorrect way that riders read and “micro manage” the trail. We need to use proper trail vision and “macro manage” the trail–in all situations–if we want to ride well. We cover this extensively in camps (here’s an article on Trail Vision). And, that water-bar requires a little wheelie for the front wheel and a little un-weighting of the rear to get the back wheel up and over. These techniques are simple and even easy–if done properly–in a controlled and safe setting (and, of course, covered in camps), but as is the case with this switchback, now they have to be done while turning and on a very steep section of trail: basic technique, just more difficult terrain.

So now let’s look at that rock…

IMG_3283

In the above photo, there are multiple things going on, but again, all basic techniques that are covered extensively in the camps… One thing that is happening is that Julie is accelerating to gain momentum to help get over the rock. Easy right? Well, most riders can’t accelerate the bike at this point because they simply are in the wrong gear (too easy). Most riders simply don’t understand that tough technical climbs require us to slow down our pedal cadence, so that we can increase the cadence at the right time and accelerate. If you’re already “spinning a high gear”–as is the traditional advice for climbing–you simply can’t pedal any/much faster, and thus, can’t accelerate and gain momentum. There are many other problems with having a high pedal cadence on technical climbs and we cover all of them in camps. On smooth sections of trail, while your butt is planted on the seat? Sure, by all means, spin that high and efficient cadence–just like you would on the road. But once we get into nasty terrain on the trail, that cadence has to slow down ( many of these reasons are addressed in the Pedal Wheelie Video).

Another thing that has to happen here is proper weight placement. Julie has her weight properly centered over the bottom bracket of the bike. This allows the bike to pivot around the BB and allows both wheels to roll up and over the inconsistencies on the surface of that rock. Most riders end up with their weight too far back on climbs (too far forward on descents) with their weight on the seat (on their butt) of the bike. This means that the front of the bike ends up too light (give you a case of the “swervies” as the front wheel deflects and bounces off line) and the back end is too heavy and therefore will not roll up and over obstacles, but instead gets hung up, slides to the side, or perhaps spins because the rider is trying to incorrectly apply power where there is no traction (Spinning out is usually a result of this. If a rider spins out, instead of leaning back–which is common advice but entirely wrong–the rider should have accelerated below the obstacle and lightened up the rear wheel instead of trying to “power over” the obstacle…all addressed in camps).

IMG_3286

Success! In this photo, Julie has made it! She has employed all of the crucial techniques of the pedal wheelie over that root…and that root is in a switchback where she took a good line…which, in addition to that rock and the water-bar, and the 180 degree turn…and the steep terrain… make the switchback tough. This photo really shows how Julie has un-weighted the rear of the bike after immediately lightening the front with the pedal wheelie. It looks as if her weight is forward in the photo, but it’s actually on the BB (the trail is steep). Because of this, the rear wheel will “float” up the root and she won’t get jarred and thrown off balance when the rear wheel abruptly changes direction (form horizontal, to up, back to horizontal) as she would if she were sitting on the seat.

Again, I can’t teach all of the techniques that go into mastering uphill switchbacks via this blog post…that’s what the camps are for. But, I think this does give a pretty good break down of what it takes to make the gnarly SB’s and it’s all basic stuff…just doing it correctly and effectively…no magic!

If you like this stuff, you’ll love actual coaching and instruction. Make the best investment that you could ever make in your riding and sign up! If you don’t see a clinic scheduled near you, hit me up, and we’ll see if we can get one in your area. Also, please, share with your friends!

Best Bike For Skills Progression

Recently, a friend of mine rode one of the latest “longer travel” trail bikes (around 160 mm of rear wheel travel) and was blown away by the bikes capabilities on the trail. He couldn’t come up with a reason why he shouldn’t have one and he asked me what I thought.

I told him that I may not be the best guy to talk to when trying to make the decision on whether or not to buy a new bike – of course you need one of those! Who doesn’t!

But he asked me another very interesting question about having a “bigger” (more travel, slacker angles, heavier – more “all-mountain” or “enduro”) bike versus a “smaller” (lighter, less travel, steeper angles – more XC race oriented) bike, and which would be the best bike for skills progression.

I think that most riders believe that the smaller bike would be. Most riders believe that it would require more skill to ride: it would force better( or, at least more precise) line  choices, near perfect riding position, etc, and therefore, make a rider learn proper technique. While with the big bike, one could simply plow into obstacles, and the bike would do all the work – no skill required!

But I actually feel that the opposite is true: the bigger bike is more likely to give the rider opportunity to learn the skills and get the tools necessary to develope proper technique while the smaller bike may actually inhibit the learning process.

Why?

First, we don’t learn very well when we’re scared or in “survival mode”. With many mountain bikes that are very much on the XC racing side of the spectrum, the combination of things like tire choice, stem length, the geometry of the frame, the rigidity and strength of the parts (or lack thereof) – especially having the seat jacked up to the climbing height while descending (no adjustable height seat post) – can all add up to a pretty dicey ride when trying to negotiate difficult terrain. Will the thing climb like a rocket ship? Yep, probably will. But as soon as these bikes get pointed downhill or into tough terrain, a lot of riders end up in the “just-try-not-to-crash-mode”. And this is obviously not a very good environment for learning and applying new techniques.

On the other hand, the bigger bike will instill confidence. The rider will now have a controlled setting of sorts, and have the ability to focus on specific aspects of riding instead of simply “just-trying-not-to-crash”.

More importantly, the larger bike allows for higher speeds in the tough sections, thus, allowing the rider the opportunity to process the trail at these higher speeds and get accustomed to them. This is huge.

Anyone who has ever taken my instruction comes away with a new understanding and respect for how important trail-vision is on the bicycle. We spend a lot of time on vision, breaking down the techniques for using vision on the bike, how, and why they are necessary. I often stress that if you can only learn one chunk of the instruction, make it vision because it is the most important thing when riding the bike.

Of our five senses, vision is giving us nearly all of the information we need pertaining to what is happening in the immediate future with our ride. If I am scared, it is because I see obstacles that seem intimidating or maybe because I’m going – what I perceive to be – too fast. The way we see the trail and its perceived dangers affects us psychologically and this determines the decisions that we will make.

Again, a bigger bike gives you the opportunity to learn how to see and process the trail at higher speeds. You become comfortable at these speeds and therefore confident. Now you are able to work on techniques and learn skills and apply them at speeds and in terrain that would be very difficult to do with a smaller bike.

Yes, you will eventually find your limits on the bigger bike. And, yes, you do have to pedal the thing to the top (usually). But now, even if you do go back to that svelte XC race machine after being on the big dog, you have the ability to process at those higher speeds. Speeds that used to be intimidating, no longer are. Of course you will have to slow down for stuff on the small bike that you didn’t have to slow down for on the big bike, but now those decisions are more academic and not driven by fear and intimidation.

A few “for instances”:

Speeds on my XC/trail bike don’t seem fast because I’m used to the speeds of a downhill bike. Obstacles on an XC trail aren’t intimidating because I’m used to the obstacles on DH track. Of course I do need to slow down on the little bike for the same obstacles that I could blast through on the big bike, but it’s because I know that I don’t have the right tool for that particular job/section of trail—not because I don’t have the riding skills.

Most of us have probably heard the story of someone’s buddy, who is a dirt bike rider and went on a MTB ride for the first time in his life, and was extremely fast on the descents – right away! Well, this person is used to processing the trail at dirt bike speeds (that are usually much greater then MTB speeds). He’s not intimidated, he’s seeing good lines; he’s doing this part of riding – arguably, the most important part – very well.

The above is also a big reason why many pro downhillers ride a lot of motocross in the off-season.

And, if we put an average DH racer on an XC bike and point her downhill, she’ll ride the wheels off the thing, only slowing because of the perceived limitations that the bike imposes on her – but not because of perceived limitations of her skill!

So, if you were on the fence about getting into a longer travel trail machine, jump off and grab that credit card! Not only will you have a blast, but also you’ll own a great new tool for developing skills that will transfer over to you XC race bike very nicely!


Breaking Down World Cup Photos


I always stress when coaching MTB, that riding well–at any level– is all about the human body working as effectively and efficiently as possible, in an athletic sense, with the design of the bicycle. It’s multiple simple movements and functions of the human body…on a bicycle. This is true whether you are a 70 year old grandpa that simply wishes to feel more safe and more in control on the bike or whether you’re Aaron Gwin, with no chain, smoking the best riders in the world at World Cup downhill races… It’s all basics, it’s all building blocks, it’ all fundamentals… It’s all simple…

But this doesn’t mean that it’s easy.

Unfortunately (or, fortunately, for me) most riders don’t understand how the human body works in an athletic sense. They also don’t understand bicycle design. Therefore, when it comes to riding, they follow the terrible advice of riding buddies, internet jokers, faulty dogmatic MTB traditions, and bad MTB coaching. A huge component of identifying proper riding is the ability to understand WHY we need to do the things that we need to do on the bike (and why we shouldn’t do a lot of the things even “good” riders pass around as riding advice).

In this blog post, I’ve poached a couple of photos of one of the best riders in the world off of the internet and I’m going to break down what is happening in these photos: WHY this rider is in the positions that he is in and what he is trying to accomplish. What are the differences in these positions and why? And, again, many of the same techniques that World Cup DH riders–the most skilled riders in the world–are trying to execute are the same techniques that every day students work on in the camps, and consistently experience success, when these techniques click; whether that means that they finally feel comfort, control, and safety on the bike or whether that means that they have realized that new sought after tool that is going to shave big chunks off of their race times.

As some of you are aware, I’m not the hugest fan of trying to coach via internet. It can be done well, but there is no substitute for real-time coaching and instruction. Obviously, I can’t cover every single aspect of a photo, but we definitely can see some interesting stuff here.

*** Also, this post ended up getting a little advanced and in the deep end… I may lose a few folks on this one. Hey, I’ll risk that because it’s fun for me to get this deep into it, and, I promise the next post will relate to all riders, but focus more on beginners.


Below is a photo of Aaron Gwin. Aaron Gwin is a beast. Fitness, speed, power…and, yes, super solid technique. If you want to see a rider doing things right, Aaron Gwin is an almost sure bet. In the photo below he is showing pretty much flawless descending position. This is the athletic and “ready”position of the human body. You’ll see this position in almost all sports that require varied, explosive, and athletic movements (baseball shortstop, tennis player, football linebacker, etc.)

Gwin Per Pos


In the photo, Gwin is half way through a squat and halfway through a push-up (ninety degree bend in limbs), with ALL of his weight on his feet. Notice the bend in the knees? This is SO important for so many reasons, many of which we don’t have the space to get into here. (And, you can’t get that bend if your seat is up and in the climbing position. This is one big reason why dropper seat posts are a must to ride well in nasty stuff).

This position supplies maximum range of motion–or body-suspension–to the rider’s core. This is crucial for a balanced and stable core and head–which means a smooth momentum path for the core and head down the trail–even as the bike bounces, drops, and slides over the obstacles of the trail. You CAN NOT ride the bike well if you core and head are not balanced and stable (Good article on that, here). There are coaches and trainers out there that state that riders should keep their knees fairly straight and then bend at the hips… This is simply wrong for many reasons, but giving up range of motion in all directions except the bike coming directly back to the core, is a big one. (Check out this video of World Cup DH practice and tell me how many straight legs you see in the gnarly stuff).


When getting into this position (which MUST precede braking, cornering, Manual or Coaster wheelies, and others–if you intend to do things correctly and ride the bike well.) there are a few “checks” that riders can use to see in they’re doing things right. Here are two. (We get into way more with real instruction):

1) If the bike disappears, would you land on your feet? The answer should be yes. This means that not only are you in the proper athletic position, but that your weight placement on the bike is good: the weight is over the bottom bracket of the bike, thus, allowing both wheels to pivot around this point. This allows both wheels to roll over and/or through obstacles. Both wheels also have adequate traction if the rider’s weight is over the BB (again, some common-terrible riding advice is to “weight the bar” to help the front wheel get traction. I will push down and pressure the bars…but this is way different from ‘weighting’ the bars. Keep your weight on your feet and over the BB–with rare exception–for all of the reasons mentioned here as well as many more). This is crucial (here’s and video on weight distribution and it’s importance, here). Often, I’ll see riders in this position, but their weight ends up on their hands, especially under braking, or, they end up leaning back for various reasons. Both leaning forward (weight on hands) and leaning backward–contrary to a lot of common, but terrible riding advice–are bad news when it comes to controlling the bike and also how the bike will work over the terrain (again, check out this article on weight placement. There’s an excellent example at 2:33 where you can feel how this work for yourself): we need to use our legs to support, balance, and power our mass/upper body if we want it to work well in an athletic manner. If we’re using our arms, instead of our legs to do this, we’re in big trouble. This is human movement 101 stuff…

2) Can you comfortably flutter your fingers? The answer should be yes. Now, there is a lot of MTB coaching out there that states always have a loose grip on the bars. This is simply impossible. Once I’m ‘in’ the obstacle–rock garden, corner, wheeling, jumping, etc–I’m often going to have to have a very solid grip on the bars. However, when I “set up” for the obstacle–get into this good/ready/athletic position before the obstacle–I should absolutely be able to comfortably flutter my fingers, and, in theory, be able to take make hands completely off the bars and nothing, position-wise, would change. If I can do these things it means that my mass/core is being supported by my legs and my arms are free to do the small and precise manipulations–such as lean angle adjustments, steering, fore and aft adjustments, etc–that are necessary to ride the bike well (again, check out this article on weight placement. There’s an excellent example at 2:33 where you can feel how this works for yourself).

Alright, enough on that photo. How about this one:

Gwin Pump

Oh, same thing, right? Nope, actually WAY different…

This could almost qualify as good position, but BAD weight placement. However, because of where Gwin is at, the track’s surface and angle, and what he’s trying to do, it’s perfect. Keep that in mind…

Unfortunately, many riders find themselves in this position while descending AND while trying to decelerate by braking (Gwin is not decelerating in this photo. In fact, he is trying to generate more momentum…again, get to that in a bit).

The huge (yet subtle, visually) difference is in the angle of the cranks. Notice how even though the pedals are level in relation to the bike, the front pedal is substantially lower than the rear in relation to planet earth and gravity? This is a big deal. Riders always want to talk pedal position and it’s always about ‘level’ or one down and one up. In reality, our pedals should kind of end up all over in their rotation in relation to the bike; it’s really about the rider’s ‘line of force’ (as I relate to it) and the angle and intention of the pedal pressure that the rider is applying. Think about this: if you’re force is equal through both feet, and, thus, through the BB of the bike…then your cranks will be perpendicular to that force. If you’re trying to push the bike forward with your legs (as you should be doing during proper technique of a manual wheelie), or if you’re countering the forces of the bike decelerating during braking–and correctly not letting your weight go onto your hands–your angle of force isn’t going to be vertical, it will instead be downward, back to front, and the angle of your cranks (perpendicular to force, roughly) will be angled backwards–sometimes only slightly, sometimes drastically, depending on the amount of force and the angle required to accommodate it.

If, while braking and decelerating–especially in steep terrain–the rider’s front foot gets lower than the rear foot…the rider is starting to get into big trouble. This means that the rider’s weight and line of force isn’t going through the BB anymore, but is instead, in front of the BB. Now the rider’s weight will have to start going onto the hands, bars, and front wheel…now the bike, instead of pivoting around the BB over the terrain, will now want to pivot around the front axle…

If you’ve read this far, you’re probably understanding that all of these things are about to cause big problems: the rider’s body can’t work in an athletic sense with the weight being supported by the arms; the front wheel won’t ‘float’ up and over and through obstacles because all the weight is now on the front wheel; the front brake can’t be utilized well because it’s going to exacerbate all of these problems…

To remedy this: simply keeping  the heal of the rear foot quite low (flexing the toe upwards helps) will tilt the cranks backwards and keep the rider’s mass slightly back and over the BB (very subtle–perhaps only an inch or two–but this subtle shift is huge because it is moving the rider’s entire mass/core. The body is a kinetic chain, and often, very subtle movements of one part will affect the actions of the whole body) where the line of force can go through the BB… and life is good again.

There are actually coaching organizations that teach to use the front foot as a “bracing foot” when you brake. This puts the line of force in front of the BB, not through it; this will almost always drop the front foot lower than the rear; the weight will go on the hands, bars, front wheel…and the cascade of terrible technique continues… This is straight-up dangerous for all of the reasons above.

But again, without knowing the “why” behind riding technique, it’s very difficult to decipher proper riding from improper riding. Thus, bad techniques keep getting passed around.


So why can Aaron Gwin get away with this position and weight placement that I just described as potentially catastrophic? Because he is not on the brakes and decelerating (if he were, he would be out of position)…but, instead, he’s ACCELERATING forward and about to “pump” the bottom of this steep drop where it transitions to flat in an effort to gain even more momentum. Instead of his line of force being downward, from back to front to counter the forces of braking (and his cranks being perpendicular to this), his line of force is downward FRONT to BACK so he can push down and back into the tracks’s surface (roughly perpendicular to the slope of that drop), and effectively that energy will accelerate him forward. That is a ‘pump’… Also, notice where he is looking? Way down the track…focused on the next solution to the next section of track. We obviously get WAAAY into vision, reading the trail, and how this relates to riding the bike in a physiological sense in the camps (we’re not going to, here), but “you go where look” holds pretty true and Gwin is obviously focused way forward on the track.

Also, he won this particular World Cup Downhill race without a chain (snapped it about three cranks into his race run). He milked and pumped every surface of the track for all it was worth… He’s accelerating here.

Hope this wasn’t too confusing…Hope this made some sense… Hope this made a lot of sense…Two very similar positions on the bike; but depending on the surface of the trail, the forces, the angles, and the intention of the rider, these two positions could have drastically different outcomes.

Again, understanding how and why the body and bike need to work together in order to ride well is crucial. Without understanding the basics and building blocks of this, riders will have a tough time learning the proper techniques and improving on the bike. After coaching and instruction, every student comes away from my stuff stating that, conceptually, riding is incredibly simple. This is a victory in the first, and arguable most important battle.

But, that doesn’t mean it’s easy…


Trail-Building Rant

Rant time…

This has been eating at me for a couple days… This is the old crusty trail-builder grouch in me coming out.

In the photo above, you can see how the slab rock doesn’t go all the way across the trail, right? Well, it used to… Somebody–a trail “builder”, I assume–spend a bunch of time humping a bunch of tools way up the mountain to hack up the rock and make this section of trail easier.

Who cares, right? Maybe some of you are even saying, “Good! I hated that section”

Now, I admit, I don’t know all the details. Maybe this person is saying, “Hey, I spent so much time maintaining and repairing that trail, I’m entitled to a little personal touch up there…”

OK, maybe you are…

But here’s my gripe.

And, first let me say that I 100% believe that MTB needs easy and beginner level trails more than any other type of trail (***talented trail builders can and do build trails that are safe and easy for beginners and still fun and challenging for advanced riders–very often within the same trail). And, not only does my job more or less depend on safe and easy trails bringing riders into the sport, but good riders can have fun on easy trails while novice riders aren’t going to have much fun on the nasty stuff. We need easy trails.

But this trail is by no means a beginner level trail and it never will be. Also, there’s no need for it to be made into an easy trail because, from the spot where the photo was taken, you can literally see multiple easy trails in the surrounding area. There are plenty of them around.

What gets me is that whomever hacked the rock slab out of the trail–I think it’s safe to assume–has permission to be up there working on that particular trail. But of all the places on that trail that need a little help and time, that sure as heck wasn’t it. That section of trail WAS sustainable: the rocks have been there for, oh, what? 4 billion years? Give or take…There wasn’t an issue with water run off and erosion (there will be now). And it wasn’t dangerous.

The rocks got hacked because they were a little tricky and technical which made that section a bit difficult (I guess I could shut up here…because it’ll be difficult and technical again in about 6 months when the left side of the trail erodes away).

There are definitely reasons to remove obstacles from trails: sometimes just to open them up and let them flow a bit better is a good reason (but this particular spot actually added a little more character and flair to an awesome trail IMO); sometimes sections need to be made more sustainable (that wasn’t the case here).

My point is this: let’s not sanitize the trails because we don’t have the skills to ride them. Especially if there are plenty of tamer trails almost literally a stone’s throw away. Go ride one of those. Or get off and walk the parts that are too tough for you to ride. Or get better…

It’s great that MTB is basically a mainstream sport at this point. And, of course, with that we will see a few growing pains. One of those pains is that it seems like many trail builders feel that everybody should be able to ride every single trail. Why? We’re all adults here. Not everybody gets a trophy…

We don’t need ten foot drops or huge gap jumps on public trails, but lets keep the challenging stuff challenging.

Another thing that is bugging me about this is that if you’re up on that particular trail, building, then you have some responsibility to the riding public. I can’t just go up there and build features that I myself would enjoy, but most people wouldn’t, so why can a person go up and hack some of the fun out of one of the most challenging trails in the area? This is an advanced trail and the riders that ride it enjoy the challenge. Stop hackin’ at my Fun!

The bikes keep getting better and better but the trails keep getting easier and easier…

If you’re out there building trails, great. You’re a good person, in my book, and your heart is in the right place. But take the time to educate yourself and consider your responsibilities.

Is this the end of the world? No, of course not. It’s just one little section of trail. But it is indicative of what I believe is starting to become a much bigger problem in trail building.

Video: Pedal Wheelie Technique

Proper Pedal Wheelie Technique: CLICK HERE

This video refers to a the “Pedal Wheelie” which is generally used when climbing. Usually the rider will be going rather slowly (climbing) and, thus, need to maintain or increase what little momentum they have in order to get over and beyond an obstacle.

This wheelie is not to be confused with the manual or coaster wheelie (video here: https://www.dirtsmartmtb.com/uncategorized/video-manual-wheelie-coaster-wheelie/) which is generally used when going downhill when the rider has plenty of speed and momentum required to get over and beyond an obstacle, but because of the speed and momentum from descending, the front of the bike must be manipulated in order to not impact the obstacle at speed.

EVERY rider that I have ever worked with has come away being able to do at least a small, yet functional pedal wheelie after instruction.

Small wheelies are usually all it takes to be successful on the trail. Often, whats gets riders isn’t the lack of height of their wheelie, but the variables such as pedal strikes; spinning out because of a lack of weight shifts and/or a lack of understand of power distribution and timing (the old adage of always applying steady and consistent power on climbs isn’t going to work in tough technical climbs); staying seated when they need to get off the seat; lack of understanding of proper pedal cadence and gear selection (thus, an inability to accelerate the bike)…all kinds of good stuff!

As always, this is in no way a substitute for real time instruction.


Video: DirtSmart Technique on Display!

Pretty cool video here from the Rotorua round of the Enduro World Series.

CLICK IT: VitalMTB

Remember the Switchback Line Choice video that you checked out right here on the DirtSmart MTB website? Well, there’s a little of that…

And the DirtSmart Tri-Pod Technique vid? There’s a bunch of that… This video was directed at less experienced riders, but as I mentioned in the video, it will eventually come in handy for riders of all levels (even top pros).

And then everybody’s favorite…The Lifting-The-Rear-Wheel-In-Switchbacks vid… Some very impressive displays of this technique in the VitalMTB video…

Of course, all these techniques are covered extensively in DirtSmart MTB Camps and select clinics.

I always say that MTB riding is about basics and building blocks: a 60 year old novice rider needs to properly read the trail and make a proper line choice if they intend to get down a tough switchback in one piece; knowing how to properly use the tri-pod technique is going to help beginner riders safely descend switchbacks without having to get off of the bike…And, yet, in the video, the same techniques being used at the highest levels…

And, on a kinda funny note, in the comments someone states that, “the key is to not brake once you turn into the corner…”

Every rider that makes it brakes almost all the way through the corner. Contrary to popular belief, you have to brake in almost any corner that is steep and comes back 90 degrees or more…you just have to do it correctly.(When the rear wheel is occasionally locking up, you can hear small amounts of skidding, and you can hear the brakes being applied…that’s a sure indication of braking.) The riders that crash are braking, also. They’re just doing it incorrectly.  It’s right in front of the commenter’s face, yet the commenter still passes on the ol’ incorrect adage of “can’t brake in the corner”.  My guess–and it’s only a guess–is that the commenter was watching the riders who failed–who clearly braked, but incorrectly–and jumped to the popular conclusion that you can’t brake in the corner…but didn’t notice that the successful riders were braking also. This happens all the time: riders don’t look deep enough into what’s really happening on the bike, jump to conclusions, pass on bad advice…blah, blah, blah…(DirtSmart students know about the “Three Stages of Braking” and know the secret!!!)

WOW!!!!! True Downhill Mountain Biking

I just had to share this. Modern Trail Bikes are great, but you can’t do this on them. Best downhill mountain biking edit I’ve seen in a while.

CLICK IT:

http://www.vitalmtb.com/videos/member/Queenstown-Destruction-George-Brannigan-Goes-WILD,28479/iceman2058,94

VIDEO: Proper Weight Placement

CLICK HERE FOR VIDEO: https://youtu.be/2WBSjoAiA_A

Proper weight placement on the bike. I often refer to proper riding position and proper weight placement as the foundation of riding. These two things have to be done correctly or you’re effectively dead in the water right off the bat. Just like an actual structure, if the foundation is a mess, then anything that gets built off of that will also be a mess. Unfortunately, most riders are in bad position by default, thus, their weight ends up in the wrong place on the bike (going downhill this usually means it ends up on their hands and the handlebars/front wheel; going uphill it usually ends too far back on the bike and over the rear wheel. We mainly address the downhill part in this video). This means that they’re going to end up pretty ineffective in their movements and attempts to try to control the bicycle.

Long story, short…we need to keep our weight over the bottom bracket of the bike (in the clinics I call this keeping our “line of force” going through the BB because often we will be pushing and driving force through the BB with our legs in order to correctly manipulate the bike…but that’s getting a little deeper into things than we can effectively do here). If we do this, we will be working with the bicycle the way it is designed to work: allowing the bike to pivot and move around that BB. We will also be supporting our body mass on the most calm and stable area of the bicycle: the bottom bracket (again, most riders end up with too much weight on their hands/bar/front wheel when descending. The bike will still kind of pivot around the BB in this position, but it will also start to pivot around the front axle–which could mean a painful trip over the bars. Either way, the bars will always have a lot of motion and are not a good platform from which to try to maintain balance of the body–they obviously play a very important role in controlling the bike, but supporting our mass should not be done with the handlebars.)

Another great thing about proper weight placement: if our weight (or, our line of force) is going through the BB, then we’re also supporting our body mass/weight with our legs. This frees up our arms to do their role in riding the bike: adjusting lean angle, steering adjustments, small and precise bike manipulations through the handlebars. This is the way our body works most effectively in an athletic manner: our arms simply can’t do their thing if we’re using them to support our body weight and mass.

There’s a big misconception in riding that we should, at times, weight the front wheel. I won’t say that we should never do this, but we need to keep out weight going through the BB with very rare exception. Sure, I may push down through the bars with my arms to maximize traction with the front wheel, but I need to keep my weight going through that BB. This is crucial.

As always, these videos are by no means intended to substitute for real-time instruction…


MTB Technical Climbing

MTB Technical Climbing. In the following, I will address proper climbing body position and its importance while ascending steep and technical climbs and also debunk a couple of infamous myths regarding climbing on your MTB.

While we can get away with sloppy technique on relatively easy climbs and still make it to the top, when things get steep and loose (when traction is at a minimum) and obstacles such as water bars, erosion ruts, baby-head sized rocks, and who-knows-what-else, begin to appear on the trail (these things almost always naturally appear more often when the trail gets steep—dirt doesn’t like to stick to steep inclines, so it erodes, exposing the obstacles), our technique needs to be nearly perfect to top the climbs. Simply pedaling harder – as we all know – won’t get it done! Also, proper technique will save you huge amounts of energy even on climbs that you currently may actually make, but maybe waste a bunch of energy in the process because of not-so-great technique.

Losing traction, “bogging out”, doing accidental wheelies, and/or getting a case of the “swirvies”, are all common causes of riders not making it to the top of technical ascents. My guess is you’ve experienced all of the above issues when trying to ascend steep terrain (I think we all have!). While other aspects of riding technique such as proper use of vision (extremely important); proper gear selection, or cadence (very often overlooked – even by “good” riders); and others, are essential in order to make it to the top, proper body position will do a ton to help alleviate the above “climb killers”.

Andy. Climb.PosDakRidge

Forward on the seat, chest down, weight over the bottom bracket of the bike…That’s good climbing position…


First, let’s talk about weight-shifts. Take a look at the photo. Notice how far forward I have scooted on my saddle. Is that comfortable? Nope! However, very rarely will you need to move this far forward for an extended period of time (Most saddle companies do make saddles built with things such as the “enhanced climbing nose” to make being in this position as comfy as possible. If it is too painful to move this far forward with your current saddle, look into a different one. Your grundal will thank you!).

Why move this far forward? A couple reasons: if your bike is set-up correctly for you on flat ground and you feel like you’re in a good position to comfortably and effectively apply power to the pedals, what happens when your front wheel is elevated perhaps a foot, like in the photo? Your hips (your center of mass and origination of balance and power) have now moved rearward in their relationship with your feet (your effective applications of power). Moving forward – shifting your weight forward – helps you maintain your “power position” as much as possible when the front of the bike becomes elevated, enabling you to continue to effectively apply power to the ground when things get steep. Another very important reason that I move this far forward on the saddle: I put more weight on the front of the bike. Accidental wheelies and cases of the “swervies” (when your front wheel begins to wonder uncontrollably all over the trail, making it impossible to hold your line) occur because there is too much weight on the rear of the bike (not enough on the front). Shifting your weight forward will help to prevent these things from happening.

Even slight movements, or shifts, of the hips make a huge difference in our ability to ride the bike (contributing massively to weight placement, balance, power delivery). I am almost constantly making weight shifts – moving my hips fore and aft – on the saddle when ascending. A gentle climb with a small grade? I move forward only slightly – maybe a quarter of an inch. Medium grade? Medium movement – perhaps an inch … Steep as heck? All the way forward – as far as possible.

Eventually, on super steep stuff, you will have to come out of the saddle. If you stay seated, your mass will simply be too far back in relation to the bike and the front end will have no weight on it, thus no control and a case of the swervies. In the clinics, I constantly refer to having our weight over the bottom bracket of the bike and riding the bike through the BB. Not only is this going to be the most stable and calm area of the bicycle (the bike will pivot around the BB by design), but, if we have our weight—or, our line of force, as I often refer to it—going through the BB, both wheels will be properly weighted: the front will be planted allowing for control and steering and the rear will be weighted properly for traction. This is the way the bike is designed to work. This is huge. Will it take a little more energy to get out of the saddle? Yep. But, you have no choice on the super steep sections of climbs.

Another massively overlooked part of proper body position on steep climbs is the position of your upper body. Get that chest down!!! Look at the photo above. My chest is literally only a few inches off of the stem, and, when the front wheel climbs up the rock that it is touching – elevating the front of the bike even more and pivoting it around the BB – my chest will almost be touching the stem (and I’ll come out of the saddle slightly—or more accurately, I’ll keep my weight on the BB, my core will stay stable and balanced traveling in a smooth momentum path up the trail, and the bike will pivot around the BB, pitching backwards and dropping the seat from under my rear). I CAN NOT allow my upper body to rise as the front of the bike rises, or – assuming I am in perfect balance before the angle of the bike changes – I will no longer be balanced on the bike (weight on BB), I will be falling off the back of the bike, and I will have to “hang” on the handlebars, effectively pulling back on them (because of gravity, my body wants to fall off the back of the bike). Of course, I still will need to pedal to maintain momentum, but, because I will be “hanging” off the back of the bike and pulling on the handle bars, the bike will want to move out from under my body (rear wheel still moving uphill because of pedaling, handlebars wanting to fall off the back of the bike with my body), and – Bam! I’m doing an accidental wheelie or the front of the bike becomes so light that it’s now swerving all over the trail. Either way, I have to cut my power, and that’s it – I’ve stalled out, “bogged down” – I’m done, and my climbing is over. I didn’t make it … that has happened to everyone.

Lon charging up a nasty section. His chest could be a little lower, however, his weight is on the BB and not on the seat (not seated). This allows the bike to pivot around the BB without pulling his weight too far back.

Lon charging up a nasty section. His chest could be a little lower, however, his weight is on the BB and not on the seat (not seated). This allows the bike to pivot around the BB without pulling his weight too far back.


Lowering the chest – drastically, in the case of a climb this steep – allows me to keep my upper body balanced on top of my lower body (and the BB of the bike). I don’t want to lean forward with weight on my handlebars, nor do I want to “hang” off the back off the bike. In fact, in theory, I should be able to “flutter” my fingers on the grips when I’m in balance on the climb. This ensures that my weight is balanced on my lower body and not leaning or hanging on my hands. (I also say that you should be balanced in a position that if the bike where to disappear, you whould land on your feet)

D excellent Climb Pos

Dee’s weight is over the BB of the bike, she’s actually off of the saddle a bit, and her chest is low. This allows for optimal weight placement and and keeps her weight balanced on the most stable part of the bike (the BB area) as the bike pivots around the bb as it goes up those roots.  Great job!


This riders weight looks to be too far back mainly because of how upright he is. Notice the front tire sweving from side to side? getting the chest down would plant that front end...

This riders weight looks to be too far back mainly because of how upright he is (this trail is steep, photo doesn’t really show it). Notice the front tire swerving from side to side? Getting the chest down would plant that front end…


Also, on a climb this steep, I will accelerate the bike (as much as possible) in order to have as much momentum as possible to help me get up the steepest part of the climb, or over obstacles such as the curb-type rock-ledge that my front tire is touching in the first photo (white Yeti Bike). This means that an even lower position of the upper body is needed during the acceleration in order to maintain fore and aft balance.

Your weight shift (fore and aft on the saddle), and lowering your upper body are both mandatory in ascending steep, nasty climbs – to do one or the other is simply not enough. Often, you do need to keep a fair amount of weight on the rear tire to maintain traction (weight over the BB will accomplish this) over slippery rocks, water bars, etc, so you can’t slide as far forward on the saddle as you would like to; you must compensate for this by lowering your chest even more in order to stay balanced on the bike (not “falling” off of the back of the saddle). Also, if you can exaggerate your movement forward on the saddle, you won’t have to drop your chest quite as low. If its super-duper steep, however, I’m probably all the way forward on the saddle—or out of it—and as low as possible with my upper body.

I also need to get out of the saddle for another reason. I need to get my weight off the seat so that the rear tire can “float” up obstacles. I want to get my butt off of the seat BEFORE the rear tire comes in contact with the obstacle and this will effectively “un-weight” the rear wheel. Take note of my upper body position in the first photo; my butt will only leave the seat a couple inches (the bike pivots around the BB and the seat actually drops away, then pivots back as mentioned above), and I will maintain this upper body position, and then return to the saddle (the bike pivots back when the trail flattens out a little). It’s still mandatory to maintain this upper body position, even if I do come out of the saddle briefly.

Since I’ve mentioned pulling or “hanging” on the handlebars, I feel that it’s necessary to debunk a popular myth about climbing on mountain bikes. Perhaps we’ve heard that we should “pull” on the handlebars with each pedal stoke? This advice comes from way back in the day and from road cyclists. While this technique may provide some additional leverage and miniscule amounts of additional power on the road (which is paved with excellent traction, unlike steep nasty MTB trails). It’s a kiss of death to a mountain biker. Road riders don’t have the problem of doing accidental wheelies on climbs because of the construction of the road bike and because the climbs simply aren’t very steep compared to MTB trails. The only times I “pull” on the bars on a MTB while ascending is to make a weight shift forward with my body. And in this case, I’m pulling my body forward, establishing a balanced position, and then I refrain from pulling until I make another adjustment; or, perhaps, make an extreme adjustment in search of traction. I don’t continuously pull on the handlebars with each pedal stoke for reasons explained above.

Perhaps we’ve also heard that we want to climb with our elbows in. Look at the photo. My elbows are fairly elevated. While I AM powering the bike with my lower body, the difficulty of the terrain necessitates frequent weight shifts and adjustments in order to keep the bike moving (the handlebars are used to manipulate the bicycle into a position so that it can be powered and controlled primarily with the lower body). Most of these adjustments require a substantial amount of effort. Your elbows will need to be up and out and, in an athletic and powerful position, in order to be effective with these movements.

Its safe to say that climbing steep and technical terrain requires far more dynamic technique and movement then climbing paved climbs with perfect traction (that’s not to say that one is more difficult – or painful – than the other!). Therefore, a lot of that old advice that may work on the road, or extremely smooth trails, isn’t applicable to riding a MTB in the nasty stuff. Apples and oranges …

Try this out for yourself: find a steep trail with consistent grade and get into the proper ascending position described above. Apply the power. That should feel pretty good, now, suddenly, do everything wrong: scoot back on your saddle and sit bolt up-right! You’ll notice that your power – and therefore your speed and momentum – will drastically decrease.

Trail-Vision and Riding Smoothly

I often refer to MTB racing, and particularly timed racing, as “Death By Paper Cuts.”

First, it sounds cool… And, second, in highly competitive, tight racing (and/or trying to smoke your riding buddies on the local trails) gaining big chunks of time over opponents in any given section usually doesn’t happen.  It’s more like a wheel here.  A bike length there… Little by little, that adds up.

Jared Graves, 2014 Enduro World Series Champion, when asked to describe his riding style in an interview stated this: “Smooth, efficient, aggressive when necessary…”

YES!!!! I love that.  That’s a quote from the EWS World Champion and that is EXACTLY what I teach with MTB instruction and exactly what I try to apply in my own riding.  Riding SMOOTHLY and efficiently is where you start stacking up those wheel-lengths (paper cuts) of time over opponents (and/or riding buddies).

But how do you ride “Smooth”?  Well, there are lot of factors that go into this, such as proper body position, proper technique in manipulating the bike, proper weight placement, etc., but one of the most important factors, without a doubt, is Trail-Vision and the ability to read the trail correctly.

Smooth (and proper trail vision) also leads to Efficient: smooth means not wasting energy, not making mistakes, not fatiguing.  And, again, all this adds up… If you participate and/or follow the racing disciplines of Enduro and Downhill, then you’re already aware of how important fractions of seconds can be.  But even if you don’t, and you’re a XC racer, endurance racer, recreational rider, or beginner, the stuff we’ll address in this article is still relevant in helping you get to the next level with your riding.  If you can go faster on the descents and still use less energy and recover adequately (which you can if you’re doing things correctly) then you’re going to be WAY ahead of your buddy who wasted energy, made mistakes, fatigued, and still was still slow on the descent.

Let’s look some overall times from a few races last year.  In the 2014 Downhill World Championships held in Hafjell, Norway, 3.028 seconds separated first through fifth places.  Second place, Josh Bryceland was off of the Champ, Gee Atherton, by 0.407 seconds; and third place, Troy Brosnan was 0.566 off of Atherton.  That’s half a second between first and third on a course where there were plenty of opportunities for things to go very right or very wrong.

Neko Mulally was back 2.21 seconds, in forth, AND he snapped his chain right out of the start gate (we’ll address this run a bunch).

Also, In the Enduro World Series in 2014, after well over an hour of timed stages and multiple days on the bikes in each of these respective races (again, with ample time for all kinds of drama to unfold), Valloire and La Thuile, 3.5 and 3.15 seconds separated first and second place, respectively.

Those are tiny amounts of time…

Yet, if you follow some of these races and the athletes, read and listen to interviews, etc., you’ll notice how none of these top riders are saying, things like, “I just need to go faster” or “I just have to pedal more”.  Nope… There is a ton of strategy to this game. It’s not simply about “trying harder”.

Being smooth…Going slow to go fast…Braking for speed… And especially SEEING THE TRAIL PROPERLY all come into play, big-time, when trying to ride well.  This is true at the highest levels as well as the recreational and beginner levels of riding.

If you consistently take bad lines on the trail (often the main line, because it’s created with the bad riding techniques and bad trail vision of the majority of riders) because you don’t understand trail-vision and don’t know how to read the trail properly…well, you’re only going to be able to go so fast (and you’ll be out of control and unsafe).  Most riders, when they try to go fast, do things backwards: the ‘aggressive’ part comes first, and that just gets them into trouble because they don’t have fundamental skills and strategies to build off of and use as tools.  Using the wrong tools for the job—even using them well—will only get you so far.

Putting the bike in the right place on the trail is huge when it comes to riding smoothly.  Vision is a massive component of this, and arguably the most important part of riding.  It comes first in every situation.  If you can’t read the trail properly, then it doesn’t really matter how good you are at any other aspect of riding; you’ll consistently be going to the wrong places on the trail, your momentum will consistently be getting you into trouble, and you’ll be fighting the bike, the trail, your body mass, etc.; crashing at worst, and wasting time and energy, at best.

(In the Instruction Clinics, I do an exercise where we slow down, see the trail properly, and then act.  It blows students away—including some of the top professional racers in the country—how they actually end up going faster by doing this.  This is the exact thing that happened to Neko Mulally, in his World Champs run when he snapped his chain)

There’s a lot going on when it comes to seeing and reading the trail properly and vision techniques, and I obviously can’t get into all of it here, but a big part of doing this right is what I call “Macro-vision”.  We need to see big chunks of trail and see a solution to the next big chunk.  Often, this means seeing the furthest point on the trail that I can see, and calling that my “end-point”.  I need to get to there.  Everything I do needs to be done in regards to that point in the least amount of time possible: often, this means controlling speed initially in order to maximize momentum and/or exit speed at that point on the trail. Again, most riders do this backwards: they “micro-manage” the trail.  They focus on what is immediately in front of them with no consideration of what will happen further down the trail.  Instead of looking at 60, 80, or 100’ sections of trail and finding a solution to this distance of trail, they ride whatever is right in front of them, in 10 – 15’ sections, unaware of what’s up ahead.  They may have success on the first obstacle in a section, but then they’re set-up terribly for the next one and then the one after.  (Yes, we do need to see the details of the trail and process these details and make decisions.  We can’t simply just “look ahead” on the trail and expect things to turn out fine.  This IS a very important part of trail vision, but it’s another topic for another article.)

Easy example: you’re cruising down the trail and there’s a right turn up ahead.  Well, hit that right turn as fast as possible with good technique right?  Except that “right turn” doesn’t mean much.  You need to look past that turn to a point where the turn is over, your “end point”.  You need to get to there in the least amount of time possible and with maximum speed/momentum lined up correctly for your next end point, which will soon come into sight…if you’re looking for it!  Even if you’ve ridden the trail a million times, you still need to “spot you mark” at your end point.  This is human movement 101 stuff: you WILL go where you look (we get way into this in the clinics).  Often, this may mean looking through trees, catching just a patch of trail, but that’s all you need at this point in time, you’ll deal with the details of the trail later (we do have to look at and process the details of the trail, eventually).  This tells you all about your momentum requirements for the turn.  Is the turn 90 degrees?  Does it come back more then 90?  Is it less then 90?  Different answers to that question (the angle, or sharpness, of the turn) will require or enable you to treat you’re momentum differently.  If you don’t see the end point, then you don’t know how much you need to slow down (or not) before you enter the corner.

I used a corner for this example, but any section (or successive sections) of trail need to treated this way. This is a huge component of “Smooth”.

Neko Mulally, when interviewed in Dirt Magazine, November ’14, about his 4th place in the 2014 DH World Championships and asked how he pulled off a podium without a chain (his best result to date), had this to say, “I don’t know how I was able to think about all of this on the spot, but watching the replay, I braked harder in some sections in order to carry a straighter line or more exit speed and also made smoother arcs through the turns…that’s something I need to tap into more often”.

Yep.  That’s also Proper Vision at work… Anybody that has been around Downhilling for a while has probably raced chainless DH races.  The chainless race times are always pretty close to the times when the chains are on (commentator, Rob Warner, mentions this during Mulally’s run).  This always blows people away, but really it shouldn’t be a huge surprise, because when you can’t pedal, you end up milking every little bit of speed out of the track (pumping, etc.).  You minimize every impact…and, you look way down the trail for those smooth momentum paths, straight lines, and smooth arcs.  There’s a saying in motocross racing—and it applies to MTB whenever the trail gets a bit tough—that “the top riders are looking at a totally different track then everybody else”.  It’s the same track, it’s just that the top riders are looking for those ‘smooth momentum paths, straight lines, and smooth arcs’ rather then just riding the main line on the trail as fast as they can.  This is also why the top riders are the first to adjust and find new lines on the trail or track—create new lines—when the old ones start getting blown out.  Smooth momentum paths have to be seen first; that’s where you should start.  Then, you try to apply a line on the trail’s surface to that momentum path, not the other way around.

There’s another saying in racing that holds true, “Don’t take the smooth lines fast. Take the fast lines smooth.” Think about that one for a bit…

When Mulally was asked if there was flow and clean riding in his run that may not have occurred if he had a chain, he stated, “I think I learned to ride smoother and really get the most out of my technique.  If I had been a hack and come into corners too hot, got on the brakes too hard and pedaled really hard out, I could have gone slower.”

That last quote will probably hit home pretty hard for some riders out there…

So all this probably makes sense to the DH and Enduro racers, but how about the XC folks and recreational riders?  Well, another cool thing that Mulally said when asked if he had more energy for pumping because he didn’t have a chain and couldn’t pedal was, “Yes, I definitely felt much fresher than in seeding and practice through the entire run.”

This is relevant to all riders.  Proper technique—especially proper vision—will save you energy.  Big-time!!!  On normal trails, not DH or descending oriented trails, we’re going to have to pedal a ton, but if we do things right, we can save that energy for when it really counts.

Watching Mulally’s run, there are flat sections of track where he is coasting paaaainfully slow.  He names numerous sections of track (probably about fifteen seconds worth) where he would have been sprinting had he had a chain.  He was two seconds out of first place.  Let’s face it, if Neko Mulally would have used those same techniques: seeing the track better, going slow to go fast, being smooth and efficient instead of overly aggressive…and had a chain, he’d be the World Champion right now.

Being smooth on the bike is a crucial part of riding well at any level of riding.  SEEING THE TRAIL PROPERLY is a huge part of this.  Macro-Vision is but one component of proper trail vision.

Many of the techniques I addressed above are completely foreign to most beginner, novice, and/or intermediate riders. Those riders NEEEEEED to learn these techniques if they want to get fast and/or be safe on the bike.  And, what I find pretty cool and half-fascinating is that even for Neko Mulally, one of the best riders in the world, who is clearly doing a lot of things, technique-wise, pretty well (you can’t ride that fast unless you’re doing a lot of things correctly)…there’s still a lot to learn.

Dropper Seatposts: Remote Lever Position

MTB Dropper Seatposts are here to stay. If you’ve been paying attention to improvements in bikes and equipment over the past few years, then you’re probably aware of what dropper seatposts, or adjustable-height-seatposts, are. If you ‘re unaware, check out the RockShox Reverb or the KS Suspension Lev, two of the leaders in the dropper post game…

While there are still a few folks out there that will tell you that dropper posts are unnecessary, are gimmicks, etc., most riders are realizing that getting the seat out of the way on difficult terrain is mandatory if you want to ride well in those conditions (while still being able effortlessly to raise the seat for optimal height when climbing and pedaling). There’s always somebody out there that will say, “Well, my friend doesn’t have one of those things and he can ride anything…” or, “The pro XC racers don’t use those,” (they will, soon…). And all the ol’ classics: ” I don’t think I need one of those, I hear they break /I’m just a beginner/I don’t live in the mountains/they weight too much…”

Trust me, I’ve heard all the reasons why riders believe that they don’t need a dropper seatpost. Without getting into it too deep, I’ll say that if you don’t currently have one, than this is probably the best product that you can buy (when used properly and with even relatively proper riding technique) to improve your riding in nasty terrain. And that means being safer, way more in control, more comfortable, more confident, and definitely faster. There is plenty of info out there on these things, so check into them if you’re still a bit fuzzy.

Just a little more for the Doubters:

1) Downhill bikes, 4X bikes, BMX bikes…any bike where control is paramount will have the seat down and out of the way (You have to get the seat out of the way in order to maximize your ability to ride the bike in nasty trail conditions. We get into why this is so important, extensively, in the Instruction Clinics).

2) RockShox, KS Suspension, Thompson, Specialized, Fox, Crank Brothers, and more (all big players in MTB, obviously) manufacturer their own dropper posts, and have now done so for a few years (they wouldn’t continue do this if there wasn’t a market…$$$).

3) Currently, any company that makes high-end “trail bikes” will spec their bikes (or offer the option to upgrade) with  dropper seatposts (if they plan on selling them and staying in business).

4) ALL top Enduro racers (“Enduro”, not endurance…) have dropper seatposts on their bikes.

5) We’re now starting to see light weight, short travel posts (65 mm and instead of the usual 120 or 100 mm) specifically designed for XC racing (which is the area of MTB that is probably the biggest hold out because of the fear of the slight weight penalty).

Bottom line: if you want to be able to ride your MTB in the tough stuff to the best of your ability, you have to get the seat out of the way to do it. On super easy trail, equivalent to a dirt road, in a straight line? It doesn’t really matter…but any bit of steepness, rough trail surface, fast corners where the bike will need to be leaned over…you need to get the seat out of the way to do this well and still be able to get the seat up to pedal effectively and climb.


Within the last couple years, many students have been showing up at clinics with dropper posts on their bikes. This is Great!!! However, one place where I pretty consistently see problems is with the placement of the remote lever, or switch, that mounts on the handlebar and activates the post (allowing it to be raised and lowered). Riders, even though they have this awesome tool in a dropper seatpost on their bikes, often mount it in the wrong place and simply can’t reach the lever while their hands are in the riding position, thus, they have to remove their hand from said position in order to activate the post, and this isn’t always an option when things are getting serious on the trail.

It is crucial that the rider can get to this remote lever and activate the post while the rider’s hands are on the grips, in their preferred riding position, and while also activating the brakes of the bike.

This is important, not only in order to control the bike for speed and efficiency, but also for reasons of safety: if a section of trail catches you off guard, and all of a sudden you’re getting in a little over your head (we’ve all been there), trying to slow down and/or maintain control…and you can’t get the seat out of the way because you can’t take your hand out of braking position… Well, things are about to go real bad. Now you’re out of control, and out of riding position because the seat is still in the way…because you can’t get to the remote…because your controls are set-up improperly…

This poor set-up is often the result of the dropper seatpost remote being installed inboard of the brakes the shifters. If this is the case, the rider will almost certainly not be able to reach the remote with out removing his hand from the riding position (taking it off of the grip, and, thus, brake). It’ll simply be too far away from the rider’s hand (unless the rider has huge hands).

The photos below shows an example of this.

The photos above and below demonstrate how the rider is unable to reach the remote lever if it is mounted in-board of the brake and shifter.

The photos above and below demonstrate how the rider is unable to reach the remote lever if it is mounted in-board of the brake and shifter.

cant reach 2


The remote will also often be mounted on the right side of the handlebar (such as in the photos above). This means that it pretty much has to be in-board of both the brake and the rear shifter because the right hand will be very active on the rear shifter and brake lever and, thus, needs to easily reach those. This means the remote is a bad location for all the reasons mentioned above. Solution? Mount the remote on the left side.

These two photos show the rider being able to easily reach the Remote Lever , (no front shifter because of the 1x drive train set-up).

These two photos show the rider being able to easily reach the Remote Lever (no front shifter because of the 1x drive train set-up).

good 2


If the rider is using a 1x drive train (one chain-ring in front: no front derailleur or shifter—as in the photos above), then mounting the remote on the left side clearly makes more sense because there is more room there due to the lack of the front shifter. But another huge advantage to this is that once a rider gets comfortable using the dropper post (which doesn’t take very long) they will start using the dropper post (with the left hand) at the same time that they are shifting the rear derailleur (right hand). This would not be possible with both the remote and rear shifter mounted on the same side. Example: the rider crests a hill spinning a relatively easy climbing gear; the rider should be looking ahead on the trail, gauging the approaching downhill with proper vision techniques and anticipating that the next time that they will pedal, they’ll be going quite a bit faster; thus, they’ll drop multiple gears anticipating the increase in speed. These last few cranks to drop the gears, while cresting the hill, will often be happen at the same time that the rider is dropping the seat, getting ready for the descent.

Not a big deal is you aren’t concerned with going fast, but every little bit counts if you are (and that includes racing, trying to keep up with your buddies, or just pushing yourself…”death by paper cuts!!!”).

But lots of riders do still run front shifters (left side of bars), so does that make it impractical or defeat the purpose of running the post remote on the left side of the handle bars? Not at all, in this case, you should set-up the front shifter in-board of the post remote. Why? Because you seldom shift with the front derailleur anyway (unlike the rear, which gets lots of use), and once you get comfortable with the dropper, you’ll be using it way more then you will the front shifter.

These photos show the remote lever mounted on the left side and under the bar. The top photo shows the lever actually mounted right next to the grip (sometimes necessary for small hands). The bottom photo shows the lever mounted between the brake and shifter. The rider will not be able to reach the front shifter in either case, but that's OK (reasons in text)... Notice the two different styles of lever.

These photos show the remote lever mounted on the left side and under the bar. The top photo shows the lever actually mounted right next to the grip (sometimes necessary for small hands). The bottom photo shows the lever mounted between the brake and shifter. The rider will not be able to reach the front shifter in either case, but that’s OK (reasons in text)… Notice the two different styles of lever.

THompson, Below W: shifter


Another thing that I frequently see that isn’t so great (and this pertains mainly to the RockShox Reverb post, which is probably the most popular dropper post out there so it’s worth mentioning) is when the remote is mounted on top of the bar instead of underneath it. This isn’t so good because A) it’s more difficult to reach then if it were below the bar. B) You stand way more of chance of slipping your hand off of the grip and losing control if your thumb needs to go above the bar to activate the remote rather then stay below it. C) It ‘s much more vulnerable to damage in a crash if it’s mounted above the bar. (The trick here is to run the remote that is intended (by RockShox) to be mounted on top of the bar on the right side, upside down on the left side below, the bar.)

Pretty good, but could be better... The lever will be easier to reach, safer to activate, and more protected if mounted under the bar.

Pretty good, but could be better… The lever will be easier to reach, safer to activate, and more protected if mounted under the bar.


There are many people out there—myself included—that believe that dropper seatposts are the all-time greatest equipment innovation in mountain biking. I incessantly use this piece of equipment on the trail: any trail feature that requires even the least bit of bike handling prowess warrants some manipulation in seat height. When the dropper seatpost is set-up properly, then this literally becomes second nature. However, if it isn’t, you simply can’t maximize the benefits of this awesome piece of equipment.

MTB Body Position: Descending and Balance

MTB Body Position. While riding mountain bikes in technically demanding conditions is by no means easy, if we take the movements of the rider’s body on the bike, along with the mechanics of the bicycle itself, and strip everything down to the most basic elements, the task (or tasks) of riding can usually be seen as quite simple.

Likewise, when riding, if we simply allow our bodies to work the way that they function best, allow our bikes to work the way that they are designed to work, and effectively manage our momentum down the trail instead of forcing things and fighting the laws of physics … Well, most of us would be riding very well!!!

Riding works like many things in life that at first seem complicated and overwhelming: once we break down the complications and see something at its basic bits and pieces, things start to make sense.

Unfortunately, a lot of riders complicate things with misinformation and subsequent bad technique. Often, learning to ride the bike properly is as much about UN-learning bad habits and “getting out of your own way” as it is about acquiring new skills.

This is kind of one of those times: by understanding the way things work (balance) and simply allowing them to do so (with good position on the bike), we’ll be able to use one of our most important tools to its fullest potential.

In this article we’ll get into how body position on the bike affects our sense of balance and how when we’re in proper position, we can allow this very important sense of balance to shine like a diamond. Also, we’ll see how when our position on the bike is incorrect, it can make our sense of balance quite ineffective.


The first thing that I’d like to address is how our sense of balance actually works. Of course, my intent is to relate this information to mountain biking, not to reach the deepest depths and specifics and intricacies of human anatomy and physiology. So, if that’s an argument that you’d like to have, please save it for another time. (Preferably a time when you and I are sat behind a couple of cold beers that you purchased)

The first element of our balance system is made up of motor and sensory receptors known as proprioceptors. There are many types of proprioceptors, but basically, the receptors that are afferent (going to the brain) are transmitters within our muscles, joint cavities, tendon/muscle junctures, etc, that sense where our bodies are at in space. Some sense the angle of extension or flexation within our joints, some sense the amount of force or the rate of force being applied in a stretching muscle. The messages that these receptors send, when combined, and “computed”, with the other elements of our balance system by our brain and “reflex centers”, then send out messages to muscles in the body to make adjustments, counter-act, readjust, etc, to make sure that the movements of the body are actually effective and controlling the movement of the body in the manner desired. This is obviously an extremely important chunk of riding the bicycle.

The next part of our balance system is the vestibular system that resides in our inner ears. This system senses movements in the forms of acceleration, deceleration, rotational movement, the force of gravity, etc, via the movement (or non-movement) of fluid and gunk in various cavities.

And the third part of balance is our vision. This makes sense because so much of effective balance depends upon determining where our bodies are at in space, and so much of vision is about determining what and where “space” actually is. The vestibular system also monitors head movement to ensure proper vision.

So, what about body position? There are many, many reasons why we need to maintain proper body position on the bike and maintaining proper balance is only one of them. We can’t go into all of them here. I like to say that body position is the “foundation” of riding. Nothing else can be built until the foundation is laid down. And just like building an actual structure, if this foundation is not built properly, you WILL run into problems later on.

Now here’s where things get really… simple? Yes, simple. When we break things down, the human body, from a motion standpoint, really only performs combinations of a few basic movements. All of these movements originate at our core (trunk of your body…the thing that your arms and legs connect to). In recent years, much of training for athletics has moved from throwing around super heavy weights and getting as “strong” as possible to, first and foremost, focusing on the ability to stabilize the core and effectively use strength, power, fitness. This makes a ton of sense: without a strong and balanced core from which all body movement originates, you’re dead in the water. (If Lou Ferrigno has crappy balance, he’s going to stink up the local MTB trails because even though he has incredible-hulk-power, he won’t be able to effectively apply it to handling the bike.)

So we need to maintain a position on the bike that allows our body to maintain balance of the core. (I say, “allow” because we can’t voluntarily control our sense of balance). And this position is what I call the “athletic position of the human body” and it can be seen in the accompanying photo (you will also see this in pretty much all other sports: a tennis player waiting to return a serve, a baseball shortstop, a football linebacker…). 


21 OCT 2011:  Mountain biking the trails of Deer Creek in Littleton,CO.


Notice that the appendages of the rider are roughly halfway through their range of motion: halfway through a squat with the legs; halfway through a push-up with the arms; the back is flat and almost parallel with the trail surface; the rider’s butt is sticking out and so is his chest; and the chin is up with the head level. What this position does (among many other things) is effectively create suspension for the core and allow it to maintain a SMOOTH MOMENTUM PATH down the trail by not being subjected to the harsh forces and abrupt movements of the bike. And this gives the balance system a great platform from which to do its job. It should be obvious that the rider’s limbs are in a position to absorb shock, or forces that move the bike toward the body, but equally as important (because the rider’s limbs are approximately halfway through there range of motion), the rider also has the ability to allow the bike to drop away from him or allow the bike to slide, bounce, or lean from side to side (move in any direction), without upsetting the smooth momentum path or upsetting the BALANCE of the core. This is absolutely essential. There IS NOT a top bike handler on the planet that doesn’t do an excellent job of this. Look to any photograph, video, whatever, that features top bike handlers and you will see that this is the neutral position for all of these athletes when dealing with technical riding. Riders will need to allow their limbs to extend or bend FROM this initial position, but everything needs to start here.


In the above position, the rider is able to allow his sense of balance, proprioception, etc, to instantly make the adjustments necessary to generate and apply the necessary forces to his bike. The rider has range of motion in any direction with all four limbs and the core is balanced. If the core is bouncing around abruptly, and continually being knocked out of balance, the body has to first balance the core before adequate forces can be generated. Getting knocked out of balance occurs when riders ride with straight arms and/or legs: in this case, there is only one direction that the bike can move without upsetting the balance and trajectory of their core and that is straight into them. Movement of the bike in ANY other direction will alter the momentum path of the core, and upset the balance of the rider. Unfortunately, most riders do ride with straight arms and legs, way too high on the bike. Most are often in a perpetual state of being knocked around and out of balance, never able to pro-act or react to the situation, but instead, along for the ride (for better or worse), hanging on with a white-knuckle death grip, out of control, and hoping for the best until the trail, hopefully, smoothes out.


Let’s take things further and talk about the rider’s head. It’s safe to say that some pretty important things happen in the head when riding a bike. With very little exception, whatever motion occurs at the core of the body will also be felt in the head. Take a second and do this: jerk your head in a certain direction and then abruptly stop it. Notice how it takes a second for you to get your bearings back? That is because it takes the vestibular system in your ears some time to figure things out and then reset. Really, this system only works if it can compare movement to static inertia (or, necessary future movement vs. current movement in a constant direction.). If you can’t keep your head still, then you can’t provide this system with a basis from which to work and you’ve given up one of your most necessary tools in riding the bike. Proper position suspends the core, which supports the head, which allows the vestibular system to work effectively. Again, watch some video of the top gravity riders; their heads are incredible calm.


And how about the vision aspect? Ever get what I call “eyeball jiggle”? This occurs when your head is getting jostled around so erratically and forcefully that it seems almost as if your eyeballs are going to jiggle right out of your skull.  Your vestibular system, which sends messages to your eyes to compensate for some head movement (much like image-stabilization in a camera) is being overloaded by excessive motion. Needless to say, your vision, which has a huge affect on your sense of balance, is pretty much useless at this point, and again, you’ll find yourself “just along for the ride” with very little control, hanging on for dear life, and just hoping to survive.


So to wrap all of this up, our sense of balance is a very powerful tool, and, though it may seem complicated in its entirety, it’s a combination of various, fairly easy to understand systems within the human body. Though we can’t control our sense of balance the way we can voluntarily move an arm or leg or pedal harder (we can’t really “balance harder”), we can use proper body position on the bike to assure that this system is working most efficiently and effectively while riding.


Though we did not thoroughly cover body position in this article, for now, use what we did learn about proper body position to “suspend the core” and allow that balance system do its thing!


Off-Season MTB Training

Off season MTB Training… Its winter time and usually around this time of the year is when many riders start freaking out about training and trying to figure out what they should be doing now so that they’ll be able to ride the bike better next season. But too often, riders over think their off-season MTB training and spend way too much time and energy doing things that aren’t relevant to improving their bike riding.

I have good news! For most riders (of course, there’re always exceptions), this stuff is a lot simpler then most people think! Working in gym and on the road bike during the off-season is great, but nothing will give you the gains that putting in the work on the bike and improving your bike skills will do (and it’s way more fun then going to the gym!).

I stumbled across this interview with Jared Graves recently:

http://enduro-mtb.com/en/interview-jared-graves-talks-training-mental-focus-and-2014/

In it, Jared talks about how he trains for Enduro Racing and how it differs from the training that he used to do for gravity oriented racing (DH and 4X) and BMX.

This is pretty relevant to most, if not all, MTB riders who want to excel on their bikes and want to have the fitness element, the bike skills…all the pieces of the puzzle in place as much as possible.


But, first, who is Jared Graves and why should we care what he thinks?

If you had to pick the greatest all-around MTB racer of all time, Jared Graves would be a pretty good first choice. He’s had success (including a couple world championship titles) in all MTB disciplines: DH, 4X, XC, and, most recently the rather new discipline of Enduro Racing (He was also an Olympian in BMX).

Now, just because a racer is super fast, it doesn’t necessarily mean that they are also a great teacher, or coach, or even that they know what the heck they are actually doing that makes them so good at what they do!!! There are all kinds of examples of athletes that are phenomenal at their chosen sport, but couldn’t coach their way out of a wet paper bag!

However, I have spent a little time around Jared, and from what I’ve seen first hand, heard from others, read, etc., I’ll say that Jared is one of those athletes who does know his stuff. He’s a smart guy and very critical about every aspect of his riding (and extremely talented and fast).

Also, he’s currently focusing on Enduro Racing*** (if you’re unaware of what MTB Enduro Racing entails, read the description at the bottom of this post) which in my mind, and in the minds of many others, is back to what True MTB Riding/Racing is all about.

Downhill Racing (awesome fun that it is) went in the direction of motocross bikes without the motor; a true DH bike is useless without a chairlift or a shuttle to the top of the run; and if you’re serious about DH, it’s not a matter of If—it’s When—you’ll end up in the hospital. XC racing? Spend hours upon hours upon hours on your road bike getting in phenomenal shape so you can race on dirt-roads on your mountain bike on the weekends…I’d rather puke blood (just kidding!!!)

Neither one of the above MTB racing disciplines (admittedly oversimplified explanations) are very similar to what most of us really ride as everyday mountain bikers which is getting out on fun, challenging, accessible (or not) trails on very capable, modern mountain bikes. Pedal to the top, pin it to the bottom!!! Have FUN!!!!

And this is why Enduro Racing is so borderline nauseatingly popular right now. It’s racing your fun bike on fun trails…the same type of riding most of us do on a regular basis: Mountain Biking!!!!


So, now we have Jared Graves, an extremely successful and knowledgeable racer/rider who is excelling at a racing discipline that is very similar to what we, as regular mountain bikers, do and want to excel at…and what’s he do for training to be the best in the world at mountain biking? He rides his bike!!!! A lot!!!

Is he in the gym doing a ton of top-secret cutting edge workouts? Is he putting in super-human miles on the road bike with some crazy road-training-tweaked-to-enduro-racing-program by some road guru/coach? Not according to him and not as far as I can tell (this is also consistent with a lot of other very successful enduro racers).

Here’s a guy that is paid to be in the best shape possible. He has all the time in the world to be in the gym/on the road bike/stationary trainer… and while he does spend some time doing these things (for muscle imbalances, aerobic base…just to switch things up and not burn out, etc.) his time with these is, relative to many MTB Racers, seems minimal. When it comes down to it, he’s riding his bike, working on SKILLS, looking for speed.

I couldn’t agree with this more!!! Students ask me questions all the time about training for MTB riding and what they should be doing, and I always emphasize that riding your bike is going to be the most important thing you can do for your bike riding!!! For some riders, gym work and building strength—for speed and/or for injury prevention, etc.—will be pretty important. For others—if, say, lack of fitness is their weakness—some road bike/trainer time may be the best way to deal with this limiter. But, either way, we’re all mountain bikers, and spending time on that mountain bike and doing things right while riding is a crucial part of riding well–and, I believe should be top priority–no matter what your fitness level is and no matter what your goals are.


I’m definitely not saying that off-the-bike training is a waste of time. It has its place. Working hard in the gym, putting in time on the road bike as well as other common off-season MTB training techniques can offer large benefits. Resistance training to retain lean muscle mass, stretching and massage, yoga…all these things are great and perhaps should be worked into your program. But, if your goal is to be a better Mountain Bike Rider in difficult terrain, then focusing on improving your bike skills—with very, very, very rare exception—will do you the most good in all areas of riding: safety, fitness, speed…you name it! Most of us have limited resources when it comes to time and energy, so we need to put our effort in where it will do the most good. What do you really want to focus on?

(If you do have weaknesses, imbalances, injuries…dealing with those may trump bike time for safety/health reasons, and if you have concerns over these, see a doctor and/or relevant professional and get checked out)


Some beginner or recreational riders may say, “Dude, that’s Jared Graves you’re talking about. The guy already has killer fitness. I need to get in shape, first, so that I can do these things…” There is a point there. However, as long as your fitness is at a level that allows you participate safely in riding, then bike skills (and the very important on-the-bike specific fitness, that will come when working on bike skills) need to be priority. Being efficient, smooth, and effective on the bike; understanding how to read a trail, where you need to be making decisions and finding lines, seeing solutions to trail sections with adequate time to be able to be proactive and put the bike in the right place; understanding the how and why of proper riding position and weight placement; understanding how your body works optimally in an athletic manner and allowing it to do this while working in accord with the design of the bicycle; understanding how to properly manipulate the bicycle…these things are all crucial to riding the bike well and you’re simply not going to learn them in the gym.

These bike skills are crucial to a beginner and novice rider just for safety purposes. And, when these skills come together, the rider’s efficiency will go through the roof and this is huge in riding the bike successfully: even great fitness won’t do you much good if you’re wasting a ton of energy because you’re doing things wrong on the bike, or worse, crashing a bunch.

Too often I find that riders are looking for fitness and training programs that they can do off of the bike—and commit a substantial amount of time to—when they really should be focusing on what they’re doing on the bike in order to get the biggest gains in their riding. For a professional rider who can afford to put all of their time into their training—a gym program, road riding, etc.—when done properly, can be a huge asset. But for most riders, if you’re putting that much time into “training”, then you’re not working on your bike skills. Bike skills are what will make you smooth and efficient, safer, more under control, more confident…and faster, when it comes to riding in technically challenging terrain. There is so much going on when riding an MTB on the trail that it is crucial to get the proper movements, proper positions, proper techniques, down to default and ”muscle memory”. You’re not going to be able to analyze and contemplate and figure it all out when it’s really” go time” so you have to put the time in first so that the skills are there when you need them.

This is true not only for a multi-time World Champ like Graves, but also for a recreational or beginner rider.

Of course, there will be exceptions to this in the wide world of MTB: if you’re goal is to do well at a 100 mile dirt road race, then sitting on a trainer for hours at a time will probably do you more good then understanding what proper descending position is, why it’s so important, and where it should be applied on the trail. But, again, we’re focusing on riding technically difficult terrain (Mountain Biking!!!), here, and 100 miles of dirt road isn’t very technically demanding. If we flip it around, however, you can ride on that trainer and build yourself some awesome cardio fitness, but that won’t keep you from going over the bars on a steep drop-off because you don’t have any technical skills. Another example: if you don’t understand proper climbing position and technique, you’ll be fighting your own mass, the bike, and the trail as soon as the climb gets steep, loose, and nasty, and you’ll be wasting so much energy that even if you do have a high level of fitness, you’ll still be cooked after struggling all the way to the top.


OK, I understand that it’s winter right now and riding bikes is simply out of the question for some riders. I know that many people will be in the gym, on the road, at a spin class… And, yes, all of these can have huge benefits when done properly and for the right reasons. It’s impossible for me to say what the right program is for you if you’re going to do off the bike training, but I will say relax a little in the off-season. Much of off-season training, such as building an aerobic base, should be done at lower levels of exertion and stress. Get outside: Ski, snowboard… If you need to be indoors, play basketball, racket ball, whatever. Be active and have fun. And, of course, if you are a high-level athlete and need to put some hard work in to fix some problem areas, or you have some definite weaknesses that you need to attend to, then by all means, do what you have to do…

But, your priority still needs to be bike skills if you’re interested in becoming a decent mountain bike rider.

Save some for the spring, because on the bike is where the work will really pay off…

If you burn yourself out over the winter, and you show up in the spring as a totally ripped gym-rat, but without riding skills and no energy or motivation to go out to get them…you didn’t do yourself much good as far as your riding is concerned.


And here comes the MTB Skills Coaching plug: if you have a proper understanding of what needs to be done, skill-wise, on the bike, then good!! Go for it! Work on it! However, most riders don’t, or at least they have a bunch of questions, and this is where formal instruction and coaching comes into play. Take some instruction and learn what and why correct riding technique is what it is. Learn how to practice and improve upon these skills and techniques so you can move your riding to the next level, whatever that may be. Work on making correct technique your default instead of drilling bad habits into your game.


**** An Enduro MTB race is essentially a race timed over what are called “test stages” and these will be primarily downhill sections of trail. These test stages will usually be anywhere from 5ish to 20ish minutes in duration. The test stages are connected by “transition stages” that usually involve climbing the elevation required to get to the top of the test stages (these may be hours in duration). Sometimes these are timed, but usually can be ridden at a fairly leisurely pace. There may be 2 -5ish test stages per day, often with hours of riding required on the transition stages in between the test stages. Usually, Enduro races are multiday events. The test stage times are cumulative and that’s what determines the winner. And, for all intents and purposes, the racers have to be self supported with no outside help, and can only use the parts and tools that they choose to carry with them.

 So, picture three to five of your favorite rides. Do all of them in one day; you’re timed on the downhills (which is cumulative over the entire race) and you can’t have any outside support (with repairs, etc.). And do that for a few days in row. That’s basically Enduro racing.

This type of racing is huge right now and for good reason: it’s pretty much true mountain biking! Ride super fun trails all day, pin it on the downhills, pedal to the top, be in good enough shape to do it all, fix your own bike, make good selections with gear, food, hydration, etc…sounds like mountain biking to me!)

Achieving Your MTB Goals

Ahh, it’s a New Year!!! And, of course, with it comes all kinds of resolutions, promises…and new (or old) GOALS! Keeping in the spirit of this New-Year-Thing, I’m going to address a great strategy for achieving your mtb goals with some examples of how riders of any ability can use this strategy and benefit from it.

Most of us, as mountain bike riders, probably have some goals that we’d like to achieve: some things we’d like to do better on the bike in the coming year and beyond. But when it comes to achieving goals, like most things, there are good ways and not so good ways to go about them. Put together a solid plan, put some work into it, go into action…and there’s a real good chance that you’re going to achieve what you set out to do. Go about it haphazardly, be lazy about it…and you’ll be sitting in the same spot next year with that same list of unmet goals in your head.

I’m going to introduce the S.M.A.R.T. acronym. I first heard this applied in fitness training but it could be applied effectively in pretty much any goal-achieving scenario and definitely applies in mountain biking.

You’ve probably heard, Write Your Goals Down, etc… This takes things a bit further and deals with the steps you need to take to achieve your goals in a much more thorough manner.

So we’ll get right into it, starting with ”S”

“S” stands for Specific

In other words, WHAT is your goal? Perhaps you want to ride more? Perhaps you want to race? Maybe you want to do well in you age division at the races? All of these can work as specific goals at this point, and this is kind of your Big Picture goal or “Macro” goal.

But, What Are Your Goals?

“M” is for Measurable

Next, we have “M”… “M” is for Measurable.

This is where we put to a number on things. You want to ride more? Well, how much more? For instance, if you really only get out on the weekends and you’d like to get two rides in during the week in addition to your weekend ride, there you go! Three rides per week… That’s a measurable goal.

If doing some racing is your goal, then how many races do you want to do? Trying out racing at one local race is much different then competing in the whole series. And for the rider that wants to do well in their racing class, what is your Measurable Goal? Are you aiming for one podium? Do you want to be top five overall in points at the end of the year? Or do you want to win the whole thing? Maybe, you know that you’re not going to race, but you have plenty of things you’d like to make happen in your riding in the future. What are these and how can you measure them?

Obviously, identifying the Measurable part starts to get pretty important because different goals will require different preparation.

“A” is for Achievable

Goals need to be achievable.

They definitely can be slightly out of reach from where you’re currently at; they definitely may require some hard work and planning to achieve; but they still have to be REALISTICALLY achievable.

Let’s say you just had twins…not a good time to try and fit two more rides per week into your schedule (my guess is riding will probably be on the back burner for a bit…). But, if you do have enough flex in your schedule, you can move things around to make the time, your family gets it and supports you…then riding three times per week is definitely an achievable goal.

For the rider wanting to do some racing, it’s not too difficult for most people to find one day and go sign up for one race (logistically, at least). However, if you plan on doing the whole series, that’s probably going to take some time, some traveling, some expenses… Is that possible for you to do considering all other things in your life? Are you willing to commit to something like that? Is it realistically an achievable goal? Likewise, for the racer that wants to “do well”, a goal of winning the Pro-Open Class Overall is probably a bit out of reach if you just started riding, are still forty pounds overweight, and still smoke a pack a day. But for a serious and committed racer that is willing to put in the work with training and make the sacrifices…that next level (or more) is achievable.

“R” stands for Relevant

Now, we’re down to our “Micro” goals.

These are pretty much our daily goals that we need to accomplish in order to get us to that Macro goal. These have to be relevant to the Macro goal to keep us on course.

For example, the rider that wants to ride three days per week instead of one: you have a real job, and you’ll be riding early in the mornings and possibly at night during the week. Do you have proper gear for the cold mornings and decent lights for night riding? (If not, one of your goals is to get these things). How’s your diet? Three rides per week instead of one will definitely be an adjustment on your system and require some decent fuel, and your time will now be crunched a bit; consistently grabbing fast food on the way to work because you didn’t have enough time to get some decent recovery food into your system is bad news for your plan. Getting dehydrated, getting sick…all things to be avoided with simply education and planning.

These are things that need to be done off of the bike, but they’re still very relevant to achieving your goal. At this point, it’s probably more about adjusting your lifestyle so you can spend time on the bike. But, these are still micro-goals that need to be achieved in order to move forward.

For the more serious rider or racer, “R” will probably start to be about training properly, maybe getting some formal instruction or a riding coach (shameless plug); but, ultimately, doing things that will make you better at what you need to do to achieve your mtb goals. I often see serious racers putting hard work into areas that just aren’t relevant to what they’re trying to achieve. Too often I see racers just adopt some training plan because that’s what X-Top-Pro Dude does. You should ask yourself what are YOUR weaknesses and how can YOU improve in these areas? If you don’t know, can you hire someone to help you out? These are relevant goals…

“T” is for time

And, finally, we have “T” for time …  As in, “When you gonna start?”

Set a date. “After the Holidays” doesn’t really cut it. Next Week? How about What Day next week? For the rider that needs the cold weather gear before they can start their morning rides, plan on WHEN you’re going to buy that stuff. For the racer that needs some help with technique, WHEN will you start with a coach. For the racer that needs a trainer, WHEN will you start looking for a trainer and WHEN will you start your training? This needs to be down to the day, in my opinion.

I really like the S.M.A.R.T. acronym. Obviously, the examples I used are pretty simple; we could go way more into detail in all areas, there will always be a bit of overlap and adjustment in goal setting… But, overall, I like this system because it makes the person actually think about what they want to do and how they need to do it. And, perhaps most important, when they are going to start…